WARNING: It is our recommendation that you pay Badger Ridge to install, or have a competent gunsmith install our 209 conversion kit. If you chose to do the work yourself, you do so at your own risk. During or after installation, you could be hurt, killed, or your property damaged. Modifying and inspecting firearms requires the ability to recognize an unsafe component and determine proper effective repairs. Failure to do so may cause death, injury, or damage or loss of property.
ALWAYS PLACE THE SAFETY ON AND UNLOAD/DE PRIME YOUR FIREARMS BEFORE WORKING ON THEM
Tools Required
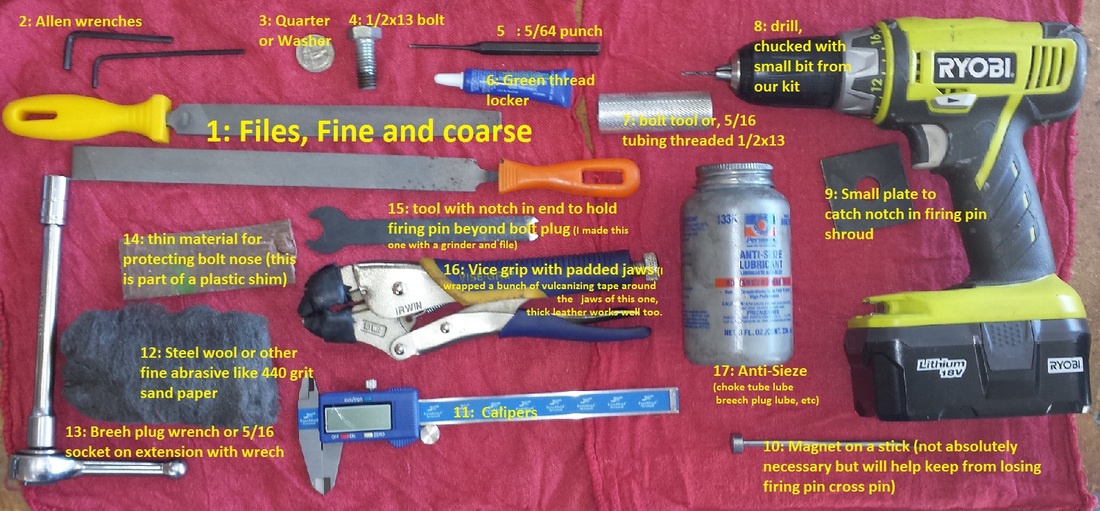
TOOLS SHOWN:
1: Files for metal (fine and course)
2: Allen wrenches (7/64 for vent liner and 5/32 for bolt screw)
3: Quarter (or similar washer or coin) to hold the firing pin in a retracted position
4: 1/2 inch 13TPI bolt approximately 1″ to .75″ long
5: 3/32 or 5/64 pin punch
6: Thread locker (Red or Green – Red is stronger but green is better at tight non threaded applications, so either is acceptable)
7: Bolt Tool (aka tool 002) can be made out of 5/16 ID tubing threaded 1/2×13
8: Drill chucked with small bit from our kit
9: Small plate to put in vise to retract firing pin
10: Small magnet on a stick (not absolutely necessary, but helpful)
11: Calipers
12: Steel wool or other suitable abrasive for cleaning and priming the bolt and bolt nose (440 sand paper etc)
13: Breech plug wrench (7/16 12 point socket on wrench with extension pictured)
14: Vise jaw padding, pictured here is a scrap piece of plastic approximately 3/16 thick
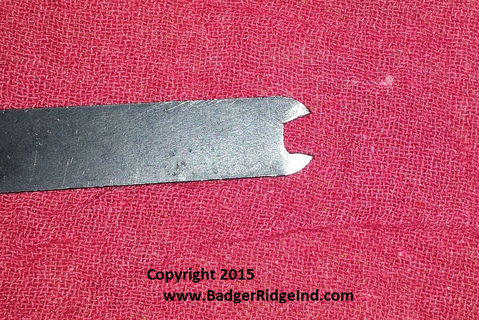
15: Optional tool to keep firing pin retracted beyond the ‘quarter notch’. I made this out of an old cheap wrench… note the notch in the shinny end…. recommend you build a firing pin tool (aka “tool 002”)
16: Round Jaw vice grips with padded jaw. I wrapped mine with self vulcanizing tape. Thick leather works well.
17: Anti-seize (choke tube lube, breech plug lube, etc)
NOT PICTURED: VISE WITH JAWS THAT OPEN 7 inches WIDE. Cleaning solution such as brake cleaner, Acetone, etc. WD-40, gun oils, Teflon/PTFE dry lube etc.
I’ll refer to the tools needed by their numbers… ie “Small plate (9) must be placed in your vice”
All measurements on this page are in inches. Be sure your calipers are set to inches.
My Bolt original tool 002 (7) is aluminum and doesn’t engage the firing pin… it really is just a handle to hold onto the firing pin assembly.
So I used to use it to compress the firing pin spring by pushing it on a hard surface, and then engage the firing pin guide in the up position with this tool I made: Firing pin retaining tool (15).
Fred’s original installation documents for the hunter bolt nose were paper copies of some hand drawn depictions of how to install the kit. There was some text and a hand written note to call him if you needed help. The illustration that showed the firing pin being removed labeled the tool (7) as “Tool 002” I’m going to keep that nomenclature to honor the creator of the kit.
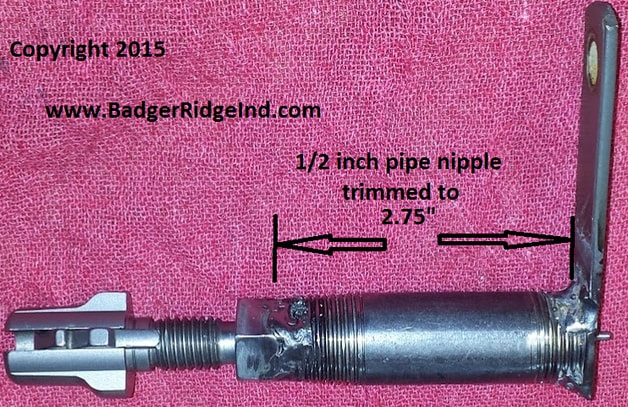
I Eventually I made my own firing pin removal tool (AKA tool 002) (click this link to see a bunch of ideas on how you can make one too.)
You can download and print an PDF of abbreviated installation instructions by going to the 700 References and selecting the PDF download.
The Badger Ridge Remington 700 ML/MLS 209 Conversion Kit

MAKE SURE YOUR RIFLE IS UNLOADED/DE-PRIMED/UN-CHARGED AND THE SAFETY IS ON Prior to handling or working on it!!!
Remove your bolt and breech plug
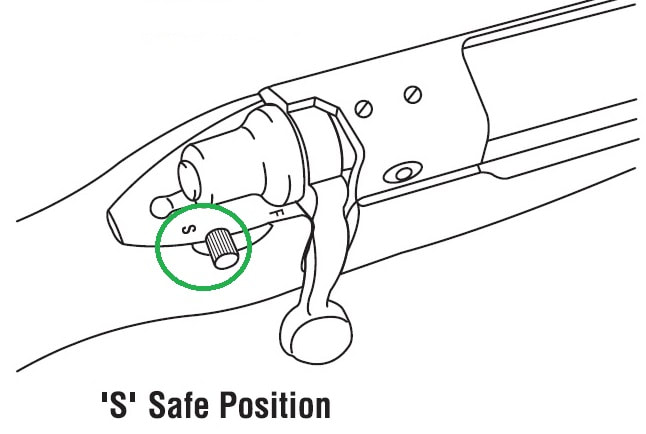
Review the Remington 700 ML owners manual. Use its procedures through out performing this installation. First, ensure the safety is on “S” for SAFE, the rifle is unloaded, de-primed, and not charged. Use a 5/32 Allen wrench (2) to remove the Bolt Stop Cam Screw. Remove the bolt. Use the breech plug wrench (13) to remove the breech plug and set aside. Clean and inspect all threads, parts and pieces for corrosion or damage. It is common for crud to build up in the threads of the breech. This is a difficult area to clean; diligence is required. I find 20 Gauge bore brushes work well to clean the breech threads. Contaminants in the breech threads can cause a breech plug to not fully seat and create a dangerous firing condition!
Get to Know Your Bolt
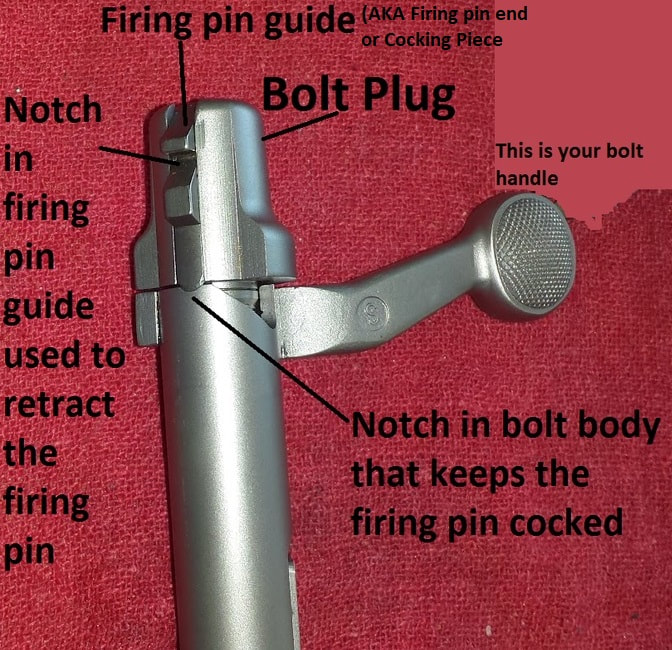
Before we get into retracting the firing pin, get to know your bolt: The main part of the bolt is the body. The handle is attached to the body by solder. The firing pin is held inside the firing pin guide by a cross pin that his hidden by the Bolt Plug. Sometimes the bolt plug is called the bolt shroud.
Not seen is a main spring that is under tension as it it compressed between the bolt plug and the firing pin nose. A firing pin guide is threaded onto the end of the firing pin. The firing pin end is also called the “firining pin guide” or “cocking piece.” Spring tension holds the firing pin guide in the notch in the bolt body. Thus it stays cocked and the firing pin assembly cannot be unscrewed unless this spring tension is over come.
The firing pin guide is what engages your trigger and safety. It has has a front raised portion for this. Between the two raised portions is a notch you can hook into a plate of steel held in a vise to retract the firing pin. Once the firing pin is retracted a notch that I’ll call the ‘quarter notch’ is exposed. Placing a quarter or similar item in the quarter notch keeps the firing pin retracted.
A retracted firing pin allows the bolt plug to unscrew from the bolt body as the firing pin end will no longer engage the notch in the bolt body. When the bolt is first removed from the rifle, the firing pin is cocked and stays cocked as spring tension keeps it firmly lodged in the notch in the bolt body. To take the bolt apart , first retract the firing pin so that it does not engage the bolt body notch and then keep it retracted while the bolt plug/firing pin assembly is unscrewed from the bolt body. There are many ways to retract the firing pin (see pictures and video below).
NOTE: When ever putting a bolt back together, one must make sure its cocked before trying to place the bolt back into the rifle.
Prior firing without cleaning can corrode the inside of the bolt. If you are having trouble at any step moving the firing pin, try soaking the entire bolt over night in penetrating oil or corrosion removers. I wrote a lengthy article in The Badger’s Den about how I dealt with a very challenging damaged/corroded bolt (click here to read about it)
You must understand The “Cocked” and “Discharged” states:
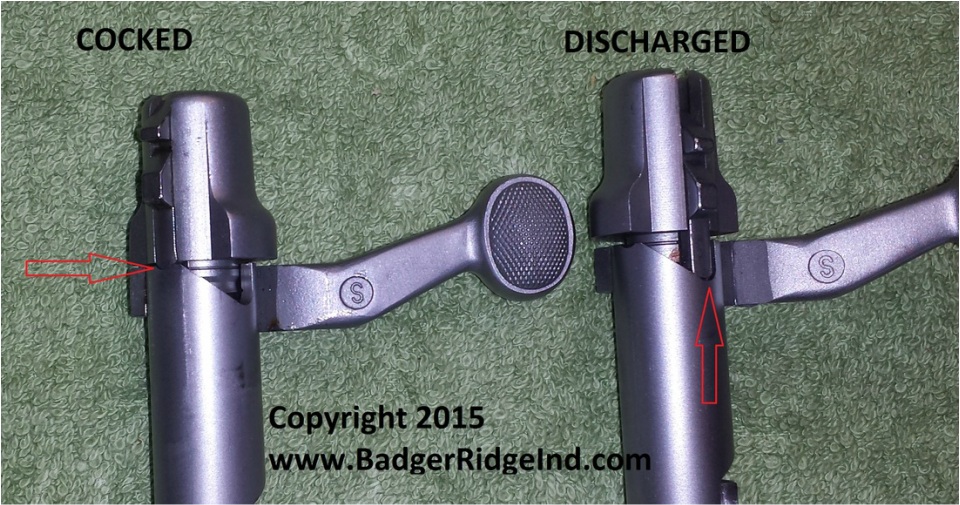

The rifle’s bolt in the original configuration can be disassembled with little to no tools. Before you can take it apart you must understand the difference between cocked and not cocked.
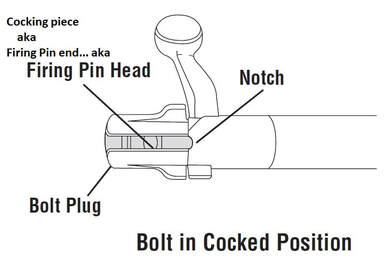
DISASSEMBLE THE BOLT
Here is a YouTube video on dis-assembly without a vice:
The video above may help you to simply field strip the original bolt configuration.
RETRACT THE FIRING PIN, HOLD IN PLACE WITH QUARTER (3), and the easily unscrew Firing Pin assembly from bolt body

A bolt can always be disassembled by placing the metal plate (9) in a vise, and hook the firing pin notch in the plate. Pull the bolt body away from the notch/bolt plug to expose the quarter notch. Place a quarter (3) in the notch.Once the firing pin is held retracted (quarter in the notch), unscrew the bolt body from the firing pin assembly.
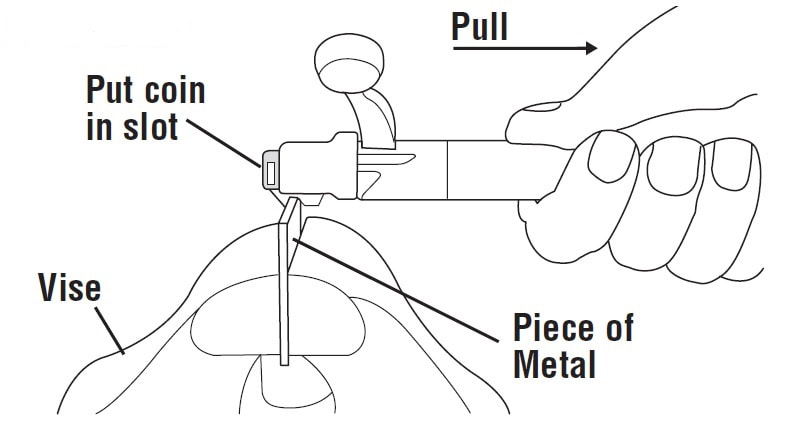
Once the quarter notch is exposed, put a coin or washer in the notch to keep the firing pin retracted. Then the firing pin assembly is easily unscrewed from the bolt body.
USE THE BOLT TOOLS TO EXPOSE THE CROSS PIN
Once the firing pin assembly is removed, more protrusion is required expose the cross pin. The best way is to screw a properly crafted firing pin disassembly tool 002 (7) onto firing pin.
If you have just an aluminum cylinder for bolt tool 002 (7) (like what comes with the “Canadian” kit), it won’t compress the mainspring and expose the cross pin. In this case, you need to push the firing pin/striker on a work top to retract the firing pin enough to expose the cross bolt. Place fabricated notch tool (15) between firing pin guide and bolt plug when using a simple aluminum cylinder.

If you make a firing pin tool, aka ‘tool 002 (7)’ you will find this very easy to do with minimal stress on the Main Spring by simply threading the bolt tool 002 (7) on far enough to expose the cross pin as seen below.

Drive out the cross pin

With the cross pin exposed, use the 3/32 or 5/64 punch to drive out the cross pin. It is not tapered, but can be tough to remove. If having trouble, try from the other side. If you really have to hit it, use the anvil of the vice to support the cocking piece so that you do not bend or damage the bolt shroud.
I place the magnet on a stick (10) on the bottom side of the pin. When the cross pin finally lets go and drives out, the magnet will hold on to the pin so that it can be reused. This keeps me from loosing cross pins. Don’t worry about lost pins, a suitable roll pin is included with the kit as a replacement to cover any ‘oops’. The roll pin is actually easier to install anyways.
Remove the old Striker

Remove the firing pin assebly from the “bolt tool 002 (7)”
Use the padded jaw vice grips (16) to remove the OEM striker/firing pin by unscrewing it from the bolt plug.
Inspect the original spring. Most are usually corroded and have unknown life left. I always replace the main spring, so put the original firing pin and mainspring in my junk bin.

Clean the inside of the bolt body, firing pin guide and bolt plug. Inspect all parts for damage or corrosion. Address any discrepancies before attempting re-assembly with the kit firing pin.
Install the NEW FIRING PIN
Using the padded jaws of the vise grips (16) grip the 209 firing pin at the cylinder opposite it’s threaded end. Install the new mainspring and insert the threaded end through the bolt plug and then thread the firing pin guide onto the end of the firing pin.

You will have to keep tension on the main spring while starting the threads of the firing pin into the guide. It helps to put the bolt plug in a vice with padded jaws.
Continue threading until the 209 firing pin cannot be threaded further into the firing pin guide.
HINT: It may help to test thread the firing pin into the cocking piece (firing pin guide) a few times, perhaps with some light oil, then remove any crud from the threads. This freshens the threads, and lets you feel where and when the firing pin will bottom out in the cocking piece prior to assembly. You should be able to do these test fits of just the two components with your fingers only. When fully threaded in, the pin will stop abruptly at the same point.
Drill hole in firing pin for cross pin
With the 209 firing pin fully threaded into the firing pin guide (aka cocking piece), and your bolt tool 002 (07) holding the firing pin guide hole exposed, use the provided small drill bit to drill a new hole for the firing pin cross pin (through the hole in the Firing Pin guide you drove the cross pin out of). If you feel any resistance, stop and drill from the other side. It is very difficult to get perfect alignment when drilling through to the opposite hole in the firing pin guide. Using another drill bit for an alignment guide will help keep both holes aligned. It is best to drill half way, stop and drill from the opposite side. It is very easy to break the drill bit inside the firing pin if any lateral force is applied to the bit, or if you ~almost~ hit the hole on the other side.
Again: drill from the opposite side and meet in the middle. See image below.

Install the cross pin
Install the cross pin with the 3/32 or 5/64 punch (5) (any larger punch can be used for instillation). A pin starter punch (not pictured) is helpful here too.
If you have trouble with the original cross pin, remove it and use the roll pin. The roll pin will give and flex a little to make up for any miss-alignment you may have in the hole you drilled.

HINT: De-burring the roll pins aids in its installation. I also like to remove a bit of the taper from the end I’m driving to help fully seat the pin without any protrusion beyond the cocking piece.
Before your remove the bolt Tool 002 (7) or the holding too (15) place a Quarter in the quarter slot. Remove tool (15) if used.
HINT: Make sure the cross pin is not protruding on either side of the cocking piece (firing pin guide) or you may have binding and cause a failure to fire or increase your lock time.
Prepare the bolt body to receive the bolt nose
Clean and inspect the bolt body. I like to use WD-40 (its cheap and reasonably effective) to blow out all the garbage that has collected inside the bolt body. I then pass rags and patches through the bolt body until clean. Shine a light and peer through inspecting for damage or any remaining gunk.
Hint: I use steel wool to clean any stubborn deposits, and sometimes very fine sand paper. Also a 27/64 drill bit (not listed in the tools) works well as a reamer to remove stubborn deposits. A 1/2×13 tap works great to clean the threads too. Remember: Don’t remove metal!
Repeat until clean and certain there is no damage to the bolt body nor crud remaining.
HINT: I’ve found noses press on easier if I ever so slightly remove the bur caused by the machining of the taper to the edge of the bolt’s nose.
Use steel wool (12) to scour and clean the bolt body’s nose to prepare for accepting the kit bolt nose and red or green loctite (or if able mask the body and media blast the bolt body nose). Clean the inside of the bolt nose similarly. It doesn’t take much to prep them; be careful to not reduce the diameter of the bolt nor increase the diameter off the new bolt nose as they are designed with a friction fit. Spray with break cleaner or wipe with acetone to remove all oils from the bolt nose and nose of bolt body. Set aside to dry completely.
Press the bolt nose onto the bolt body

Once the Bolt Nose and the nose of the bolt body are prepped, cleaned, and dry, apply red or green loctite (6) if you want. It’s OK to not use lock-tite: friction alone will hold the nose on just fine.
Align the center line of the bolt screw slot to the edge of the primer slot in the bolt nose as pictured or just to the right of the red line closer to the bottom of the slot. Then place in vice with padded jaw (14) against bolt nose and press bolt nose onto bolt. If you don’t have padded jaws, thick leather will work too. Once the nose is fully pressed onto the bolt body, remove the 1/2″ bolt (4).

Install the firing pin into the bolt body & trim firing pin
With the quarter in the quarter slot, screw the firing pin assembly into the bolt body until it stops. Unscrew the firing pin assembly just enough that when the quarter is removed the pin will fall into the discharged position. Then remove the quarter.

With the firing pin guide engaging the bolt body in the discharged position, place the bolt in a padded vise. Place electrical tape on the bolt nose to protect it from filing. Or just seat it below your vice jaws. Carefully use a coarse metal file to remove the portion of the firing pin that protrudes beyond the bolt nose without damaging the bolt nose.
Once the protrusion is shortened to be nearly flush with the bolt nose, remove the bolt from the vice. Remove the firing pin from the bolt (use the quarter), then de-bur with the fine file and shape. Then place the firing pin back in the bolt face, align to the discharged position and remove the quarter.
We used to send pins out that were much longer (like below) and required a lot of filing. They aren’t needed with most bolts, so we only send them out with the rarely purchased long noses now. See pick below if you get a pin what protrudes a lot from the nose.

Rough filing firing pin… starts long like on left, protect the nose with tape and file it until it is flush like on right. Note the nose on the left is fully pressed onto the bolt body DO NOT FILE DOWN PIN IF BOLT NOSE IS NOT FULLY PRESSED ON!.
Use calipers to determine the firing pin protrusion. The goal is to have no more than .065 and no less than .055 protrusion with a flat face and a de-burred rounded edge. To reach the goal measure the distance from the bolt face to the base of the primer slot (called “A” in the drawing). Subtract the distance from the bolt nose face to the tip of the discharged firing pin (called “B”).

A-B=Protrusion
“A” should remain constant, but as you file the tip of the pin, “B” will increase. Repeat removing the pin and taking a few thousandths off at a time then putting it back in the bolt body. It should take several cycles to reduce the protrusion to the .050 to .060 goal. Go slow; take only a few thousandths off each time with the fine file.

Work to keep a flat perpendicular profile, with de-burred and rounded edges. Keeping about 75% of the firing pin’s flat face and just radius of the edge can help reduce primers sticking in the bolt nose. Also setting the length to as close to .060″ without going over will help reduce stuck primers as well. Too long or to sharp of a firing pin can pierce primers; to short can cause difficult or intermittent discharges. The longer the pin the fewer stuck primers you will get. Remember, This is Goldilocks work… you need it just right: .050 to .060 inch protrusion with about 75% flat and the edges rounded.
AGAIN DON’T CREATE A HEMISPHERICAL PROFILE TO THE FIRING PIN! FLAT WITH DEBURED EDGES IS SUPERIOR IN THIS APPLICATION!
Random Example: A= .106 B= .026
A – B = Protrusion
.106 -.026 = .080
So file off another .015, this will increase ‘B’ to .041 which will set protrusion at .065.
.106 – .041 = .065
Say you took .020 more off… no worries, that gives you .060 protrusion which is just fine too. The goal is to get as close to .065 inch protrusion without going over, but no less than .055 protrusion.
.106 – .046 = .060 (this is acceptable too)
Once the protrusion is is proper and perpendicular (.055 to .065 range) with about 75% flat and rounded edges you are ready to clean, lube and final assemble the bolt.
Final Assembly and Breech Plug Tuning

Once the firing pin protrusion is set, its time to lube the pin and make ready to install in the rifle. Clean off all filings and then lube. I put a dab of anti-seize (17) in the bolt screw groove for lubrication.
We recommend dry PTFE lubricants for the firing pin assembly and inside of the bolt, or you may have trouble when it’s cold out. With this kit one shouldn’t get blow back in the bolt any more, so any suitable lube is OK here so long as it doesn’t gel up or gather crud. Black powder and oil based lubes don’t usually work well together, but Blackhorn209 works great with oil based lubes. All that said; no blow back means no mixing of corrosive gases with the bolt’s lubricants, so use what you want.
Make sure the bolt is cocked before putting it back in the rifle!!!
Clean the breech threads of any contaminates. It is easy for crud to gather in the breech threads and keep a breech plug from fully seating. This can be dangerous! Remember: Clean the breech threads! I found a 20GA bore brush works well.
Put a dab of anti-seize on the threads of the vent liner and finger snug it into the plug with an Allen wrench (02) using only finger pressure. Feed the new 209 breech plug into the receiver just short of the breech. Through the loading port, apply a generous line of anti-seize (17) to first few rows of threads then thread breech plug into breech [if using Blackhorn209 powder some would argue that anti-seize isn’t needed…. but I put it on anyways… an ounce of prevention as they say]. Alternatively, many folks report success using a couple wraps of white Teflon/PTFE tape on the breech plug. If you use Teflon/PTFE tape, don’t use too much or it can back the breech plug out and it will bind on the nose.
Use breech plug wrench (13) to torque breech plug to proper tightness per the Remington 700ML owner’s manual. Be careful not to put too much anti-seize on the vent liner or front of the breech plug as it can cause miss fires and hang fires if it migrates to the flash camber or front of the breech plug.
Install bolt, snug bolt stop screw with Allen wrench (1) per the instructions in the Remington 700ML owner’s manual. Ensure the bolt works smoothly and closes without binding before attempting to feed any primers. Some times the bolt binds inside the action and needs to be de-horned or polished. If rubbing or binding is not fixed prior to trying to feed primers, it is likely to lock the action up once a primer is introduced!
Feeding primers is dangerous! Only do so with the rifle on ‘safe’ and pointed in a safe direction.
REMEMBER PRIMERS ARE PLACED IN THE NOSE OF THE BOLT! Putting primers directly in the breech plug then closing the bolt wont work!!!
Once ready to try feeding primers, beware that tuning may be required : due to the variations in 209 primers). Primers may not feed at all, or if they do feed the bolt may be nearly impossible to close until the breech plug is tuned. Tuning is not very difficult but must be done correctly with a letter “C” drill bit. Some resistance is good as it is the primer being swaged into the breech plug and thus sealing — Click here for the breech plug tuning process.
Don’t worry: Our complete kits ship with Letter C bits, and we offer letter “C” bits for sale as well.
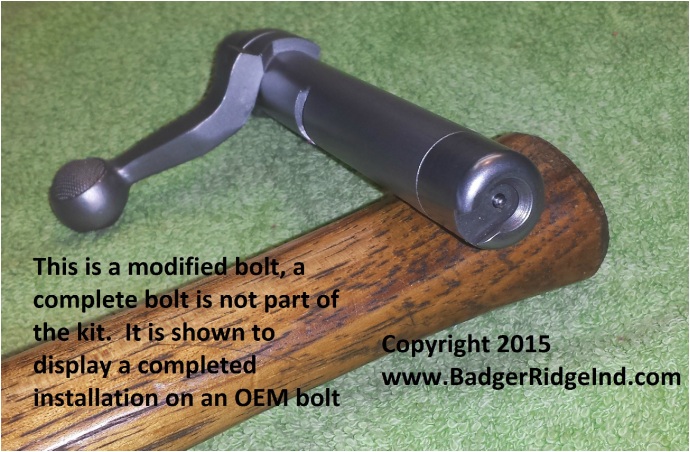
Post Installation Trouble Shooting:
Please re-read the Owner’s Manual and the installation instructions then go to our Troubleshooting Guide if you are having issues
Installers must make sure the bolt works without any binding nor engaging the breech plug prior to tuning the breech plug or firing the rifle.
Anything else not in the Troubleshooting Guide is beyond the scope of this guide. Contact us for more ideas or take the rifle to a competent gunsmith.

