Posted on Leave a comment

Tool chest organizing widgets are changing my workshop

I’m embarrassed, but I’ll admit it: I’m disorganized and inefficient compared to what I expect of myself.

I like to work on all sorts of things, but I don’t invest the time and thought I should into organizing and cleaning up. I frequently finish a project, but fail to really ‘finish’ it by putting all the tools that got drug out back where they belong. Eventually when I need those same tools, I then cannot find them. Along the way I’ve bought a bunch of different sets of box end wrenches, and frequently grab more onesie-twosie at swap-n-shops. I occasionally have to cut weld or bend one to make a custom wrench for a specific job. So I have multiples of the same size in all sorts of lengths. When I need one of them, I typically have to stop and think about the last project I completed with that tool, and then begin searching the locale where that project was done. Or dig through the pile in the respective tool drawer.

I have resolved to do better. I know that the foundation of being organized is having a place for everything, then making sure to put everything back in its place. And to that end, I went around the shop and started gathering all the loose wrenches, screw drivers, pliers etc. When I pulled out the drawers of my tool chest and tossed them all in, I realized I had only just begun.

The ‘before’ pic of my wrench drawer after I tossed in the wrenches floating around the shop

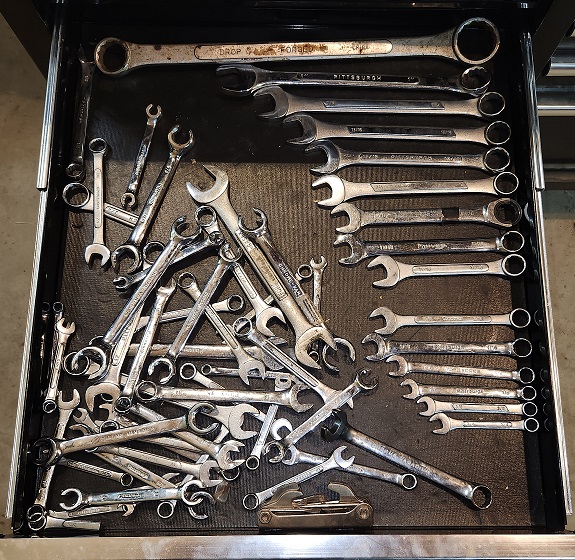
That’s when inspiration hit me. I wanted to get started organizing, but of course, I had a whole bunch of other things that I had to get done before I could act on that inspiration. I turned those obligations into opportunities to continue working out in my mind what I was thinking of doing. Where I wanted to end up. Once I’d cleared my obligations out of the way, I rewarded myself with some time ‘CADing’ out what I had in my head for a tool drawer organizing widget:

Tool Drawer Organizing Widget
This little widget interlocks with other widgets and has a magnet in it to hold tools in a tool chest drawer

At first I realized I had to keep it simple: just tackle all the box end wrenches that continually floated around. I knew that I didn’t want to make an investment into designing a “perfect” large organizer that I’d have to change and reprint once I bought new tools, or a different tool chest. I needed something flexible, that would adapt with changes in the work shop. So I decided a small flexible modular approach was best. I knew I wanted a magnet in the organizers to help hold the tools in their proper place. That’s what I “cadded.”

Then once I had the widget in my hand and I began to use it, I realized that I needed more than one size, that I wanted to follow the convention of metric-Blue, inch-red, and that these same widgets could organize many different types of tools. Along the way I think I got my box end & flare nut wrenches the way I want (at least for now):

This is the “after” picture for the “before” picture above: MUCH BETTER! Even have room to spare!

Now I just have to make myself put these wrenches back in their proper place when I’m done with the project that draws them out of the drawer. I also want to come up with a flexible labeling system, but really I’m not sure I’ll invest more time to that end: Just knowing where the 10mm and a few other sizes are by setting them off with different colors, seems to do enough that I’m not spending all the time I used to digging through the drawer looking for a specific size. I find what I need fast now.

So how does all this affect you? We’ll I’m glad to explain it to you! First I’m offering this tool organizing widget solution for sale here at Badger Ridge. You too can organize your tool chest drawers in an effective and flexible manner. First you need to appreciate that these widgets have magnets in them. They want to stay where you put them in your tool chest drawer. You’ll be best served if three or more are snapped together to get much greater stability than a single widget. Also with the magnets, metal tools want to stay in them, but aren’t so stuck that its work to get a tool of of them. Second the widgets snap together and apart if you need to re-arrange them, and again for stability, you probably want to plan on having 3 or more widgets snapped together.

Also, before you buy you probably want to understand what sizes are available and what purpose they will probably serve. Let’s start with the standard widget:

Standard tool drawer organizer widget
Profile of standard tool drawer organizer widget

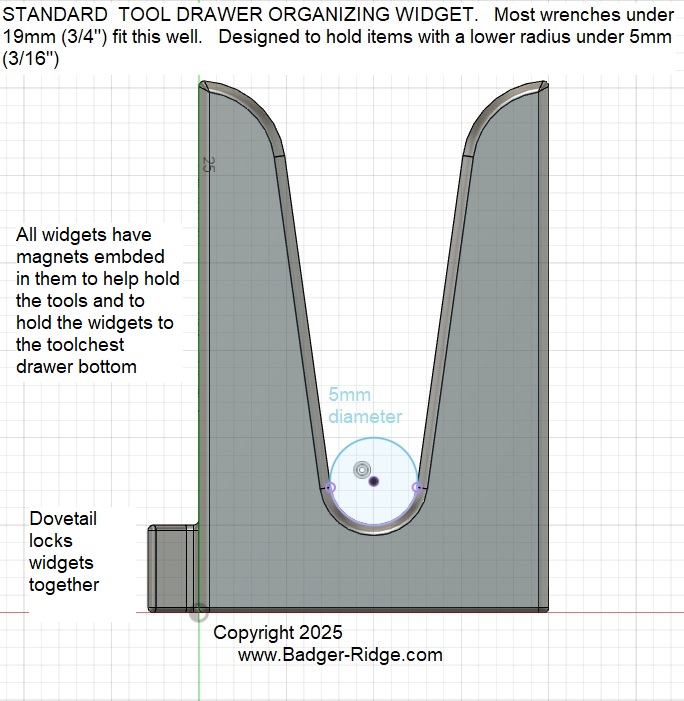
The standard widget holds wrenches smaller than 1″ (25mm), and does great with screw drivers with smaller shafts. However I’d plan on wrenches over 3/4″ (19mm) to fit better in a “large” widget:

Large Widget Profile

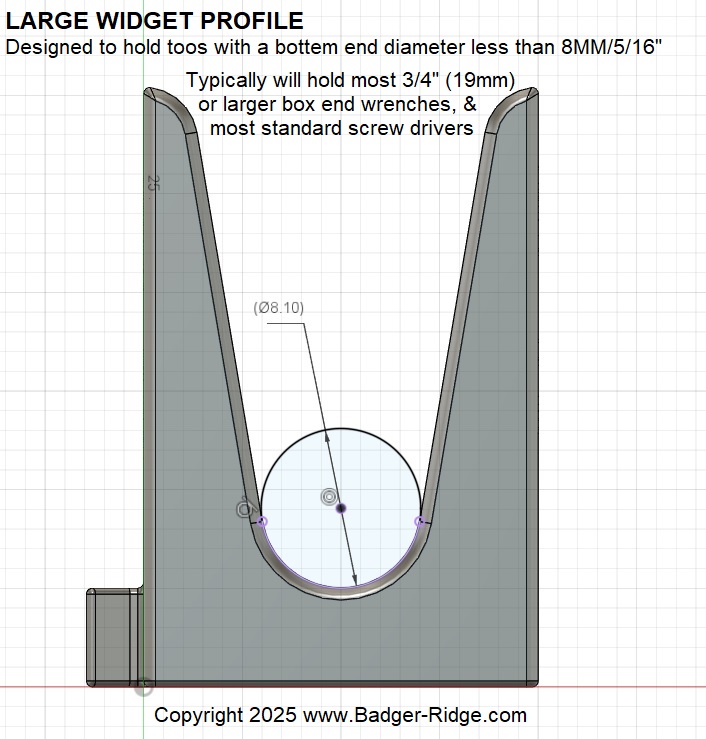
Also I’ve found that standard screw drivers sit better in the large widget.

When I moved on to my drawer of ratchets I realized I needed a couple of different larger widgets. The standard and large widget have the same foot print, only their mouths had different profiles. But to hold the larger shafts of my 3/8″ and 1/2″ ratchets (bot standard and telescoping), I needed to make two larger widgets. I called them XL & Jumbo (see below)

Extra Large Widget Profile
Jumbo Widget Profile

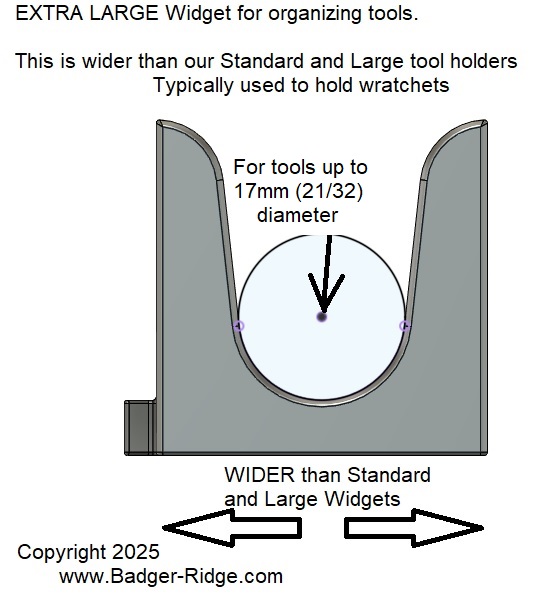
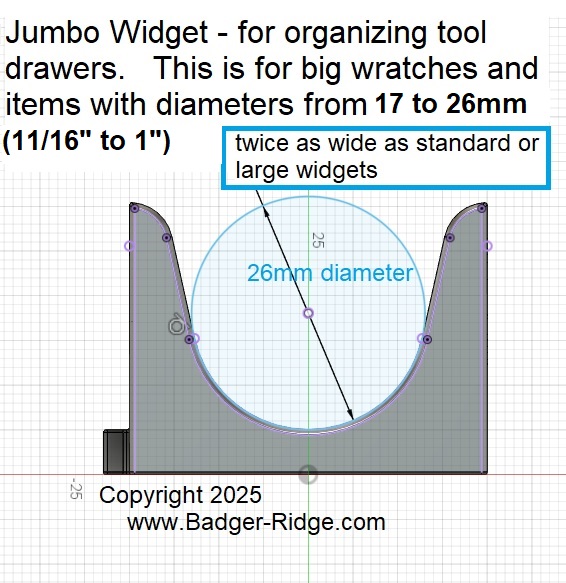
The jumbo is double the width of the standard/large widgets, it holds my telescoping ratchets & 3/4″ drive ratchet. The XL widget is in between the Jumbo & the Standard/Large and holds my standard 3/8″ ratchets well.

So ignoring wrenches, if stuff to be held is under 5mm in diameter, use a standard widget. If its over 5mm but under 8mm, a large widget. Between 8 and 17mm, use and XL widget. Over 17mm, but un 26mm use a Jumbo.

In summary, let me break it down for you like this. If I was organizing a tool chest I’d count things in the following manner. First I’d go through and count all the wrenches. I’d break them down into two groups: how many below 19mm (3/4″) and above 19mm. I’d then break those into metric counts (for blue), and inch counts (for red). You might want to adjust these for using grey for 10mm etc… color choices are up to you.

For each wrench smaller than 19mm (3/4″) get a Standard Widget

For each wrench 19mm (3/4″) or larger get a Large Widget

Then segregate and count your remaining screw drivers, nut drivers, ratchets, extensions, etc, measuring at the diameter of the portion that would rest on the widget. Sort them by under 8mm, over 8mm, but under 15mm, and over 15mm.

For each screwdriver/nut driver with a shaft under 8mm driver get a Large Widget.

For each extension, and ratchet handle under 8mm (probably only 1/4 drive) get a Large Widget

For each screw driver, nut driver, etc., with a shaft 8mm (5/16) or larger get an XL Widget

For each extension, and each ratchet with a shaft over 8mm up to 17mm get an XL widget

For each extension & ratchet over 17mm (but under 26mm) diameter get an Jumbo widget

For each telescoping ratchet and 3/4″ ratchet (certainly will be over 17mm diameter) get a Jumbo

For each hammer handle (over 17mm diameter get a Jumbo

This has been an effort that had yield great rewards in organization and efficiency. I hope you have a similar pleasant experience making your tool chests do more for you. To get started putting these widgets in your cart please click here.

If you have a 3D printer and would like to purchase a personal use license to print our tool widgets, please click here.

Posted on Leave a comment

Benelli Clone Shotguns are great, but many need some basic upgrades

My favorite shotgun (if I don’t have to carry it while walking all day) is my Remington VersaMax. You may not know this: the VersaMax is a “sporterized”, improved, clone of the Benelli M4. I’ve shot mine a lot. So much that I ran into many of the issues that pop up from using them, even while caring for them. The first issue I had was light primer strikes/mis-fires. I went on a quest to figure out the issue and the fix:

I found that there were 3 basic areas to focus on simultaneously to fix the VersaMax light primer/failure to fire issues:

VersaMax Bolt with scar from burr in bolt carrier cam pin slot

First, The bolt carrier: the cam pin slot slot frequently had a burr leftover from manufacturing that was gouging and impinging on the bolt and the Cam Pin itself deformed. It didn’t seem like it was up to the task of lasting for a long time. Removing the bur from the slot and buffing out the gouge in the bolt improved my troubles. I replaced the Cam pin with a better Benelli version, but those two improvements were not enough to fix my light primer strikes.

File knocking burr of edge of cam pin slot in VersaMax bolt carrier

Second: the hammer/spring/plunger. I moved on to the trigger pack to find the hammer spring plunger was chrome plated, but was flaking off and created hard, abrasive, crunchy grime that bound up the hammer. This robbed my hammer of energy needed to hit the primer hard enough to detonate it. I attempted to fix the hammer plunger’s chipping chrome, but even after polishing the edge of the chrome still attached caught and slowed the spring’s push. It began the process of flaking more off. On top of that, the hammer itself was deformed and mushroomed. So I replaced the Hammer, Hammer plunger, and spring with Benelli parts.

Remelli Kit, Benelli Cam Pin, Hammer, Spring, Plunger for Versa Max shotgun

Third: the manual doesn’t tell you to clean and lube the recoil spring. I removed the buttstock, removed the action spring from the tube in the butt, cleaned and lubed. This worked for a few hundred shots, but then I had to replace the recoil spring. It had worn. Mine had gone from about 13 inches long to just under 12 inches long.

Versa Max worn out action spring against new spring

I posted about my adventure and listed the parts I researched and then put up for sale. We’ve helped a bunch of folks get their VersaMax’s firing reliably again. Along the way I started getting calls from VersaMax shooters (and Stoeger M3000 shooters) about extractor and extractor spring issues. Others had lost their D/C clips while fixing their guns. So now we offer those too:

Benelli Extractor
Benelli Extractor

So if you need some advice, or parts please make a purchase or give us a call at 989 795 2526, send us and email, for fill out a contact form. We’d like to help you have a more reliable shot gun for a rewarding hunt.

Trigger Pack Hammer retaining D or C clip, Benelli, Remington VersaMax, Stoeger
Posted on Leave a comment

THE REMINGTON 700ML/MLS, A JEWEL IN THE ROUGH; Can you make it shine? (PART 2)

Originally posted at our old website on 4/23/2015

THE REMINGTON 700ML/MLS, A JEWEL IN THE ROUGH; Can you make it shine? (PART 2)

4/23/2015

Excerpted from Remington 700ML Owner’s Manual

Can You Make It Shine?  Yes! and Here’s How!

In my last post in The Badger’s Den I detailed how my first encounters with a “Canadian 209” modification on my Remington 700 MLS and subsequent years left me disappointed.   I knew the rifle could be more.   Over the summer of 2012 I began a journey through forums of dedicated muzzle-loader enthusiasts to find that there was a better solution; I just didn’t know about it.   The solution was a bit buried in forums full of customization, tinkering,  some bad ideas, and dead ends.  I hope to spare you all the details, cut to the chase, and share with you the product that has finally let me love my 700 MLS. 

The kit I found and fell in love with was developed by a guy named Fred, who sold it on a few dedicated muzzle loader forums.   It was called just a bolt nose kit.   But what we offer is more than just a bolt nose,  ours is the complete kit.  So here at Badger Ridge we call it the “Hunter Remington 700 ML/MLS 209 Conversion Kit, by Badger Ridge”. 

Close up of feeding a 209 primer into the kit’s breech plug

First let me truncate and summarize years of posts over many forums and years of development:   Fred developed the kit to modify the OEM Remington 700 ML/MLS black powder muzzle-loader to work properly with 209 primers.   At first he made the parts for himself and a few friends. Then the friends started sharing on the forums their success and general pleasure with the kits and from there it grew.   Then people started tinkering with smokeless modifications to the 700ML/MLS.   That required a barrel swap and and the original bolt nose was too short for the breech plugs that fit the smokeless barrels, so a second bolt nose was made just a bit longer and was called a “Smokeless” like the one you see below the OEM and the smoker, but…  ah… well I promised to keep it simple… and now I’m rambling… so  I’ll explain the “smoker” (standard black powder) modification kit we sell.  

Like I said, I’m just going to focus on making your “Smoker” work.   I suggest you keep it simple as well, and leverage the work and info I’m putting in this blog and my reference section… and end up with a great black powder rifle without breaking the bank. 


FINALLY THE WAY THE 700 ML/MLS SHOULD BE!

A Remington 700 MLS with the Hunter-Badger Ridge 209 Conversion Kit
Longer nose developed for Smokeless barrels (.085 longer than the smoker)

The long-nose above is only for use when re-barreling. We don’t recommend re-barreling and thus you won’t read much about long-noses.

Leaky Breech, OEM Remington 700 MLS

Leaky Breech, OEM Remington 700 MLS above. Note the percussion nipple. The Badger Ridge Remington 209 Conversion Kit is all you need to modify your 700 ML/MLS to use 209 primers without blow back, no special tools to carry in your possibles bag, and it protects the primer from weather (without plastic shrouds to lose).   Any questions?  No?  Good, Now rush off to Our Products and buy it!   Oh, wait you got questions… OK so read on:

Badger Ridge’s Remington 209 Conversion Kit

Back to what makes this 209 conversion so great:

Those familiar with the successful Savage ML-II may recognize some of it’s innovative features applied to the Badger Ridge Kit.   First should be the bolt nose.  

The original 700MLS bolt -needs- our bolt nose placed over the bolt body.  Its a firm press fit that is also held in place by by friction (you can also add loctite if you wish). It won’t move on you (unless you put a torch and a wrench to it).   The nose holds the primers firmly in place and ‘feeds’ them into the breach plug.  It works a lot like a single shot rifle, except you slide the primer into and out of the bolt nose.  No back pressure will be able to push the primer back and blow combustion gases all over the action because the bolt nose holds it firmly into the breech plug. 


Badger Ridge/Hunter breech plug above OEM with #11 percussion nipple

Next is the breech plug.   The original Remington breech plug was designed for percussion caps, not 209 primers. So with this kit the original breach plug is removed and discarded.  The kit’s breach plug is used in its place.   The kit’s breech plug is noticeably longer with a nose that protrudes in to the barrel. Thus a specific breech plug is required for each caliber; each kit is caliber specific. The longer length (and larger internal diameter) creates a much larger ‘flash chamber’ that allows the 209 primer to reach its maximum effectiveness with minimum blow back through the breech plug.  And even so, the flash chamber is sealed by the primer so that it functions as a sealed breech system; the primer keeps any blow back inside the flash chamber.

The kit’s breech plugs have the hole for the primer purposely tight.  This is so that it can be ‘tuned’ to the particular brand of primer you choose.    See the info in the references section for more info on tuning your breech plug with a letter “C” drill bit.

Also your OEM breech plug wrench (or a 7/16 socket on an extension) can remove or install the kit’s breech plug.  So no new or additional tools are required.

Breech plug with vent liner

vent liner is threaded into the end that abuts the powder charge.   A vent liner ‘focuses’ the fire made by the primer into the powder charge.   As the vent liner receives a lot of heat and pressure, it erodes over the course of many firings, however it has an 7/64 Allen head that allows removal for cleaning, inspection, and periodic replacement.  We provide a 17-4 Stainless vent liner with each kit.   The is regarded by many as the best and is interchangeable with the Savage.


A Real Firing Pin!!!

Finally we get to the firing pin.   Yes it is a real firing pin.  I couldn’t make myself call the OEM nor the Canadian 209 mod’s anything but a striker.   The OEM striker is removed and replaced by the kit’s firing pin.   The kit’s firing pin is purposely too long; it will need to be shortened to the proper protrusion and shaped to properly discharge a primer without piercing it.  Every kit’s firing pin requires fine tuning to the individual bolt.   

OEM striker next to Badger Ridge/Hunter firing pin

DIY or pay us?  You choose!

The bolt modifications may be something you do, something you have a gunsmith do, or you can just send us your bolt and for an appropriate fee we’ll do the bolt modification.  If you choose us, all you’ll have to do is purchase the kit with installation, mail us your rifle’s bolt, we’ll do the modification (we always replace the main spring with a new one) and send it back with a new breech plug and vent liner (see this installation service page for the details).  Once you get your bolt, all you’ll need to do is assemble the rifle per the Remington 700 ML owners manual (You may need to tune the breech plug with a letter C bit to feed your choice of primers). 

For you bolt mod Do-It-Your-Selfers, you’ll need to drill a hole into the new firing pin during the installation (a bit is provided in the kit), and install the cross pin to hold the firing pin in the cocking piece/firing pin guide.   In-case you lose the original bolt’s cross pin, a spare roll is included in the kit as well.   You will also need a vice with jaws that open at least 6 inches, or a hydraulic press, and the ability to file the firing pin to tolerances held to 5/1000ths of an inch.   

A detailed Instruction guide has been posted to the reference pages.

Start making Gems out of rough stones!

Our Remington 209 Conversion Kit alleviates blow back by solidly holding the primer into the breech plug.  It improves the accuracy and the performance of the 209 primer by using an improved breech plug, it promotes longevity by using a common replaceable, inexpensive vent liner, and strikes the primer with a real firing pin.    Now you can turn that rifle you couldn’t give away into a real performer.   

So get that old 700ML out from the back of the closet and breathe new life into it with our 209 system! Or when you are walking through the local gun shop and see the lonely 700ML/MLS sitting in the corner with the discount sticker on it, go ahead and pick it up.   You know how to turn that rough stone into a gem.

Soon in The Badger’s Den,  I’ll get on my stump about the only powder I shoot in my 700MLS: BlackHorn209

Posted on Leave a comment

THE REMINGTON 700ML/MLS, A JEWEL IN THE ROUGH; Can You Make It Shine? Part 1

Excerpted from Remington 700 Manual

Can you make it shine? YES! BUT FIRST YOU NEED TO UNDERSTAND THE PROBLEM AND YOUR OPTIONS

In 2002 I returned from a 3 year overseas tour.   I started my new job as a flight instructor and I started back into my old ways of hunting, fishing, and tinkering with guns.   My dad, ever so generous, gave me a muzzle-loader he picked up on the cheap.   Remington made a muzzle-loader based off of their bolt action center-fire model 700.  The blued steel version was called the 700ML.  The stainless version, sometimes called the magnum, was the 700MLS.  The benefits of converting a center-fire design to a muzzle-loader were obvious to me:

  1. Center-fire rifles typically have faster lock times
  2. It could use standard Remington 700 short action rings and mounts, and some other accessories
  3. It had a good trigger (for a factory rifle)
  4. It resembled the bolt action rifle I used the rest of the deer season
  •  The safety was in the same spot.
  •  The stock was pretty much the same
  •  Though it was a single shot, the bolt worked the same as well.

Before I ever fired it,  I read the owners manual, scoured the internet, read forums, and consumed every bit of information I could find.   I poured over ChuckHawks article after ChuckHawks article. They were not very kind to the 700ML.  I found most who had used the 700ML/MLS had high hopes going in but found it had less than desirable attributes as a muzzle-loader.    Hence why my dad was able to pick one up at such a low price.   The biggest problems I noted during my research:

1- #11 percussion caps are not as reliable and hot as 209 primers.

2- The bolt was held in by an Allen head screw with an un-threaded tip.  It was easy to miss align, mangle the bolt and have a hard to work bolt.

3- Burning powder blows back through the percussion cap and into the bolt and action 

(note 3 happens on side locks too, but the orientation of the lock and simplicity of the hammer make it less significant)

Black powder residue is corrosive.  Blow back throughout the action caused the shooter to have to remove the bolt, disassemble and clean it after shooting the rifle.   Failure to clean would certainly result in corroding the striker, spring, and inside of the bolt.   Blow back got all over a scope, and some of the blow back could get into the trigger as well.   To clean that, one had to remove the barreled action from the stock.  This meant that one could possibly shift the zero after every cleaning.  I had doubts as to how much, and made sure I used a torque wrench on each action screw.   I then scribed a mark on each screw so that I could put them back with in the same tension after a field cleaning without a torque wrench.   I didn’t know what more I could do.   I wasn’t to concerned: I’d know if that was going to be a problem after a few range sessions.

The Savage design was taking over the market in the center-fire modified to muzzle-loader rifle.   It had all the benefits and addressed some of the problems I had read about.  But I had a free 700MLS in my hand and a desire to tinker.  I knew I could and had to modify it.  

I took the burs off of the tip of my Bolt Stop Screw with a file, and used a stone to work away the burs and abrasions on the bolt that I made when i misaligned and tightened up the screw.   I lubed bolt and the slot the bolt stop screw rides in with anti-seize grease.  No problems now,  check off #2.

I also knew I had ‘better’ options than black powder.   My dad had always used Pyrodex in his traditional side locks.   I further researched and decided on Hodgdon Triple Seven.   It was available in pellets and granular powder.  It also was reported to be ‘less’ corrosive than black powder and Pyrodex, but still corrosive.   I was suspicious of the claim of being “less corrosive” as a possible sales pitch.   But when I realized Hodgdon made both Pyrodex and Triple Seven I wasn’t as worried; they had a solid reputation.  I chose the granular powder because it was cheaper and allowed me to work up a load in smaller increments and see what my rifle would shoot best.  For bullets, my research pointed me to MMP sabots and jacketed 45 caliber handgun bullets.   I bought rings and put on a solid 4×32 scope. 


The thing that really needed to go was the #11 percussion cap system.   So off I went on my internet search to find a 209 modification for it.    And at that time the pickings were slim on conversions (and still are).   I found and purchased online what I’ll call a “Canadian” 209 kit.  There really wasn’t any other 209 options.  The kit came with a special tool to remove and replace the firing pin/striker with the included striker.  It also had a new main spring, a 209 nipple to replace the #11 percussion cap nipple, and a fork to install the nipple and remove fired primers.   Once I got the kit, I followed the instructions and I thought I had it whipped… but I really didn’t. 

I went to the range and followed the Remington 700 ML/MLS Owners Manual as I worked up loads.  I found that my rifle shot the best at 80 grains.  Also there was still a bunch of blow back even at low charges, that worsened as I stepped up the load.   As charges increased I started to find fragments of primers in the cavity around the primer holder.  So, for many years I used 80 grains of Triple Seven, black MMP sabots, and .451cal 250gr Hornady XTP bullets.   I deformed primers and had blow back, but the rifle was accurate at 80 grains.  It was the best I could make of it; hotter loads weren’t an option.  

I killed deer, cleaned the rifle, set the screws back to their scribe indexes and had no problems with point of impact shifts.


MY FIRST ATTEMPT (Canadian kit) WAS LESS THAN I HAD HOPED

Leaky Canadian 209 nipple (fail)

I was disappointed with the amount of blow back I was getting, and the labor it took to take the rifle apart and clean it.  I was always a bit worried I missed something in the bolt and would have a failure to fire at a critical moment… say when the shoulder of a Boone and Crockett trophy was in the cross hairs.   Also, after shooting a deer, gutting it, and hauling it out of the woods, I was beat.  The last thing I wanted to do was tear down a rifle and clean it.  But I did.

I had to understand what was happening with the ‘Canadian’ 209 modification if I was going to do better.    The replacement firing pin ended with a large cylinder that had a nipple that fired the primer.    The ‘Canadian’ kit used the original OEM breach plug, but had the replacement 209 nipple threaded into it.   It was a bit tricky to get a primer in and the kit came with a fork to remove the spent primer that was also the wrench to snug up the nipple into the breech plug.  Extra tools to carry in the field didn’t sit well with me, but I put them in my possibles bag.


Leaky Canadian 209 nipple (fail)

There was a small slot across the face for the fork to engage and a large cut out in the side for a spring to hold the primer in place.  When cocked to fire, there was a gap between the striker face and the 209 primer. Nothing held the primer in place besides the spring on the nipple.  Also the primer was exposed to the weather unless I used the OEM plastic cover.   I had read that the weather shroud was not to be used with 209 primers somewhere, and had entered the land of operating outside the manual.

When the rifle fired, the striker sprung forward and struck the primer. With ignition came large pressures that blew the primer out and back against the face of the firing pin.   With the firing pin being only held against the primer by spring pressure, the primer could move aft, unseat, and spray blow back.   Not to mention the nipple holding it was slotted so that pressure could blow the primer out that way too.   It was obvious why I was getting blow back, deformed and blown up primers.   This explained why it worsened as I worked up powder charges.

So the Canadian 209 modification worked… but was messy, and the primer was exposed unless I took a perceived risk of adding the plastic weather shroud.   I also lost the shroud on a hunting trip and had to purchase another.  I knew that my rifle returned to zero after I cleaned it.  I killed deer, and never had a hang or a miss fire.  I loved the trigger, and the feel.  But I still wasn’t happy with the blow back.

I had to find a better way, so I again searched high and low.  Eventually I found the  best Remington 700ML 209 modification!  

And that is the subject of my next Badger’s Den: THE REMINGTON 700ML/MLS, A JEWEL IN THE ROUGH; Can you make it shine? (PART 2)


Copyright BadgerRidgeInd.com 2015

Copyright Badger-Ridge.con 2024


Posted on 2 Comments

We Moved Websites!

BadgerRidgeInd.com is now Badger-Ridge.com

Due to webservice providers and their associated credit card processors adopting woke business attitudes and practices, we were forced to relocate our eCommerce website to this new domain: Badger-Ridge.com

We are the same people doing and selling the same things.

We apologize in advance for any hiccups and growing pains you experience with us as we learn the new web environment and endeavor to meet your needs.

Click here to check out Our Products