Posted on Leave a comment

What more do you want?

Here at Badger Ridge we offer all sorts of specialized solutions. Our motto is “Simple Effective Solutions”. Our business model is to find un-serviced “nitches” that we can understand and service well via a website and the post office: we aren’t looking to go toe-to-toe with any of the bigger names in industry. We are not interested in opening a storefront. However the title of this post is a serious question: “What More Do YOU Want?” Let us know by calling or submitting a contact form.

That said, if you have an idea or a need and you bring it to us we’ll listen and consider if we can meet the need and if we can sell it to others. We’ve got lots of little things we are working on when we aren’t fulfilling orders and raising our family. Some of those little things have sat for quite some time and frankly they bug me, but that’s the truth of it. Anyway, let’s discuss the things we have brought to market: let’s focus on what we have delivered when potential customers have called and wanted something like what we have done, but a little bit different:

Gun cabinet Organizers & Custom gun room accessories

This group of items got started during the COVID lock-down. I was stuck in the house and needed something to do. When I went to the gun cabinets so I could go shooting, and saw that I was short of stand off’s for my Stack On Cabinets so I made some. Then eventually, I realized the over under and side by side didn’t sit well in the barrel rests and made a solution there too.

I realized that I had too much stuff floating around that really needed a place…. and all the unused space in the door: I went to work on door shelves, ammo holders, pistol magazine, and pistol holders.

Then when others saw what I did they made suggestions for AR-15 Pmag holders, AR-10/AR-308 Pmag, and AKM Pmag holders. Others had different brand cabinets and trusted me with their barrel rests and stand offs and I made clones of them along with other options. So if you have a Sports Afield cabinet/safe, Sentinel Gun Cabinet, or old skool Stack-On gun safe we can help.
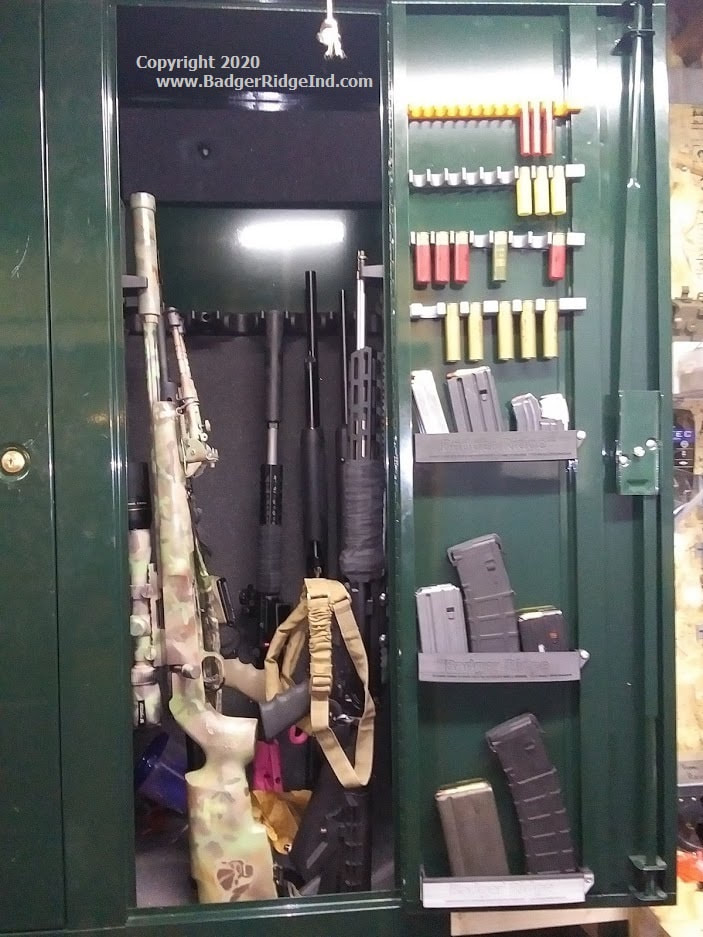
Modified stack on gun cabinet
STACK-ON Cabinet with our organizers (Left Hand door open, Right Hand is closed)

Shooting bench barrel rests

After all the options for gun cabinets and safes, guys were building gun racks, shooting benches, and custom gun rooms. They contacted us wanting better options. One of the first things we did was modify the Stack-On gun cabinet barrel rests to allow more space between the guns: we call them custom barrel spacers/rests. They use standard Stack-On scope stand offs. However others liked the profile of 5-9 Barrel rests they could get in foam, but didn’t like the foam. So we looked at them and improved them: check out our hard plastic 5-9 barrel rests if you are building a bench or a gun rack for your trap range.
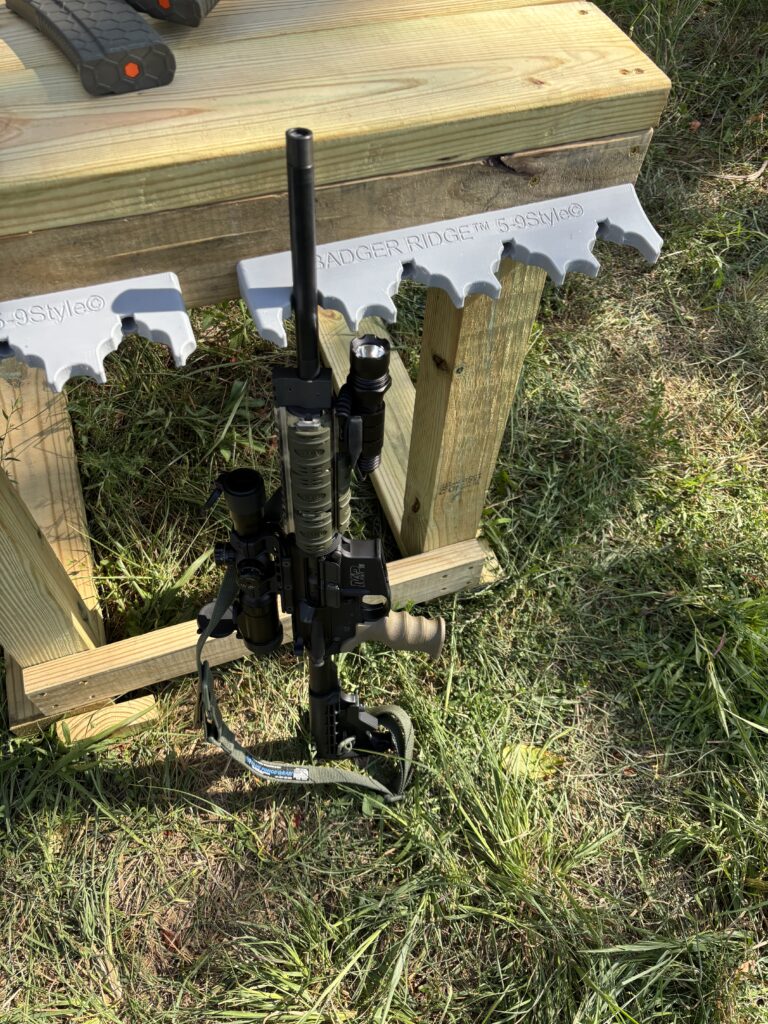
Customer photo of 5-9 rest on his home built bench

Baseball Bat-Rack

My son loves to play base ball. Few of the fields around here have racks in the dug out to keep the bats organized and out of the dirt. I had to fix that too:
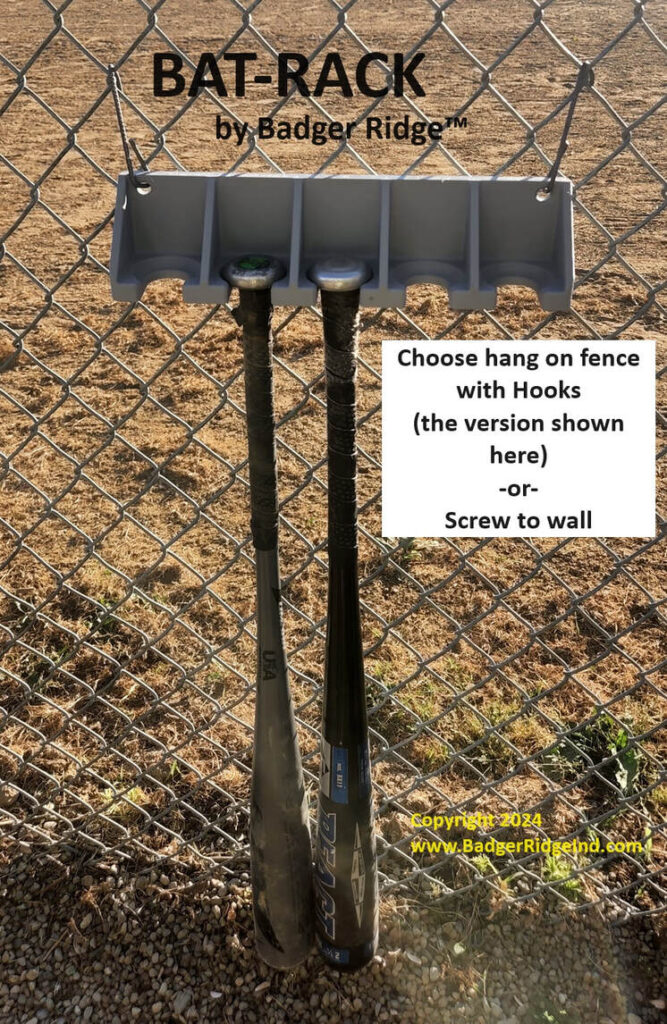
Bat Rack On Fence
Bat Rack, this version hangs on a fence with hooks. Others version mounts to walls via screws

Remington 700ML/MLS sealed breech 209 system

This sealed breech 209 system for the 700ML/MLS is our bread and butter 209 conversion. Multiple pages of this website are devoted to it. If you have a Remington 700 ML/MLS muzzleloader, you really want to use this system (whether you know it yet or not).
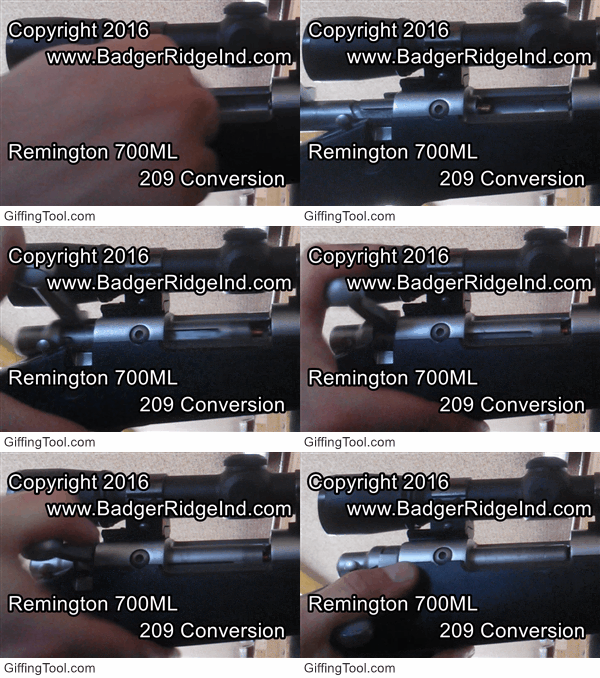
Animated Gif Loading primer in Remington 700 209 sealed breech

Ruger 77-50 Sealed breech 209 system

The Ruger 77-50 is somewhat similar to the Remington 700 ML/MLS… so folks started to bug us to make a sealed breech 209 system for the Ruger 77-50 too. It’s too complicated of a conversion for most, so we don’t offer Ruger kits: you have to send your bolt to us. However we do have the ability to produce already converted 77-50 bolts. Typically only folks who hunt in Idaho & Oregon need to keep the old system running (they are forced to use the original system in those two states and are the most common people to just buy a new bolt as it it the most expensive option).

Ruger 77/50 sealed breech 209 system

Vent Liner retrofit

The Remington 700 & Ruger conversions use Savage type vent liners. So we also listed them for sale under Savage Muzzle loader category. When folks kept calling asking for help with other muzzle-loaders and getting them to shoot BlackHorn209 or just shoot more accurately, we realized their was a need. We found many folks had forgotten to put anti-seize on their Savage 10ML/ML2 vent liners and corroded them into the breech plug. Most Knight muzzle loaders have vent liners silver soldered or epoxied into their breech plugs. All these needs had a very similar solution: drilling out the vent liners and chasing the original threads, or just drilling countersinking and threading a breech plug to take vent liners.

So we met all these needs by offering to our vent liner retrofit service. If you have an old rare Savage 10ML (that uses the primer modules, not bare 209 primers), we recommend our retrofit service to update the breech plug to use the new 10ML-2 vent liners.

Savage 10 ML (the original not the 10ML-2) Modules and de-priming system

And while helping savage 10ML owners with their vent liners issues by retrofitting 10ML-2 vent liners, customers began begging us to produce and sell the special 209 modules the 10ML uses. Customers trusted us and sent in components to examine. Upon examining the modules we found that their seemed to be lots of variation in them. This variation in the originals produced carbon leaks/build up inside the breech plug. So we tightened the tolerances. Our modules seal better, but they require diligent cleaning of the breech plug. Also sometimes you have to custom fit our module to your rifle. Once you do, you will find it works better than the original. We also improved the rim: most users report that they snap into the extractor and feed better than the originals too.
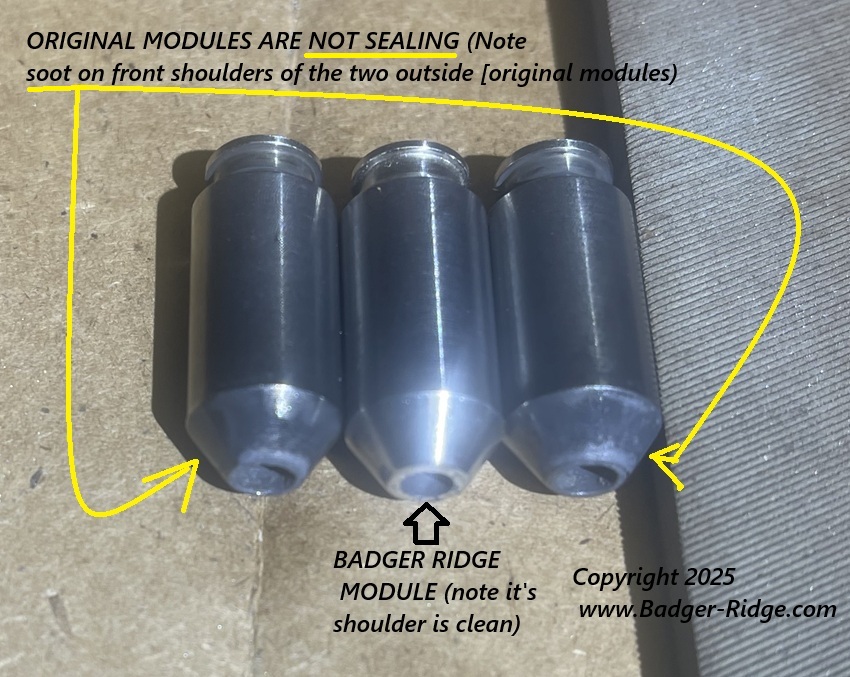
Savage 10ML primer modules compared
Savage 10ML primer modules compared – note no soot on the Badger Ridge (improved) module

Then folks started asking for the same module but made to use large rifle primers. Everyone loves the new LRMP (Large Rifle Magnum Primer) in these new modules.

Savage Breech Plug Wrenches

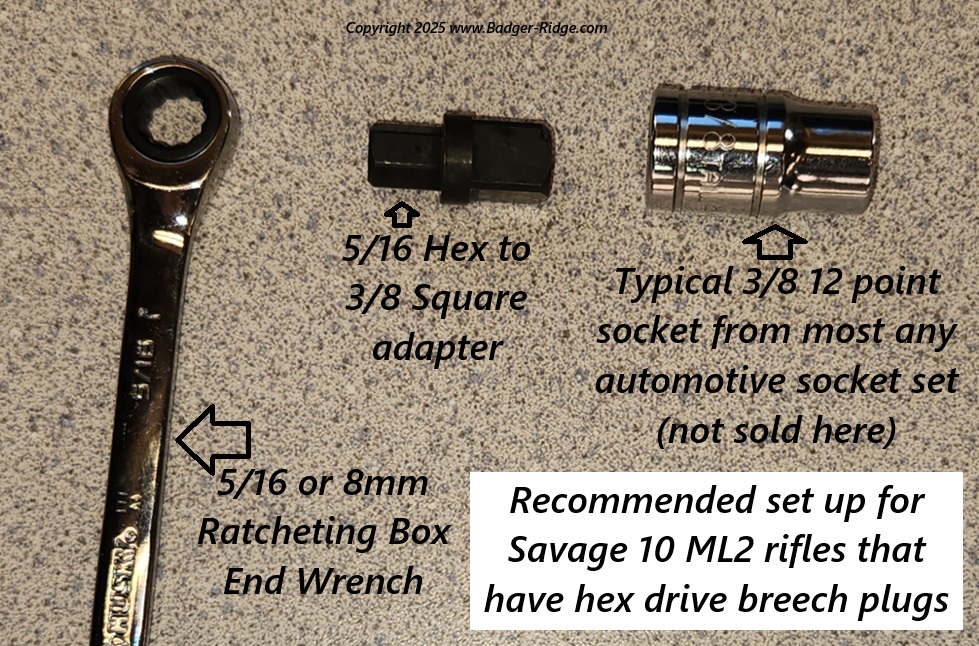
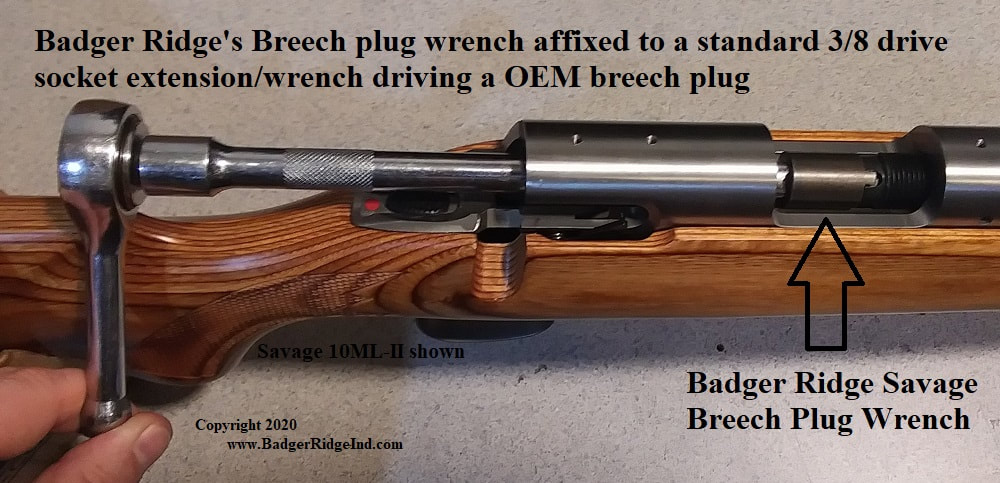
Folks called saying they bought a Savage 10ML2 but it didn’t come with a breech plug wrench. People also begged for a better option to remove their breech plugs without having to mess with the tension on their action screws. So we made the Savage 10 ML EZ breech plug removal tool system. Our tool is compatible with standard 3/8 ratchets, or you can get the entire system and remove the Savage 10 slotted breech plug without having to remove the bolt. If you have a hex drive breech plug, just omit the breech plug wrench, but get the other two pieces and pair them with a 12point socket and you can take the breech plug out with out removing the bolt. Thus: You can install and remove both types of Savage breech plugs with our simple effective system.
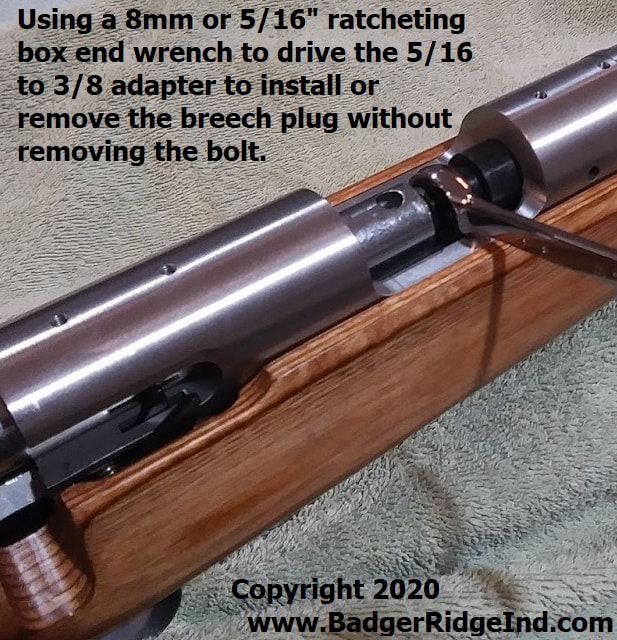
Badger Ridge EZ Savage Breech Plug Wrench installing breech plug without removing bolt
Badger Ridge Breech plug wrench on 3/8 ratchet extension
Badger Ridge Breech plug wrench on 3/8 ratchet extension,
Hex drive EZ setup - for Savage 10ML2 with hex drive breech plug
Hex drive EZ setup – for Savage 10ML2 with hex drive breech plug

450 Bushmaster/M14/M-1A gas system shims

These shims have become one of our best sellers. They started because I needed to time a muzzle break on my 450 Bushmaster. Then a customer wrote in thinking they’d shim M14/M-1A gas systems. He was right. Then GunBlue490 decided to try them and made a video about it. Buy with confidence!

Austin and Halleck Owner’s Manual & Main Springs

We started trying to make a sealed breech 209 system for these old accurate but unreliable rifles. The first design had issues. We hope to revive the project, but everything else seems to get attention first. We do however offer the owner’s manual for download and replacement main springs.

Remington VersaMax (and other Benelli clone shotgun) reliability fixes, and replacement parts

I could drone on about the VersaMax shotgun, how I love it, but it let me down… so I learned how to fix it and love it again. However, I’ve already written a few blog posts about that. So go read them if you want to. Once I started to sell what I found to fix my VersaMax, I was contacted by guys who needed additional help (with both the VersaMax and other Benelli clone shotguns). So now we sell “Remelli” kits, cam pins, new action springs, extractors, extractor springs, magazine plugs, butt stock retaining hardware, and are working on a few more things your Benelli or “Benelli clone” shotgun may need.

What more do you want?

This is an actual serious question. A lot of our items are ideas or contributions from our customers! Got a problem you need a fix or part for? Think we can make something others will want too? Let us know !!! Call us or use a contact form to start the conversation!
Posted on Leave a comment

When WD-40 isn’t WD-40 it can be really good

For this installment of the Badger’s Den, I’d like to discuss WD-40.

But first, let me assure you: We are the same people delivering the same simple effective solutions as always. So if a web search brought you here looking for solutions for your muzzle loader, gun cabinet/safe storage & organizers, tool organization, etc. You are in the right place, and probably just a click or two away from finding it (try one of the links in the prior sentence), or try the menu in the side bar (if you are on a desktop computer… or scroll down if you are on your phone). Or just click here to go to Our Products.

But I hope you stick around and read my thoughts on WD-40.

What is WD-40? Now-a-days, that’s a tricky question. For many years, WD-40 was just the light oily stuff in a blue and yellow can that seemed to be on the shelf in every store. It got used on everything. And it got a bad reputation for drying out and leaving a cruddy crust that seemed to jam stuff up more than fix or lube it.

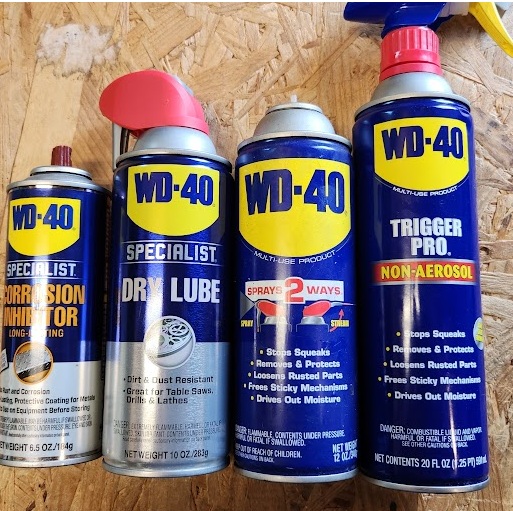
But now-a-days, WD-40 is still that same oily stuff in a can, and it’s a company, with an entire “WD-40 Specialist” product line. To keep it simple for this post, I’m going to address “Traditional WD-40” as just “WD-40.” The “WD-40 company” will be called “WD-40 company”. All the other “specialist” products the WD-40 Company sells, will be addressed by what I commonly call them: “WD-40 Dry lube” “WD-40 Corrosion Inhibitor” etc.

We don’t sell any WD-40 company products. But I use four of them, and you might too. Seeing they are available just about everywhere, effective when understood, and typically reasonably priced, it’s understandable that you’d have some on the shelf and use it. But the question is, are you using it correctly?

WD-40 actually does stack up ‘OK’ against many other products commonly used in automechanics: grime removal, rust penetrant, etc. It’s rarely the best, but it’s typically OK.

When it comes to guns, if you listen you will find lots of different opinions on WD-40’s usefulness. Many will have horror stories, and tend to be negative. You probably heard stuff like: “Absolutely never use WD-40 on a gun.” If you did a little research you’d find statements claiming WD-40 products are in use in most gunsmithing schools. Can both be true? Is there more to this?

I get to talk to a lot of folks on the phone as part of our business. Some folks hate all things WD-40. They usually have a story that goes along with it. I sometimes ask them what they mean when they say “WD-40” there’s so many cans with that logo on it now, that it can be confusing. I usually keep it simple with them and tell them I used WD-40 all the time, but:

Traditional WD-40 is never the only thing, nor last thing I use on any firearm component!

WD-40 products
WD-40 products I use regularly

Let’s start our discussion with the Traditional WD-40. My understanding is that:

  • WD-40 was formulated as a “Water Displacement” product while trying multiple formulations, and as it was the 40th formulation that was tried, it was named WD-40.
  • The US Air Force was the largest of WD-40’s first purchasers. The USAF prescribed it as a metal treatment for it’s Titan Missiles. It was rubbed on the outer bare stainless steel skin to protect it from corrosion. On things like missiles, paint has weight and weight adds up. The missile can fly farther with a heavier payload the lighter it is, so they omitted paint and had the missileers rub them with WD-40.
  • The Air Force guys got used to using WD-40 elsewhere and also seemed to be in the habit of bringing it home and using it on more stuff there. They wanted to buy it commercially, so it hit the shelves. It got used on all sorts of mechanisms, and became the ubiquitous can of lube on most folks shelves. WD-40 became so universal, that the company that made and sold WD-40 changed it’s name to “WD-40.”
  • Please note: Traditional WD-40 wasn’t specifically designed as a lubricant, nor a penetrant. However it does seem to work pretty well in those regards… at least until the carrier evaporates and leaves a crusty crud that can jam up mechanisms.

So what does this mean for us gun owners? To me its pretty simple: I use WD-40 to clean crud off guns all the time. I find it especially useful in neglected black powder rifle bolts (something I work on regularly). If one of my guns takes a dip in the water, or hunts in the rain, I’ll hit it heavy with WD-40 too. But WD-40 is never the only thing, nor the last thing to touch one of my guns.

And again, I’m talking traditional WD-40 here. I see it as an effective, inexpensive way to remove moisture and heavy grime. Once that is gone, I remove the WD-40 with something else, and then lube and protect with a final more expensive product designed for the job: like gun oil (Rem-Oil, CLP, etc).

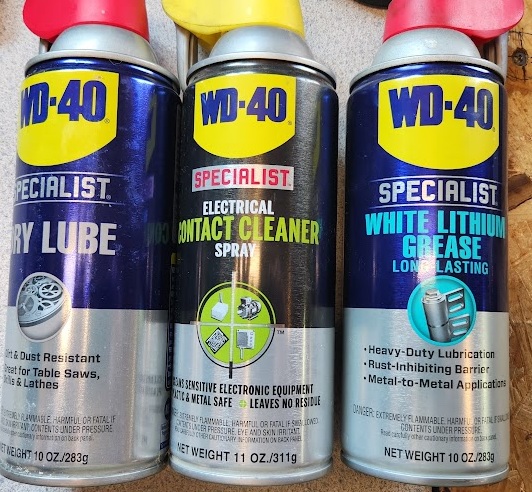
WD-40 specialist products
Three useful WD-40 specialist products

Don’t confuse WD-40 (traditional) with the Specialists. The “Specialists” are entirely different animals. Like WD-40 the “specialists” are reasonably priced, and readily available. They have specialized focuses. I use two of them daily, and pretty sure I have a third & fourth on the shelf too.

Mostly I use WD-40 Specialist Dry Lube. I use it often to remove the Traditional WD-40 I just doused something down with. The evaporative carrier in Dry Lube does a great job of carrying everything left behind away, and leaving it dry but lightly lubed with small PTFE balls. This dry lube feels slick, and leaves a surface that won’t attract dust, hold grime, and most of all doesn’t gel in the cold. I love to clean out shotgun magazine tubes with WD-40 Dry Lube and let it stay slick for feeding shells. Gun actions, trigger packs, and the interior of bolts get heavy doses of Dry Lube. The grime is allowed to float away. Then these mechanisms get drops of gun oil (Rem-oil/CLP) or small dabs of grease where needed.

Like it says on the Dry Lube can: this stuff works great on things like table saw blades, miter saw blades, and other stuff you want to keep dust free. I’ve seen a noticeable difference in how my saws cut after applying a little bit of it.

When I get metal that’s exposed or I need to store something and not worry about corrosion, I’ll hit it with WD-40 Specialist Corrosion Inhibitor. Frequently old antique guns that get stored more than shot, get cleaned, get whipped down with the WD-40 Specialist Corrosion Inhibitor, and then put away. The stuff is pretty greasy. So If I’m going to shoot a gun I coated with Specialist Corrosion Inhibitor, I remove it and lube it properly with standard gun products. But that gun stays lightly coated with the Corrosion Inhibitor most of the time its in storage.

Small metal parts that I stock and sell get hit with Corrosion Inhibitor too. If you buy something from us, like Small Ruger Screws, they will arrive with a light coating of this stuff. I don’t use the corrosion inhibitor everyday, and maybe there is something better out there, but I’m still working through my first can of the stuff I bought a while back.

The third type I have sitting around is Specialist Electric Contact cleaner. I’ve used it to blast gunk out of automotive electrical connectors & parts.

The fourth is the white lithium grease. It doesn’t seem special compared to any other white lithium grease I’ve used. While I have a bunch of dry lube cans, I only have one of the inhibitor, the contact cleaner, and one of the white grease.

So is WD-40 good or bad? Well what WD-40 are you talking about? What is the application? I’d say WD-40 company products, are pretty good values, when you understand them and use them correctly. Like anything: if you want success, you need to be smarter than what you are operating. Start by reading the instructions!

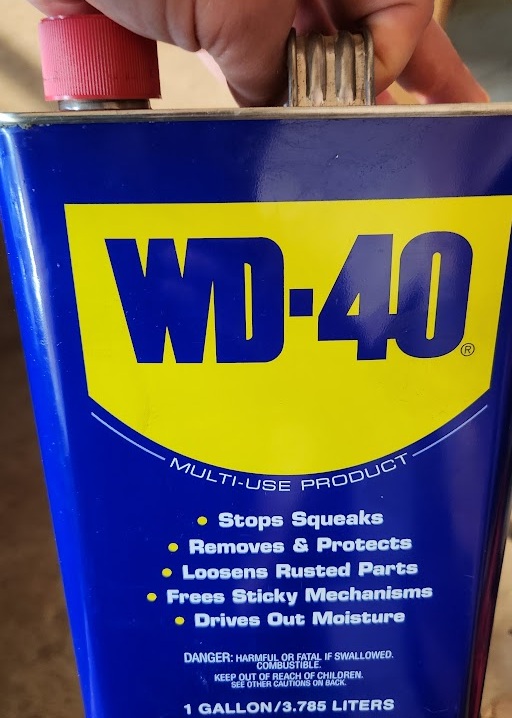
The gallon can I refill my “trigger pro” from

Are the Specialists the best at what they do? Maybe? The real question to ask is, “Are they effective enough and can you get your hands on them?” To me those are both “YES” answers, so I use them.

As a farewell, I’d like to point out that I rarely buy and use the aerosol version of Traditional WD-40. I get the “trigger pro” and refill it from gallon jugs. The trigger pro can seems designed to prevent refills, so it does take some creative use of pliers, exacto knives, and funnels. I cannot find a more simple effective affordable manner to clean all the grimy Remington 700 ML/MLS bolts sent to me. But those same bolts never leave with just Traditional WD-40 on them: its all Dry Lube, a drop of oil, and 3M molybdenum disulfide grease when they go.

Traditional WD-40 is never the only thing, nor last thing I use on any firearm component!

Posted on Leave a comment

Tool chest organizing widgets are changing my workshop

I’m embarrassed, but I’ll admit it: I’m disorganized and inefficient compared to what I expect of myself.

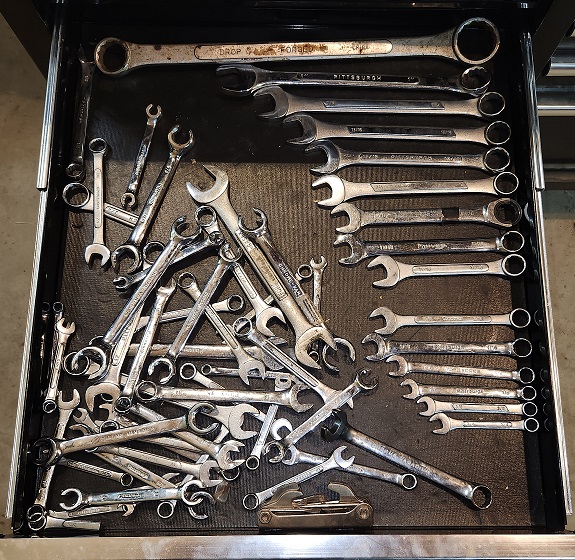
I like to work on all sorts of things, but I don’t invest the time and thought I should into organizing and cleaning up. I frequently finish a project, but fail to really ‘finish’ it by putting all the tools that got drug out back where they belong. Eventually when I need those same tools, I then cannot find them. Along the way I’ve bought a bunch of different sets of box end wrenches, and frequently grab more onesie-twosie at swap-n-shops. I occasionally have to cut weld or bend one to make a custom wrench for a specific job. So I have multiples of the same size in all sorts of lengths. When I need one of them, I typically have to stop and think about the last project I completed with that tool, and then begin searching the locale where that project was done. Or dig through the pile in the respective tool drawer.

I have resolved to do better. I know that the foundation of being organized is having a place for everything, then making sure to put everything back in its place. And to that end, I went around the shop and started gathering all the loose wrenches, screw drivers, pliers etc. When I pulled out the drawers of my tool chest and tossed them all in, I realized I had only just begun.

The ‘before’ pic of my wrench drawer after I tossed in the wrenches floating around the shop

That’s when inspiration hit me. I wanted to get started organizing, but of course, I had a whole bunch of other things that I had to get done before I could act on that inspiration. I turned those obligations into opportunities to continue working out in my mind what I was thinking of doing. Where I wanted to end up. Once I’d cleared my obligations out of the way, I rewarded myself with some time ‘CADing’ out what I had in my head for a tool drawer organizing widget:

Tool Drawer Organizing Widget
This little widget interlocks with other widgets and has a magnet in it to hold tools in a tool chest drawer

At first I realized I had to keep it simple: just tackle all the box end wrenches that continually floated around. I knew that I didn’t want to make an investment into designing a “perfect” large organizer that I’d have to change and reprint once I bought new tools, or a different tool chest. I needed something flexible, that would adapt with changes in the work shop. So I decided a small flexible modular approach was best. I knew I wanted a magnet in the organizers to help hold the tools in their proper place. That’s what I “cadded.”

Then once I had the widget in my hand and I began to use it, I realized that I needed more than one size, that I wanted to follow the convention of metric-Blue, inch-red, and that these same widgets could organize many different types of tools. Along the way I think I got my box end & flare nut wrenches the way I want (at least for now):

This is the “after” picture for the “before” picture above: MUCH BETTER! Even have room to spare!

Now I just have to make myself put these wrenches back in their proper place when I’m done with the project that draws them out of the drawer. I also want to come up with a flexible labeling system, but really I’m not sure I’ll invest more time to that end: Just knowing where the 10mm and a few other sizes are by setting them off with different colors, seems to do enough that I’m not spending all the time I used to digging through the drawer looking for a specific size. I find what I need fast now.

So how does all this affect you? We’ll I’m glad to explain it to you! First I’m offering this tool organizing widget solution for sale here at Badger Ridge. You too can organize your tool chest drawers in an effective and flexible manner. First you need to appreciate that these widgets have magnets in them. They want to stay where you put them in your tool chest drawer. You’ll be best served if three or more are snapped together to get much greater stability than a single widget. Also with the magnets, metal tools want to stay in them, but aren’t so stuck that its work to get a tool of of them. Second the widgets snap together and apart if you need to re-arrange them, and again for stability, you probably want to plan on having 3 or more widgets snapped together.

Also, before you buy you probably want to understand what sizes are available and what purpose they will probably serve. Let’s start with the standard widget:

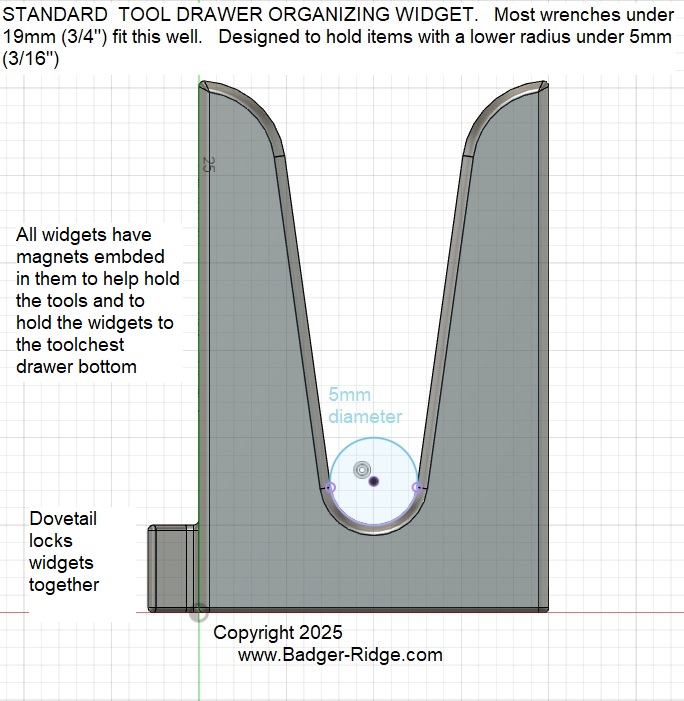
Standard tool drawer organizer widget
Profile of standard tool drawer organizer widget

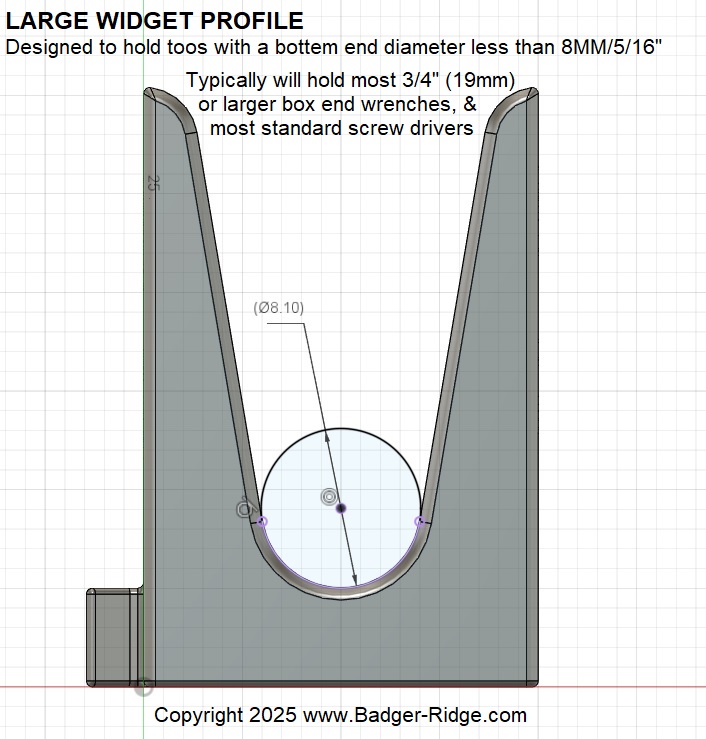
The standard widget holds wrenches smaller than 1″ (25mm), and does great with screw drivers with smaller shafts. However I’d plan on wrenches over 3/4″ (19mm) to fit better in a “large” widget:

Large Widget Profile

Also I’ve found that standard screw drivers sit better in the large widget.

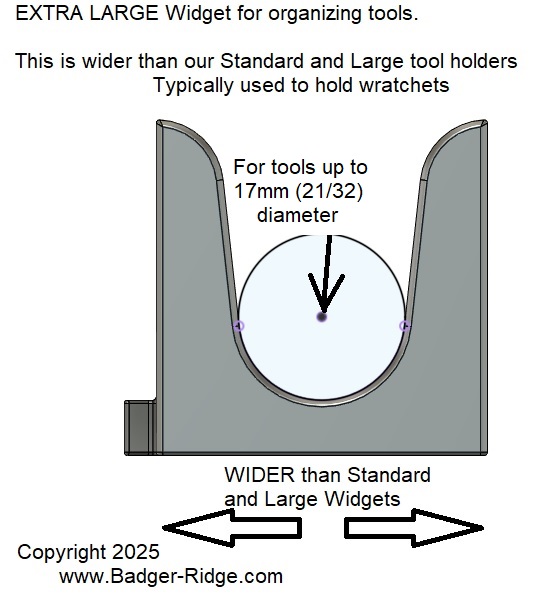
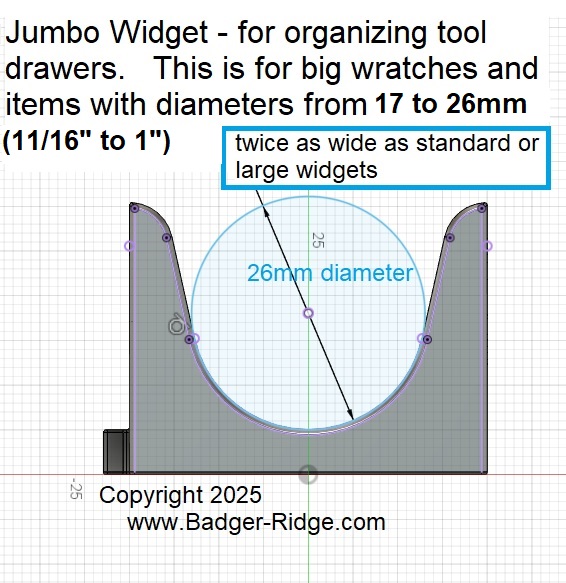
When I moved on to my drawer of ratchets I realized I needed a couple of different larger widgets. The standard and large widget have the same foot print, only their mouths had different profiles. But to hold the larger shafts of my 3/8″ and 1/2″ ratchets (bot standard and telescoping), I needed to make two larger widgets. I called them XL & Jumbo (see below)

Extra Large Widget Profile
Jumbo Widget Profile

The jumbo is double the width of the standard/large widgets, it holds my telescoping ratchets & 3/4″ drive ratchet. The XL widget is in between the Jumbo & the Standard/Large and holds my standard 3/8″ ratchets well.

So ignoring wrenches, if stuff to be held is under 5mm in diameter, use a standard widget. If its over 5mm but under 8mm, a large widget. Between 8 and 17mm, use and XL widget. Over 17mm, but un 26mm use a Jumbo.

In summary, let me break it down for you like this. If I was organizing a tool chest I’d count things in the following manner. First I’d go through and count all the wrenches. I’d break them down into two groups: how many below 19mm (3/4″) and above 19mm. I’d then break those into metric counts (for blue), and inch counts (for red). You might want to adjust these for using grey for 10mm etc… color choices are up to you.

For each wrench smaller than 19mm (3/4″) get a Standard Widget

For each wrench 19mm (3/4″) or larger get a Large Widget

Then segregate and count your remaining screw drivers, nut drivers, ratchets, extensions, etc, measuring at the diameter of the portion that would rest on the widget. Sort them by under 8mm, over 8mm, but under 15mm, and over 15mm.

For each screwdriver/nut driver with a shaft under 8mm driver get a Large Widget.

For each extension, and ratchet handle under 8mm (probably only 1/4 drive) get a Large Widget

For each screw driver, nut driver, etc., with a shaft 8mm (5/16) or larger get an XL Widget

For each extension, and each ratchet with a shaft over 8mm up to 17mm get an XL widget

For each extension & ratchet over 17mm (but under 26mm) diameter get an Jumbo widget

For each telescoping ratchet and 3/4″ ratchet (certainly will be over 17mm diameter) get a Jumbo

For each hammer handle (over 17mm diameter get a Jumbo

This has been an effort that had yield great rewards in organization and efficiency. I hope you have a similar pleasant experience making your tool chests do more for you. To get started putting these widgets in your cart please click here.

If you have a 3D printer and would like to purchase a personal use license to print our tool widgets, please click here.