
TROUBLESHOOTING & COMMON MISTAKES
Please take a moment to read & understand the rifle’s Owner’s Manual & the powder manufacturer’s instructions prior to using our conversion kit. Using our 209 conversion replaces the breech plug; apply what the Owner’s Manual says about “nipples, flash holes, & caps” to “flash channels, vent liners, & 209 primers.” Troubleshooting & good directions are also in the Owner’s Manual & your powder manufacturer’s instructions.
CAN’T FEED PRIMERS INTO THE BREECH PLUG
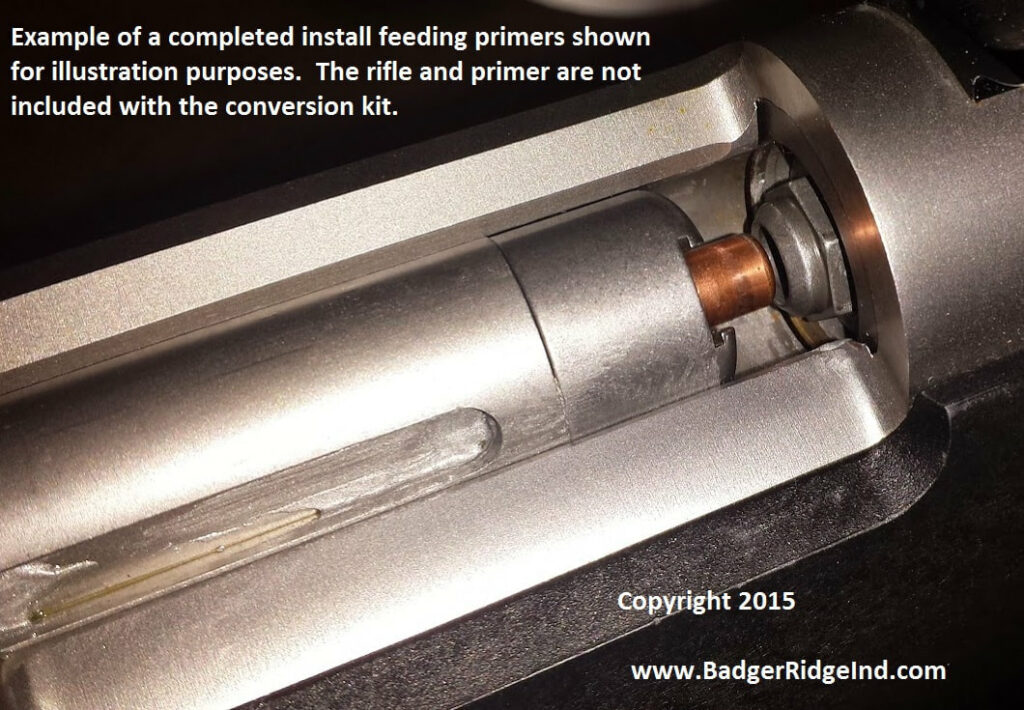
1- PRIMERS GO IN THE NOSE OF THE BOLT, NOT THE BREECH PLUG!
2- DID YOU CLEAN YOUR BREECH THREADS AND TUNE YOUR BREECH PLUG TO YOUR PRIMERS WITH THE LETTER C BIT THAT CAME IN THE SAME BAGGIE AS YOUR BREECH PLUG? CLICK HERE: WE HAVE AN ENTIRE WEBPAGE DEDICATED TO THIS!
PRIMERS SWELLING AND GETTING STUCK IN THE BOLT NOSE AFTER FIRING
There are a few things that cause this. Before we get into them, the remedy is typically just dry firing on the spent primer to loosen it. Every time I’ve dryfired on a stuck primer, it fell right out of the bolt nose afterwards.
- Causes
- Firing without a ventliner in the breech plug: THIS IS DANGEROUS!!! ALWAYS ENSURE A VENT LINER IS IN THE BREECH PLUG PRIOR TO LOADING THE RIFLE
- Some brands of primers are made of weaker stuff and/or have proportions that promote ‘ballooning’ when discharged. Winchester are the worst we have run across when it comes to swelling/ballooning: they work great otherwise, but tend to balloon more than other brands.
- Too weak of a charge. Ensure you are shooting at least the minimum charger per the rifle’s owner’s manual. The minimum charge is typically 80grains of black powder (or equivalent substitute) in most modern inline muzzleloading rifles. Sometimes ballooning goes away when working up a charge.
- Not properly setting firing pin protrusion &/or not shaping the firing pin with a mostly flat but deburred profile. This is common when ‘experts’ make the firing pin hemispherical (instead of mostly flat), &/or don’t set protrusion as proud as the directions specify ( as close to .065″ without going over). See installation instructions for firing pin protrusion details.
Failure to Fire, Misfires, Hang-Fires, Bloopers, etc. Typically these are caused by one or a combination of:
1. Using reduced power primers (“black powder”,“Kleanbore”,“Pyrodex”, “In-line” or “777”) with Blackhorn209
2. Failure to seal & compact the charge when using Blackhorn209 powder: BH209 needs tight fitting sabots!
3. Improper maintenance: Obstructions/contaminants in the flash chamber or barrel & lube that gels in cold
4. Old/Bad propellant: Muzzle Loading propellants must be kept in an airtight container in a cool/dry area. Frequently pellets are sold in unsealed containers & have been absorbing humidity for months.
5. Poorly installed conversion* (not cleaning breech threads before tuning, over tuning causing leaks, or weak mainspring, insufficient firing pin protrusion, improperly reassembling after cleaning)
*The entire bolt assembly should be cleaned & the mainspring should be replaced during conversion. If not, light & inconsistent primer strikes are probable.
*If the firing pin protrusion was set improperly, or the firing pin wasn’t fully and properly installed after maintenance, expect light or no primer strikes.
* if the the crosspin protrudes, or there is a bur or crud causing the firing pin to hang up, etc: failures to fire, & difficulty operating the bolt are probable.
If you over-tuned your Breech Plug: buy a new Breech Plug and repeat minimal tuning.
Otherwise take the rifle to a competent gunsmith with these instructions to remedy any abnormal or unsafe condition.
Remedies for obstructions or contaminants in the flash chamber/improper maintenance:
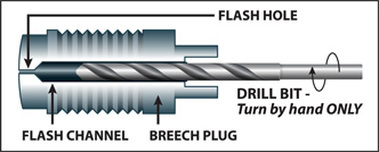
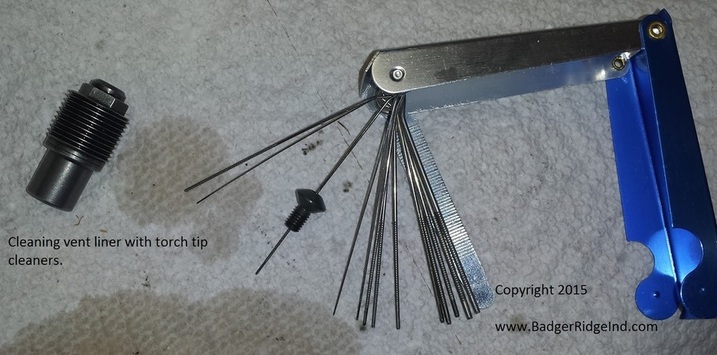
— Regularly clean the flash channel of the breech plug with a 7/32 drill bit (use fingers only: no power tools! Do not remove metal!!!). Use standard bore cleaning solvents to dissolve & remove any remaining contaminants. Clean the flash channel of the vent liner with torch tip cleaners. Remove any lubricants, greases, or oils in the flash channel prior to loading. Break cleaner and other evaporating solvents work well for this. The flash path must be clear, dry, & free of any lubricants!
— Insure anti-seize solely on the threads of the breech plug & vent liner; anti-seize or any other lubricant will reduce primer heat & cause ignition problems when in the flash chamber, or near the face of the breech plug. Teflon tape works well on breech plugs: no more than one wrap.
— Use a clean dry patch, break cleaner, or alcohol to swab out any excess oil left in the barrel before loading, Blast the breech plug clear of contaminates with break cleaner, etc. before installation
— Avoid lubricants that gel with cold (we suggest dry PTFE lubes for firing pin assemblies, triggers, etc)
If you are using full powered standard shotgun primers & doing the above maintenance & still having issues only when using Blackhorn209 (typically diagnosed by successfully & repeatedly igniting a load of other easier to ignite black powder substitute), the cause is most likely a poor seal on the primer or projectile.
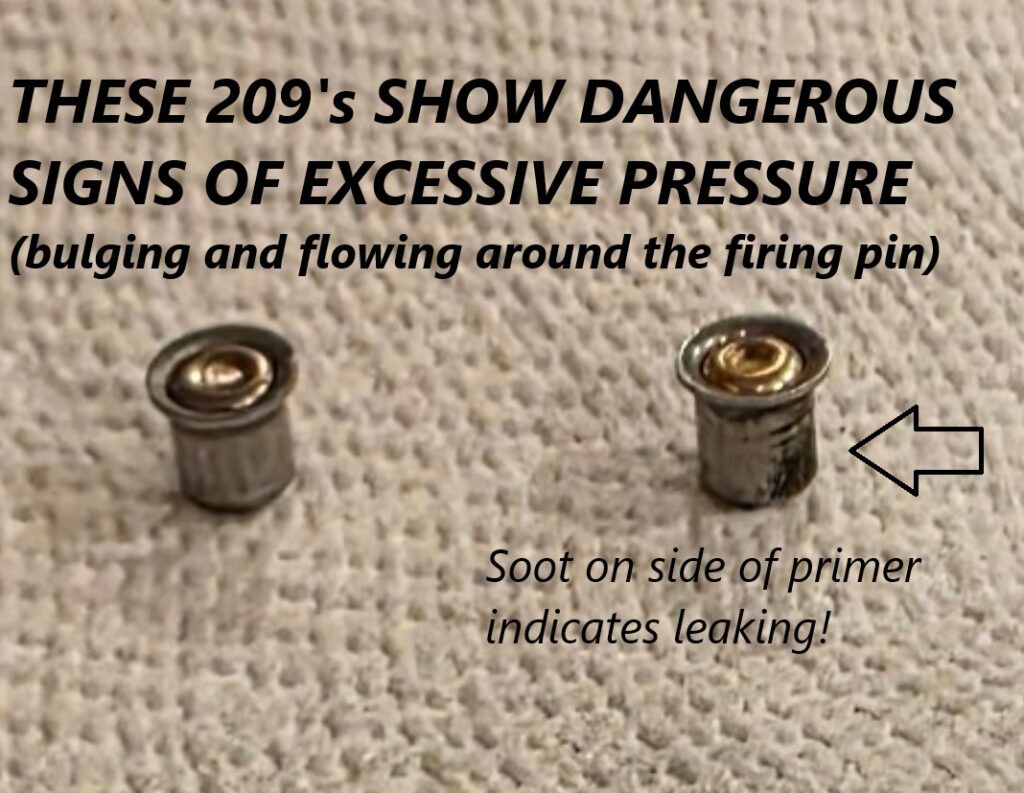
Poor primer seal can also be diagnosed by having soot or blow back on the sides of the 209 primers; only the primer’s face should have soot on it.

Remedies for proper ignition of Blackhorn209 powder:
— Change Primer: Use only standard shotshell, full powered, or magnum 209 primers with Blackhorn209.
— Seal Primer: full power 209 shotshell primer swaged & sealed properly into the breech plug; one should feel some resistance when closing the bolt only when there is a primer in the nose. This is because the primer is being swaged into & sealing the breech plug. Failure for the primer to seal is commonly caused by excessive breech plug tuning & poor primer fit. Correct by changing to a larger size brand of primers (European manufactured 209’s tend to have larger diameters), or purchase a new breech plug & do not over tune.
— Change projectile: Powerbelts, B.O.R LOCK MZ, Minet, Lubed conicals, Minnie-balls, etc do not seal until Obturated. Some clients report success using magnum primers with Blackhorn 209 & these sorts of projectiles (but we don’t recommend this). Use snug fitting saboted bullets or Hornady Bore Drivers with BH209!
— Change powder: Black Powder & its other substitutes will combust easily & work OK when not completely sealed; Blackhorn209 needs a good seal for proper ignition: USE SABOTS and a properly tuned breech plug. Just switching powders may work, but is not really fixing the problem. Sealing up the primer & projectile is required for Blackhorn209 to ignite.
Fired primer stuck in the nose: Dry-firing on any spent primers stuck in the nose loosens them for removal.
MORE DETAILS ON MAINTENCE AND INSTALLATION ISSUES CAUSING TROUBLE
Typically folks with these issues report that the system worked great until they cleaned their bolt… I’ve had a bunch of folks take their bolt apart and experience two types of issues afterwards: Bolt won’t go back in, or primers won’t reliably ignite. The two problems are due to poor maintenance and have similar solutions:

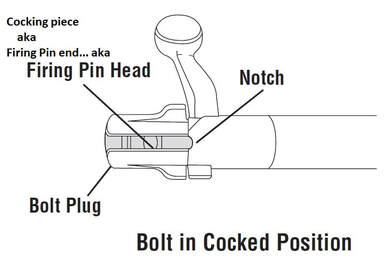
First things first! You have to understand the difference between cocked and discharged!
BOLT WONT GO BACK IN THE RIFLE: The bolt won’t go back in the rifle if its not in the cocked position!
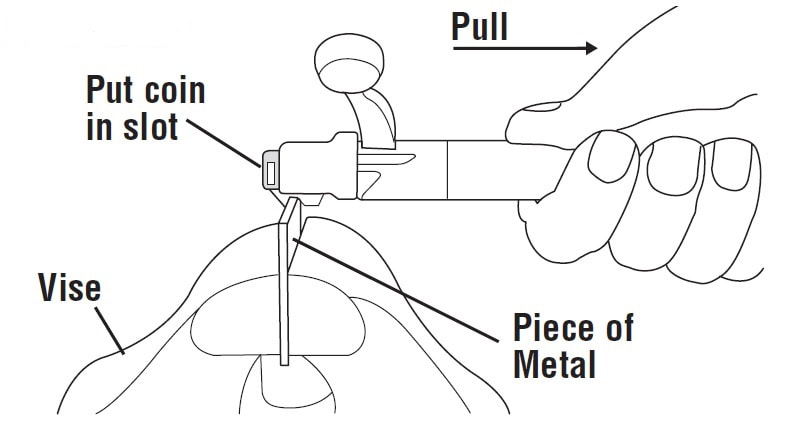
Before you can twist the firing pin to align with the cocked notch the firing pin assembly, you must first pull out the cocking piece and expose the coin slot. This compresses the main spring and requires something to pull against like a chunk of steel in a vise, or a boot lace.
Once the mainspring must is compressed, then the bolt plug can be rotated to align with the retaining notch in the bolt body:
BOLT NO LONGER IGNIGTING PRIMERS — THERE IS NO DENT, OR TOO SMALL OF A DENT IN THE PRIMER AFTER I PULL THE TRIGGER
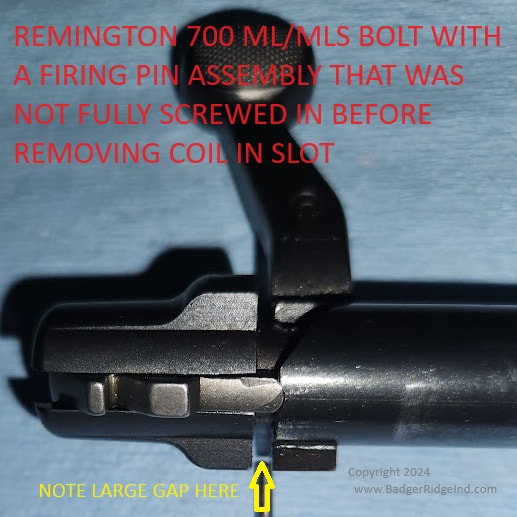
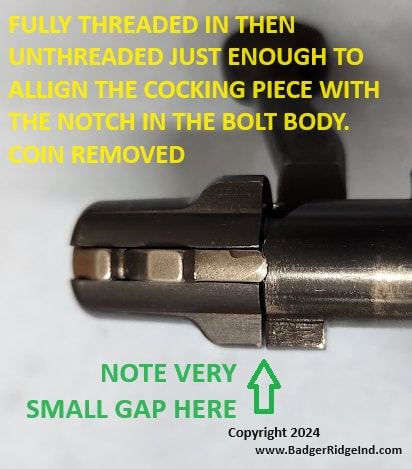
If you don’t screw the firing pin assembly fully into the bolt body and then unscrew it just enough to align the cocking piece (aka Firing Pin End) with the retaining notch, you won’t get full and proper protrusion of the firing pin.


THESE LAST ISSUES ARE COMMON WHEN FOLKS DON’T CLEAN THEIR BREECH THREADS BEFORE TRYING TO USE THE SYSTEM
WITHOUT A PRIMER IN THE NOSE, THE BOLT WON’T CLOSE – OR – BOLT IS DIFFICULT TO CLOSE — THE BOLT IS RUBBING ON THE BREECH PLUG — AGAIN WITHOUT A PRIMER IN THE NOSE!
First step: The nose is designed to have just a few thousandths clearance from the breech plug. Remove the breech plug, clean and inspect it, and clean and inspect the breech and its threads. Install and close the bolt without the breech plug in the rifle. If the bolt closes freely without the breech plug, then it was impinging on the the breech plug (go to step 2A). Also remember, using a blue sharpie to blue the face of the bolt can reveal where it is impinging on the breech plug. If the bolt is binding with the breech plug removed proceed to steps 4 & 5.
Step 2A: Ensure you cleaned all the crud out of the breech. 99% of the time, crud is left in the threads, and then pushes the breech plug back. This causes insufficient headspace between bolt face & the breech plug. Just because you can’t turn a breech plug doesn’t mean it is properly seated! Clean those breech threads! But I’m telling you: 99% of the time that the nose rubs on the breech plug, there is some crud keeping the breech plug from properly seating. A 20 Gauge bore brush is very effective at cleaning breech threads.
Step 2B: When the cause isn’t crud in the breech threads or damaged breech threads, the next most common issue causing the nose to impinge on the breech plug is: that the nose wasn’t fully, properly, and squarely pressed on. You shouldn’t be able to get any feeler gages between the nose and the bolt body… anywhere. If you can get a feeler gage in there, try pressing it fully and squarely on, or remove the nose, and clean and inspect for foreign matter preventing proper nose seating, and repress the nose on.
Step 3: If the bolt still binds on the breech plug after trying the two remedies above (2A & 2B): do not tune the breech plug, do not fire the weapon, contact us &/or take the firearm to a gunsmith. If you try both remedies above, we are willing work with you to figure it out. Start by applying black or blue sharpie (aka magic marker) to the entire breech plug and install it. Upon removal of the breech plug look for where the marker was rubbed off. Send us a bunch of pictures of it, and we’ll work it with you. Again, only after working through steps 1-2 should you try step 3: if something is binding and keeping the breech plug from fully seating, blue it and see where the marker is removed. If there is a fit issue between the breech plug and your rifle we’ll work with you to figure it out and “make it right.” This is less than .001% of the time… be sure to try the two remedies above! DO NOT FIRE OR TUNE A BREECH PLUG IF THERE IS BOLT BINDING WITHOUT PRIMERS!!!!
DO NOT PROCEED TO STEP 4 & 5 IF THE BREECHPLUG AND BOLT ARE BINDING (UNLESS THE BREECH PLUG IS REMOVED)!
Step 4: If there is binding while working the bolt (without the breech plug in the rifle) there may be a bur on the bolt (typically from misaligning the bolt stop screw during reinstallation). Remove any burs on the bolt, polish the bolt body if needed, and reshape the bolt stop screw nose as necessary. Sometimes there are burs in the action itself. Bluing the entire bolt body with a sharpie can show wear the bolt is rubbing in the action and help you find and remove burs.
Step 5: On some rifles, the bolt was always binding, then when we make it longer with the new 209 nose it really binds and won’t go all the way into the rifle. In this case, again, look for and remove any burs on the back end of the receiver. Then use a blue sharpie to dye the bolt, install and see where its binding (blue will be rubbed off), then buff those locations until the bolt feeds smoothly. You’ll probably find the bolt was already well worn in those same spots; adding the bolt nose just accentuated the rubbing further.
Installers must make sure the bolt works without any binding nor engaging the breech plug prior to tuning the breech plug or firing the rifle.
IF ANY OF THIS IS BEYOND YOUR CAPABILITIES TAKE THE RIFLE TO A GUNSMITH AND HAVE HIM CONTACT US!