Posted on Leave a comment

Slowdown! Let’s Get it Right! You’ll Need to Read & Understand the Directions!

This time of year our sales of sealed breech 209 muzzleloader accessories, breech plug vent liner retrofits, and conversions for the Remington 700 ML/MLS and Ruger 77/50 start to peak. Along with this I’ve historically noticed a trend of people rushing and not reading the directions. They then get upset and blame everyone else but themselves for their predicament. So lets slow our roll here, and go over a few things and all have a better experience.

BLUF (Bottom Line Up Front): If you want to have a good experience with our products, slow down for a minute, take the time to read the item’s listing, and the instructions. Click around and read the information at the links. It will be much better for all of us.

Common Questions:

Yes we are open. Yes we support old muzzleloaders with a variety of simple effective solutions. Yes we have 209 conversions and components in-stock and ready to ship. If it is listed on this website (badger-ridge.com): it is accurate. I.e. if the website says we have it in stock, we do. If it says you can back order it: we’re out of stock at the moment, but know and have it coming. Buy now , and we’ll ship it to you as soon as it hits our hands. Our old website is still up with directions to come here to make your purchase (because the search engines point folks to hit). But everything we sell is here! Buy with confidence.

However, we do need some time to process orders and things take time in shipment. Typically we process your order and ship the next business day. Sometimes we process and ship on Saturdays! (the details are on our Terms of USE webpage). However, if you check out and chose the free/cheap shipping, that is the slower shipping. So I don’t have much sympathy for folks who go cheap then complain it takes too long for the post office to deliver! Also cheap/free shipping is only insured for up to $100. So if you buy $200 in stuff from us, and it gets eaten by the post office, expect you’ll only recover $100. If you chose the cheap/slow shipping and it takes too long, its not our fault. Complain all you want, just don’t expect us to have much sympathy. We do the best we can to help you and get your order in the mail quickly, but we expect you to own your side while we do our best.

Animated Gif Loading primer in Remington 700 209 sealed breech

If you are in a hurry, you can upgrade your shipping (both class and insurance amounts). This just decreases the time in transit between us. It doesn’t jump you to the head of the line. We always help folks in the order the orders are placed, and do conversions in the order they arrive here to us. Also, 209 conversions of Remington and Ruger bolts takes about 4-8 weeks of time on my workbench (that’s measured by the day it arrives to the day it leaves). I often times beat that estimate by quite a bit, but sometimes I get overwhelmed with orders, hurt/sick, shop equipment breaks, etc, and need the time to get your bolt right! Please understand: The fall (hunting season) tends to be the worst because so many folks wait ’till then to send their bolts in a rush… and I hunt too!

That brings me to one of my most common contact form messages this time of year:


From: Any Dude * Date: Sat, Sep 20, 2025 at 9:39 PM
Subject: Badger Ridge Industries “Availability”

Message Body:
I need the 209 conversion kit for Remington 700 ML 50cal . I need it by October 1 do you have in stock ready to ship?


From: Badger Ridge
Date: Sun, Sep 21, 2025 at 11:39 AM
Subject: Badger Ridge Industries “Availability”

Yes,  all calibers are in-stock (just like the website says).  Will ship tomorrow (Monday) if you buy it today. Click the link below or here:

https://badger-ridge.com/product/remington-700ml-mls-sealed-breech-209-system/

As you seem to be in a hurry, you probably want to upgrade your shipping to priority mail.   Free shipping is Ground Advantage (slower than Priority).  

Yours,

Tom

www.Badger-Ridge.com

989 795 2526


But the real question is can he do it himself? How can he figure that out?

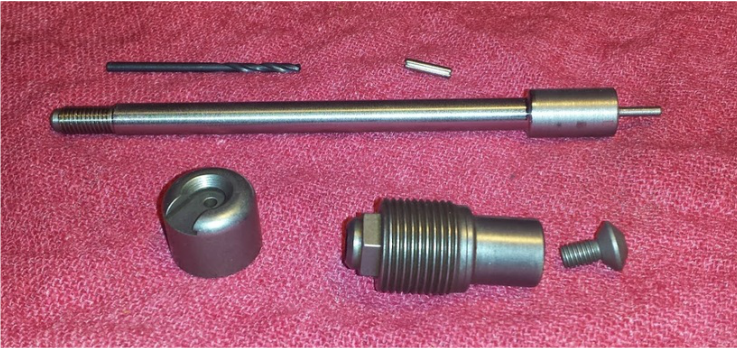
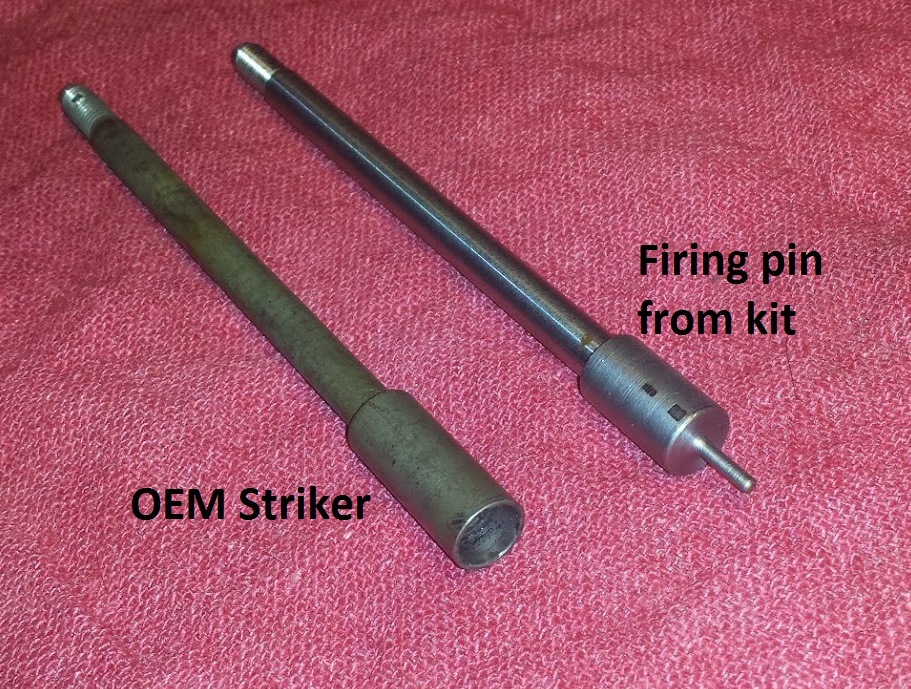
The best answer I know is to review the online installation guide here on our website, or download the PDF of the paper instructions we send with every kit, then decide. Do you have the tools and the skills show there? Do you have calipers and can you measure things to the thousandth of an inch? Can you file and shape a firing pin to thousandth of an inch specifications. When folks call me and ask such things these are the questions I normally ask them to answer for themselves. Answering for yourself heads off future issues. Though if you buy a Remington kit, and after it arrives you change your mind and want us to install it, you can purchase just installation and send the kit back with your bolt.

However, I didn’t even suggest reviewing the online installation guide, nor asked any questions to this latest contact, because in my experience he’s in too much of a hurry to slow down and consider these things. These same questions and answers are all over the website… why didn’t he read them? Clearly he doesn’t have the time to ship me a bolt and get it back, tune the breech plug, go to the range, and check his load/zero…. because he’s a week out from his dead line.

Unfortunately I’ve seen way too many times where this goes when folks don’t slow down and read the instructions… even when someone has enough sense to send me their bolt, or call on the phone… too many don’t bother to take a minute and read the instructions, or listen to good advice. Some are determined to rush down the wrong path! So, another common rush to get it wrong is not bothering to read the instructions after you get your bolt/kit. I spend most of my troubleshooting phone calls telling people the same exact things they should have read before they tried to shoot their new toy. I get being excited, but that is yet another sign to slow your roll and read the instructions. All the items below are in the Remington 700 ML Owner’s Manual or our 209 system’s instructions.

Here’s a topical list of common issues from rushing and not reading:

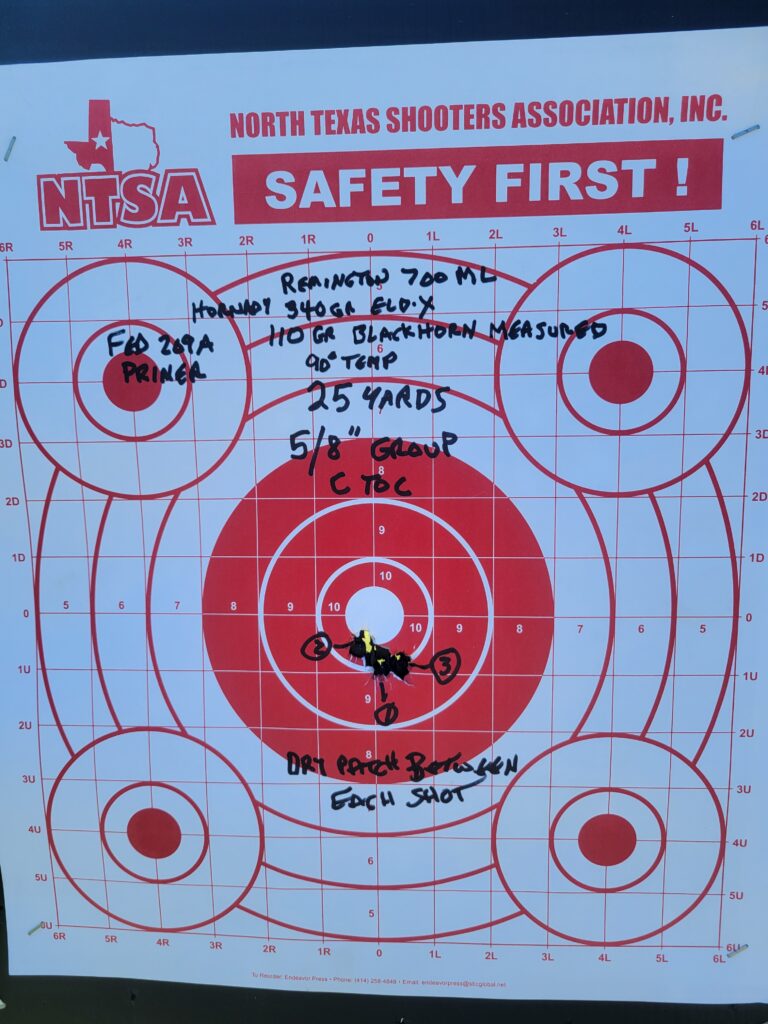
  • Misfires with BlackHorn209 powder
    • Typically folks are using muzzle loading primers in stead of full powered or magnum 209’s. It says it all over our instructions and the bottle of BlackHorn209 that you cannot used ‘muzzleloader’ primers as they are reduced power
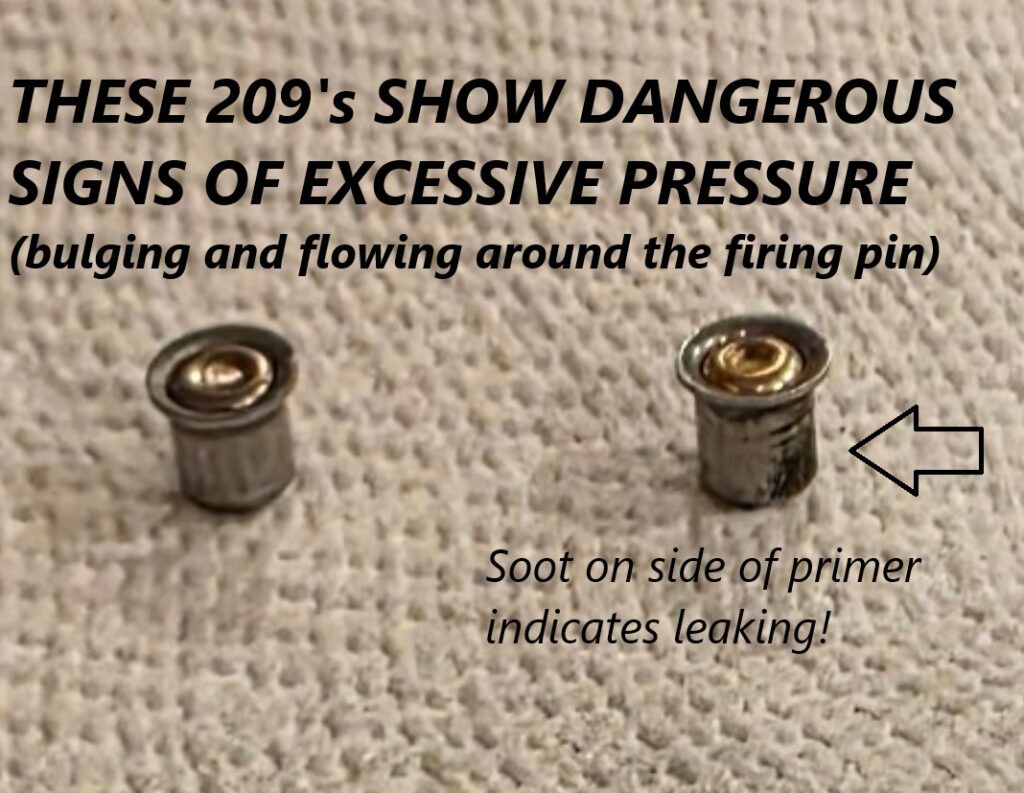
    • Some folks over tune their breech plug and get leaks down the side. BlackHorn209 won’t burn unless its totally sealed. That means at the primer and the projectile.
    • If its not the primer, the projectile maybe leaking. You essentially have to use saboted projectiles with BH209. However the new Hornady Bore Drivers seem to have a good enough base to work too (FYI I’ve seen these same Hornady Bore Drivers for sale at Walmart under the “Traditions” Brand as 309gr ELDX bullets). However PowerBelts, B.O.R. LOCK MZ, and most all conicals (aka minnie balls) don’t seal to start out, and won’t work with BlackHorn209
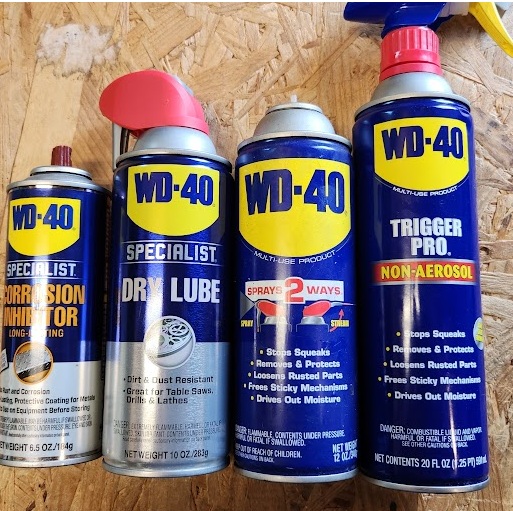
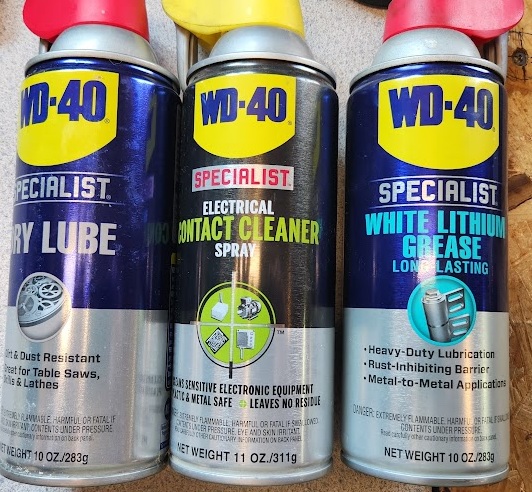
    • I’ve had folks not clean their breech plug, or leave grease and oils in the breech area too.

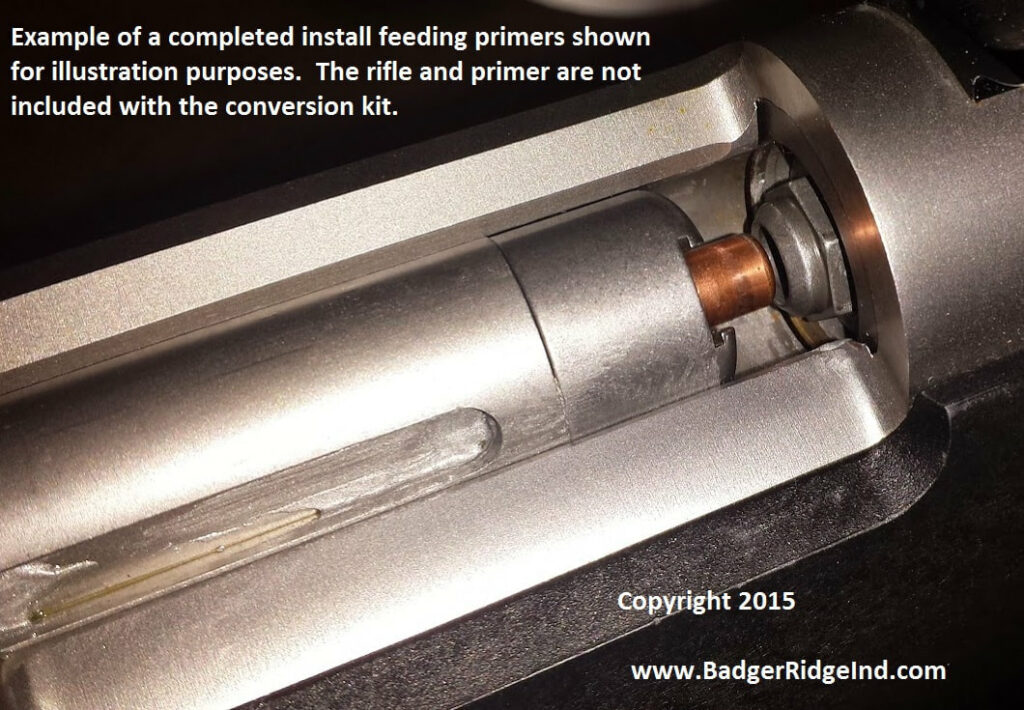
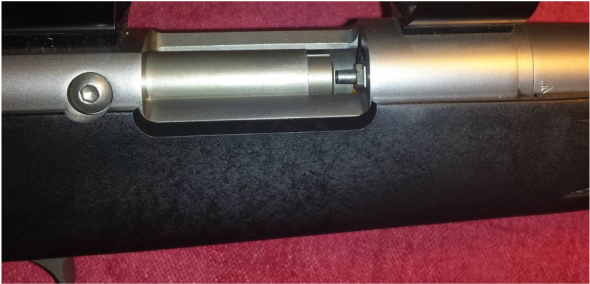
Some folks are convinced they are smarter than the rest of us. They just know better… like ignoring the warning to never fire the rifle without the vent liner installed:

These primers were shot in a rilfe that was way over tuned, leaked and the customer removed the vent liner thinking he’d fix it by ignoring the warning in the directions.

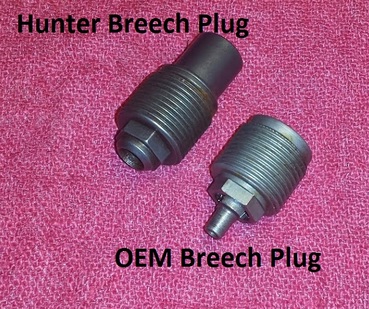
Or that they can just blindly ream the breech plug out and make it really easy to close the bolt (instead of tuning the breech plug to lightly squeeze primers when the bolt is being closed (this light squeeze achieves our primer seal and has to be set for each rifle/breechplug/primer combination)

Properly sealed discharged 209 primers
Properly sealed discharged 209 primers, this is what a fired 209 primer should look like
Diagram of Remington 700 Bolt showing firing pin assembly in cocked position
  1. I’ve had a bunch of folks take their bolt apart and have ignition issues afterwards. Normally its a “It worked great, but after I cleaned it, the firing pin won’t hit and ignite primers.” or “The bolt won’t go back in the rifle” They swear they know what they’re doing but this stuff is straight out of the Owner’s Manual!
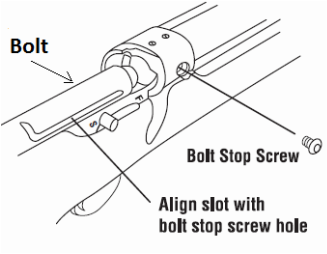
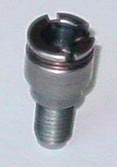
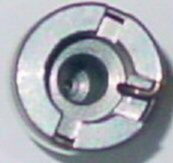
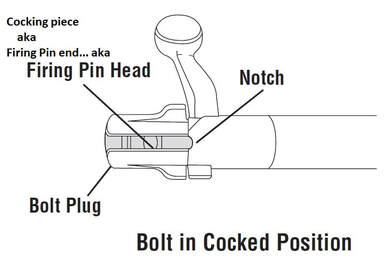
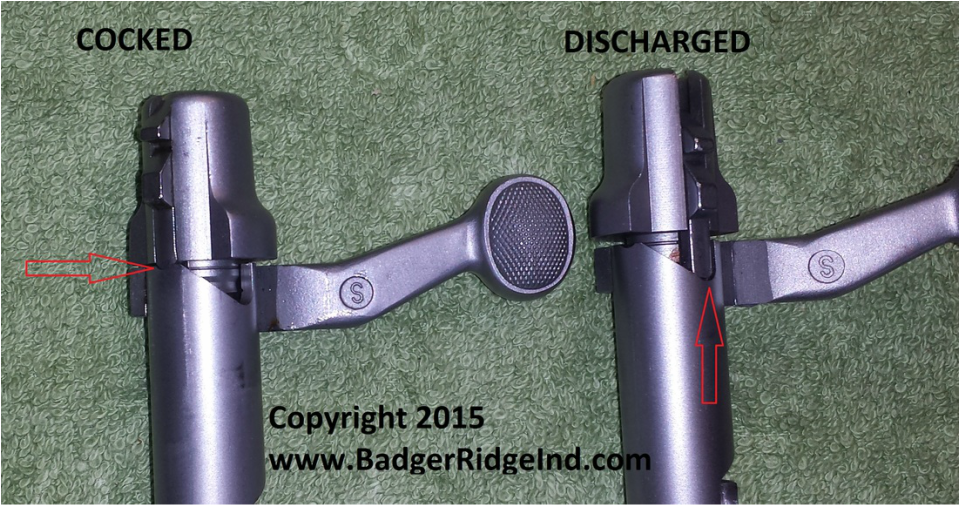
    • If you don’t screw the firing pin assembly fully into the bolt body and then unscrew it just enough to align the cocking piece (aka Firing Pin End) with the retaining notch, you won’t get full and proper protrusion of the firing pin
    • The bolt also won’t go back in the rifle if its not in the cocked position
2 Remington 700 bolts comparing cocked to discharged

I don’t want to sound like I don’t appreciate our customers. That’s far from the truth. This only applies to less than 5% of our customer base. But these same 5% are the ones constantly needing more attention and resources. But most of that 5% will take instruction after they’ve had trouble, and appreciate it when you help them. What really drove me to write this is the few really bad apples in that 5%… probably less than one percent. This bad less than one percent refuse to acknowledge their short comings and blame everyone else.

Then I realized that some of this knowledge and help was lost in the move to our new website. So I moved it this new site you are reading now at this new page: Troubleshooting our Remington 700ML 209 sealed breech system

If you need more help, please review the owners manual, the installation instructions, web page of installation instructions, and owner’s instructions provided with the kit, and then go to our 700 ML resource page and work through all the information there. It’s probably in black and white and can help you if you have internet access. That said: Go ahead and call, ask, submit a contact form, email… whatever, we’ll help you. We don’t mind, and are totally ok with helping you.

Posted on Leave a comment

Satisfied customer wrote in

We love to help. We especially appreciate positive feedback.

Moving to this new website , we are the same people that have been providing the same solutions, we’ve been separated from our old reviews and blog posts. So when Gary O from Texas wrote in with praise and a picture of a target, I asked if we could post it here (he said yes).

Hi Tom,
Just wanted to let you know how happy I am with your closed breech Kit for my Remington 700ML. Sent you the bolt and got it back and it works great. Sending pictures of 3 rounds fired after sighting in the rifle. No blow back. I am sure that a better trigger will tighten up the groups even more. Next trip out I will shoot at 100 and 200 yards. Thanks for a great product.

Gary O
Flower Mound, TX

If you need help with your Remington 700ML or MLS rifle, Ruger 77-50, Savage 10ML-2 or 10ML, or have a 209 inline muzzle loader that shot great at first but the groups have opened up, check out the infromation on our website, give us a call at 989 595 2526, fill out a contact form, or go to our products and we probably offer something that can help you too.

Posted on Leave a comment

Getting ready for Colorado Muzzle-Loader season?

We’ve been selling and installing our great 209 conversions for years now.   And I’ve noticed my questions and sales following trends influenced by the various hunting seasons and their associated rules.   This time of year many folks are getting ready for Colorado’s muzzle loader season, typically focusing on harvesting an elk.   So annually, I edit and re-post this entry.   The commentary here was also added the to the FAQ (Frequently Asked Questions).

Rem 700 MLS feeding 209 primer into sealed breech - close up
Close up of Remington 700 MLS feeding 209 primer into sealed breech

FAQ Entry:

Q:  I hunt in Colorado, sabots are not allowed for hunting during muzzle loader season.   I want to use your awesome 209 conversion, but you say you recommend sabots with jacketed handgun bullets.  What are my options?


Animated Gif Loading primer in Remington 700 209 sealed breech

 A:   Short answer is our kit will work great with any projectile.   The issue is not all powders work with all projectiles. I’ve found Pyrodex, Triple Se7en, and black powder work best with non sabot projectiles.  So I suggest that you use our kit and any muzzle loader safe powder (besides BlackHorn209) for your  Colorado hunts with Colorado legal projectiles.

UPDATE TO ADD:  Some folks are reporting good results with the new Hornady Bore-Driver bullets.   They have a substantial plastic base on them that seems to seal well and function with BlackHorn209.  You may want to try it out yourself.

Long answer:

I realize not all 50 state have the same rules.  And some state’s rules are just plain silly.   I wrote a blog post about that.

The main thing to remember here: the powder you chose must be compatible with the  projectiles you use.

Our kit will seal the breech, which keeps the crud out of the bolt and action no matter what muzzle loader safe propellant you chose.    Our kit is compatible with all muzzle loader safe propellants:  pellets, loose powder, etc.  Also using 209’s will give you more ignition heat and thus more reliable ignition over caps.  And seeing our system keeps the crud sealed into the breech plug, the 209 is ignited reliably too.  But the powder and projectile choice is up to the shooter.  Read the manuals/instructions and follow them when developing loads. Blackhorn209 powder is different from Pyrodex & Triple7even: To be reliable BlackHorn209 needs to be fully sealed; i.e. sealed at the breech (which our kit does), and sealed at the projectile.    Minnie balls, minet, power belts, B.O.R. Lock MZ and other easy loading projectiles that are legal for Colorado muzzle loading, don’t usually seal until the powder combusts and forces them into the grooves.   This deformation sealing the bore after combustion is called obturation.    The problem is BlackHorn209 doesn’t burn well until it’s sealed and can build pressure.  So it’s likely to have bloopers, miss fires, and hang fires with obturating projectiles.  Sabots seal well to start, thus if you are using BlackHorn209, it’s recommended to use sabots. 

Though the new Hornady Bore Driver bullets are reported to seal well and work with BlackHorn209, I haven’t tried them myself.

Never use smokeless powder in your Remington/Ruger!   It says it right on the barrel!

Because Colorado doesn’t allow sabots during the muzzle loader seasons I would stay away from Blackhorn209.  (or with a lot of trial, I may try the Hornady Bore Drivers).

Otherwise, If I was hunting in Colorado, I’d use our kit, choose a heavy projectile (250gr or more) that seals on ignition: Hornady BoreDriver, Thor, minie ball, lead conical, etc.   But without a lot of testing, I wouldn’t use BlackHorn209;  I’d try Triple7even, or Pyrodex.  Although they are not as easy to clean, and will foul the barrel, they are very easy to ignite even when not sealed, and will obturate the projectile and push it down the barrel forcefully.  

Black powder will work just fine with these sorts of projectiles too. I do have a few clients that report success with Blackhorn209 and magnum primers (CCI 209M or Federal 209A) using Hornady FPB’s or its aforementioned replacement: Bore Driver… and also with Thor bullets.  I also had one that said the Thors worked well at the range, but didn’t fire when he had a nice bull in his sights.  He said it was extremely chilly that morning, his rifle was cold soaked, and the Blackhorn209 wouldn’t go bang.  He was very frustrated.  

I suspect it was because the projectile shrunk with the cold, and the copper jacket wasn’t quite as malleable.  Also cold powder is just a bit harder to get burning, and thus that setup was unable to obturate the looser projectile and keep the BlackHorn209 burning. Thus without a lot of testing (like putting a loaded rifle in a freezer, pulling it out and shooting the combo… repeatedly).   I would stick with Pyrodex or TripleSeven for Colorado muzzle loader hunting: they will go bang with an obturating bore riding projectile when you need it, even when it is very cold.

Outside Colorado, Idaho, and Oregon, I recommend sabots because they have been accurate, easy to load, and jacketed hand gun bullets have always been very effective for me.   Whatever powder you chose, the velocities your muzzle loader will produce are essentially the same that good jacketed handgun bullets are designed for.   They tend to kill quickly and bring home game.   Sabots are allowed in most states, so that’s what I usually recommend.

Long-term:  If I voted in Colorado, I’d pressure my legislature to change the muzzleloader rules.   Removing the most effective projectiles (jacketed handgun bullets are great in muzzle loaders), and the most modern muzzleloading propellant (Black Horn 209) from use is bad for the game receiving the projectile.   I believe the no sabots rule promotes wounded/lost animals.


Posted on Leave a comment

When WD-40 isn’t WD-40 it can be really good

For this installment of the Badger’s Den, I’d like to discuss WD-40.

But first, let me assure you: We are the same people delivering the same simple effective solutions as always. So if a web search brought you here looking for solutions for your muzzle loader, gun cabinet/safe storage & organizers, tool organization, etc. You are in the right place, and probably just a click or two away from finding it (try one of the links in the prior sentence), or try the menu in the side bar (if you are on a desktop computer… or scroll down if you are on your phone). Or just click here to go to Our Products.

But I hope you stick around and read my thoughts on WD-40.

What is WD-40? Now-a-days, that’s a tricky question. For many years, WD-40 was just the light oily stuff in a blue and yellow can that seemed to be on the shelf in every store. It got used on everything. And it got a bad reputation for drying out and leaving a cruddy crust that seemed to jam stuff up more than fix or lube it.

But now-a-days, WD-40 is still that same oily stuff in a can, and it’s a company, with an entire “WD-40 Specialist” product line. To keep it simple for this post, I’m going to address “Traditional WD-40” as just “WD-40.” The “WD-40 company” will be called “WD-40 company”. All the other “specialist” products the WD-40 Company sells, will be addressed by what I commonly call them: “WD-40 Dry lube” “WD-40 Corrosion Inhibitor” etc.

We don’t sell any WD-40 company products. But I use four of them, and you might too. Seeing they are available just about everywhere, effective when understood, and typically reasonably priced, it’s understandable that you’d have some on the shelf and use it. But the question is, are you using it correctly?

WD-40 actually does stack up ‘OK’ against many other products commonly used in automechanics: grime removal, rust penetrant, etc. It’s rarely the best, but it’s typically OK.

When it comes to guns, if you listen you will find lots of different opinions on WD-40’s usefulness. Many will have horror stories, and tend to be negative. You probably heard stuff like: “Absolutely never use WD-40 on a gun.” If you did a little research you’d find statements claiming WD-40 products are in use in most gunsmithing schools. Can both be true? Is there more to this?

I get to talk to a lot of folks on the phone as part of our business. Some folks hate all things WD-40. They usually have a story that goes along with it. I sometimes ask them what they mean when they say “WD-40” there’s so many cans with that logo on it now, that it can be confusing. I usually keep it simple with them and tell them I used WD-40 all the time, but:

Traditional WD-40 is never the only thing, nor last thing I use on any firearm component!

WD-40 products
WD-40 products I use regularly

Let’s start our discussion with the Traditional WD-40. My understanding is that:

  • WD-40 was formulated as a “Water Displacement” product while trying multiple formulations, and as it was the 40th formulation that was tried, it was named WD-40.
  • The US Air Force was the largest of WD-40’s first purchasers. The USAF prescribed it as a metal treatment for it’s Titan Missiles. It was rubbed on the outer bare stainless steel skin to protect it from corrosion. On things like missiles, paint has weight and weight adds up. The missile can fly farther with a heavier payload the lighter it is, so they omitted paint and had the missileers rub them with WD-40.
  • The Air Force guys got used to using WD-40 elsewhere and also seemed to be in the habit of bringing it home and using it on more stuff there. They wanted to buy it commercially, so it hit the shelves. It got used on all sorts of mechanisms, and became the ubiquitous can of lube on most folks shelves. WD-40 became so universal, that the company that made and sold WD-40 changed it’s name to “WD-40.”
  • Please note: Traditional WD-40 wasn’t specifically designed as a lubricant, nor a penetrant. However it does seem to work pretty well in those regards… at least until the carrier evaporates and leaves a crusty crud that can jam up mechanisms.

So what does this mean for us gun owners? To me its pretty simple: I use WD-40 to clean crud off guns all the time. I find it especially useful in neglected black powder rifle bolts (something I work on regularly). If one of my guns takes a dip in the water, or hunts in the rain, I’ll hit it heavy with WD-40 too. But WD-40 is never the only thing, nor the last thing to touch one of my guns.

And again, I’m talking traditional WD-40 here. I see it as an effective, inexpensive way to remove moisture and heavy grime. Once that is gone, I remove the WD-40 with something else, and then lube and protect with a final more expensive product designed for the job: like gun oil (Rem-Oil, CLP, etc).

WD-40 specialist products
Three useful WD-40 specialist products

Don’t confuse WD-40 (traditional) with the Specialists. The “Specialists” are entirely different animals. Like WD-40 the “specialists” are reasonably priced, and readily available. They have specialized focuses. I use two of them daily, and pretty sure I have a third & fourth on the shelf too.

Mostly I use WD-40 Specialist Dry Lube. I use it often to remove the Traditional WD-40 I just doused something down with. The evaporative carrier in Dry Lube does a great job of carrying everything left behind away, and leaving it dry but lightly lubed with small PTFE balls. This dry lube feels slick, and leaves a surface that won’t attract dust, hold grime, and most of all doesn’t gel in the cold. I love to clean out shotgun magazine tubes with WD-40 Dry Lube and let it stay slick for feeding shells. Gun actions, trigger packs, and the interior of bolts get heavy doses of Dry Lube. The grime is allowed to float away. Then these mechanisms get drops of gun oil (Rem-oil/CLP) or small dabs of grease where needed.

Like it says on the Dry Lube can: this stuff works great on things like table saw blades, miter saw blades, and other stuff you want to keep dust free. I’ve seen a noticeable difference in how my saws cut after applying a little bit of it.

When I get metal that’s exposed or I need to store something and not worry about corrosion, I’ll hit it with WD-40 Specialist Corrosion Inhibitor. Frequently old antique guns that get stored more than shot, get cleaned, get whipped down with the WD-40 Specialist Corrosion Inhibitor, and then put away. The stuff is pretty greasy. So If I’m going to shoot a gun I coated with Specialist Corrosion Inhibitor, I remove it and lube it properly with standard gun products. But that gun stays lightly coated with the Corrosion Inhibitor most of the time its in storage.

Small metal parts that I stock and sell get hit with Corrosion Inhibitor too. If you buy something from us, like Small Ruger Screws, they will arrive with a light coating of this stuff. I don’t use the corrosion inhibitor everyday, and maybe there is something better out there, but I’m still working through my first can of the stuff I bought a while back.

The third type I have sitting around is Specialist Electric Contact cleaner. I’ve used it to blast gunk out of automotive electrical connectors & parts.

The fourth is the white lithium grease. It doesn’t seem special compared to any other white lithium grease I’ve used. While I have a bunch of dry lube cans, I only have one of the inhibitor, the contact cleaner, and one of the white grease.

So is WD-40 good or bad? Well what WD-40 are you talking about? What is the application? I’d say WD-40 company products, are pretty good values, when you understand them and use them correctly. Like anything: if you want success, you need to be smarter than what you are operating. Start by reading the instructions!

The gallon can I refill my “trigger pro” from

Are the Specialists the best at what they do? Maybe? The real question to ask is, “Are they effective enough and can you get your hands on them?” To me those are both “YES” answers, so I use them.

As a farewell, I’d like to point out that I rarely buy and use the aerosol version of Traditional WD-40. I get the “trigger pro” and refill it from gallon jugs. The trigger pro can seems designed to prevent refills, so it does take some creative use of pliers, exacto knives, and funnels. I cannot find a more simple effective affordable manner to clean all the grimy Remington 700 ML/MLS bolts sent to me. But those same bolts never leave with just Traditional WD-40 on them: its all Dry Lube, a drop of oil, and 3M molybdenum disulfide grease when they go.

Traditional WD-40 is never the only thing, nor last thing I use on any firearm component!

Posted on 1 Comment

THE REMINGTON 700ML/MLS, A JEWEL IN THE ROUGH; Can you make it shine? (PART 2)

Originally posted at our old website on 4/23/2015

THE REMINGTON 700ML/MLS, A JEWEL IN THE ROUGH; Can you make it shine? (PART 2)

4/23/2015

Excerpted from Remington 700ML Owner’s Manual

Can You Make It Shine?  Yes! and Here’s How!

In my last post in The Badger’s Den I detailed how my first encounters with a “Canadian 209” modification on my Remington 700 MLS and subsequent years left me disappointed.   I knew the rifle could be more.   Over the summer of 2012 I began a journey through forums of dedicated muzzle-loader enthusiasts to find that there was a better solution; I just didn’t know about it.   The solution was a bit buried in forums full of customization, tinkering,  some bad ideas, and dead ends.  I hope to spare you all the details, cut to the chase, and share with you the product that has finally let me love my 700 MLS. 

The kit I found and fell in love with was developed by a guy named Fred, who sold it on a few dedicated muzzle loader forums.   It was called just a bolt nose kit.   But what we offer is more than just a bolt nose,  ours is the complete kit.  So here at Badger Ridge we call it the “Hunter Remington 700 ML/MLS 209 Conversion Kit, by Badger Ridge”. 

Close up of feeding a 209 primer into the kit’s breech plug

First let me truncate and summarize years of posts over many forums and years of development:   Fred developed the kit to modify the OEM Remington 700 ML/MLS black powder muzzle-loader to work properly with 209 primers.   At first he made the parts for himself and a few friends. Then the friends started sharing on the forums their success and general pleasure with the kits and from there it grew.   Then people started tinkering with smokeless modifications to the 700ML/MLS.   That required a barrel swap and and the original bolt nose was too short for the breech plugs that fit the smokeless barrels, so a second bolt nose was made just a bit longer and was called a “Smokeless” like the one you see below the OEM and the smoker, but…  ah… well I promised to keep it simple… and now I’m rambling… so  I’ll explain the “smoker” (standard black powder) modification kit we sell.  

Like I said, I’m just going to focus on making your “Smoker” work.   I suggest you keep it simple as well, and leverage the work and info I’m putting in this blog and my reference section… and end up with a great black powder rifle without breaking the bank. 


FINALLY THE WAY THE 700 ML/MLS SHOULD BE!

A Remington 700 MLS with the Hunter-Badger Ridge 209 Conversion Kit
Longer nose developed for Smokeless barrels (.085 longer than the smoker)

The long-nose above is only for use when re-barreling. We don’t recommend re-barreling and thus you won’t read much about long-noses.

Leaky Breech, OEM Remington 700 MLS

Leaky Breech, OEM Remington 700 MLS above. Note the percussion nipple. The Badger Ridge Remington 209 Conversion Kit is all you need to modify your 700 ML/MLS to use 209 primers without blow back, no special tools to carry in your possibles bag, and it protects the primer from weather (without plastic shrouds to lose).   Any questions?  No?  Good, Now rush off to Our Products and buy it!   Oh, wait you got questions… OK so read on:

Badger Ridge’s Remington 209 Conversion Kit

Back to what makes this 209 conversion so great:

Those familiar with the successful Savage ML-II may recognize some of it’s innovative features applied to the Badger Ridge Kit.   First should be the bolt nose.  

The original 700MLS bolt -needs- our bolt nose placed over the bolt body.  Its a firm press fit that is also held in place by by friction (you can also add loctite if you wish). It won’t move on you (unless you put a torch and a wrench to it).   The nose holds the primers firmly in place and ‘feeds’ them into the breach plug.  It works a lot like a single shot rifle, except you slide the primer into and out of the bolt nose.  No back pressure will be able to push the primer back and blow combustion gases all over the action because the bolt nose holds it firmly into the breech plug. 


Badger Ridge/Hunter breech plug above OEM with #11 percussion nipple

Next is the breech plug.   The original Remington breech plug was designed for percussion caps, not 209 primers. So with this kit the original breach plug is removed and discarded.  The kit’s breach plug is used in its place.   The kit’s breech plug is noticeably longer with a nose that protrudes in to the barrel. Thus a specific breech plug is required for each caliber; each kit is caliber specific. The longer length (and larger internal diameter) creates a much larger ‘flash chamber’ that allows the 209 primer to reach its maximum effectiveness with minimum blow back through the breech plug.  And even so, the flash chamber is sealed by the primer so that it functions as a sealed breech system; the primer keeps any blow back inside the flash chamber.

The kit’s breech plugs have the hole for the primer purposely tight.  This is so that it can be ‘tuned’ to the particular brand of primer you choose.    See the info in the references section for more info on tuning your breech plug with a letter “C” drill bit.

Also your OEM breech plug wrench (or a 7/16 socket on an extension) can remove or install the kit’s breech plug.  So no new or additional tools are required.

Breech plug with vent liner

vent liner is threaded into the end that abuts the powder charge.   A vent liner ‘focuses’ the fire made by the primer into the powder charge.   As the vent liner receives a lot of heat and pressure, it erodes over the course of many firings, however it has an 7/64 Allen head that allows removal for cleaning, inspection, and periodic replacement.  We provide a 17-4 Stainless vent liner with each kit.   The is regarded by many as the best and is interchangeable with the Savage.


A Real Firing Pin!!!

Finally we get to the firing pin.   Yes it is a real firing pin.  I couldn’t make myself call the OEM nor the Canadian 209 mod’s anything but a striker.   The OEM striker is removed and replaced by the kit’s firing pin.   The kit’s firing pin is purposely too long; it will need to be shortened to the proper protrusion and shaped to properly discharge a primer without piercing it.  Every kit’s firing pin requires fine tuning to the individual bolt.   

OEM striker next to Badger Ridge/Hunter firing pin

DIY or pay us?  You choose!

The bolt modifications may be something you do, something you have a gunsmith do, or you can just send us your bolt and for an appropriate fee we’ll do the bolt modification.  If you choose us, all you’ll have to do is purchase the kit with installation, mail us your rifle’s bolt, we’ll do the modification (we always replace the main spring with a new one) and send it back with a new breech plug and vent liner (see this installation service page for the details).  Once you get your bolt, all you’ll need to do is assemble the rifle per the Remington 700 ML owners manual (You may need to tune the breech plug with a letter C bit to feed your choice of primers). 

For you bolt mod Do-It-Your-Selfers, you’ll need to drill a hole into the new firing pin during the installation (a bit is provided in the kit), and install the cross pin to hold the firing pin in the cocking piece/firing pin guide.   In-case you lose the original bolt’s cross pin, a spare roll is included in the kit as well.   You will also need a vice with jaws that open at least 6 inches, or a hydraulic press, and the ability to file the firing pin to tolerances held to 5/1000ths of an inch.   

A detailed Instruction guide has been posted to the 700 ML resources page.

Start making Gems out of rough stones!

Our Remington 209 Conversion Kit alleviates blow back by solidly holding the primer into the breech plug.  It improves the accuracy and the performance of the 209 primer by using an improved breech plug, it promotes longevity by using a common replaceable, inexpensive vent liner, and strikes the primer with a real firing pin.    Now you can turn that rifle you couldn’t give away into a real performer.   

So get that old 700ML out from the back of the closet and breathe new life into it with our 209 system! Or when you are walking through the local gun shop and see the lonely 700ML/MLS sitting in the corner with the discount sticker on it, go ahead and pick it up.   You know how to turn that rough stone into a gem.

Soon in The Badger’s Den,  I’ll get on my stump about the only powder I shoot in my 700MLS: BlackHorn209

Posted on Leave a comment

THE REMINGTON 700ML/MLS, A JEWEL IN THE ROUGH; Can You Make It Shine? Part 1

Excerpted from Remington 700 Manual

Can you make it shine? YES! BUT FIRST YOU NEED TO UNDERSTAND THE PROBLEM AND YOUR OPTIONS

In 2002 I returned from a 3 year overseas tour.   I started my new job as a flight instructor and I started back into my old ways of hunting, fishing, and tinkering with guns.   My dad, ever so generous, gave me a muzzle-loader he picked up on the cheap.   Remington made a muzzle-loader based off of their bolt action center-fire model 700.  The blued steel version was called the 700ML.  The stainless version, sometimes called the magnum, was the 700MLS.  The benefits of converting a center-fire design to a muzzle-loader were obvious to me:

  1. Center-fire rifles typically have faster lock times
  2. It could use standard Remington 700 short action rings and mounts, and some other accessories
  3. It had a good trigger (for a factory rifle)
  4. It resembled the bolt action rifle I used the rest of the deer season
  •  The safety was in the same spot.
  •  The stock was pretty much the same
  •  Though it was a single shot, the bolt worked the same as well.

Before I ever fired it,  I read the owners manual, scoured the internet, read forums, and consumed every bit of information I could find.   I poured over ChuckHawks article after ChuckHawks article. They were not very kind to the 700ML.  I found most who had used the 700ML/MLS had high hopes going in but found it had less than desirable attributes as a muzzle-loader.    Hence why my dad was able to pick one up at such a low price.   The biggest problems I noted during my research:

1- #11 percussion caps are not as reliable and hot as 209 primers.

2- The bolt was held in by an Allen head screw with an un-threaded tip.  It was easy to miss align, mangle the bolt and have a hard to work bolt.

3- Burning powder blows back through the percussion cap and into the bolt and action 

(note 3 happens on side locks too, but the orientation of the lock and simplicity of the hammer make it less significant)

Black powder residue is corrosive.  Blow back throughout the action caused the shooter to have to remove the bolt, disassemble and clean it after shooting the rifle.   Failure to clean would certainly result in corroding the striker, spring, and inside of the bolt.   Blow back got all over a scope, and some of the blow back could get into the trigger as well.   To clean that, one had to remove the barreled action from the stock.  This meant that one could possibly shift the zero after every cleaning.  I had doubts as to how much, and made sure I used a torque wrench on each action screw.   I then scribed a mark on each screw so that I could put them back with in the same tension after a field cleaning without a torque wrench.   I didn’t know what more I could do.   I wasn’t to concerned: I’d know if that was going to be a problem after a few range sessions.

The Savage design was taking over the market in the center-fire modified to muzzle-loader rifle.   It had all the benefits and addressed some of the problems I had read about.  But I had a free 700MLS in my hand and a desire to tinker.  I knew I could and had to modify it.  

I took the burs off of the tip of my Bolt Stop Screw with a file, and used a stone to work away the burs and abrasions on the bolt that I made when i misaligned and tightened up the screw.   I lubed bolt and the slot the bolt stop screw rides in with anti-seize grease.  No problems now,  check off #2.

I also knew I had ‘better’ options than black powder.   My dad had always used Pyrodex in his traditional side locks.   I further researched and decided on Hodgdon Triple Seven.   It was available in pellets and granular powder.  It also was reported to be ‘less’ corrosive than black powder and Pyrodex, but still corrosive.   I was suspicious of the claim of being “less corrosive” as a possible sales pitch.   But when I realized Hodgdon made both Pyrodex and Triple Seven I wasn’t as worried; they had a solid reputation.  I chose the granular powder because it was cheaper and allowed me to work up a load in smaller increments and see what my rifle would shoot best.  For bullets, my research pointed me to MMP sabots and jacketed 45 caliber handgun bullets.   I bought rings and put on a solid 4×32 scope. 


The thing that really needed to go was the #11 percussion cap system.   So off I went on my internet search to find a 209 modification for it.    And at that time the pickings were slim on conversions (and still are).   I found and purchased online what I’ll call a “Canadian” 209 kit.  There really wasn’t any other 209 options.  The kit came with a special tool to remove and replace the firing pin/striker with the included striker.  It also had a new main spring, a 209 nipple to replace the #11 percussion cap nipple, and a fork to install the nipple and remove fired primers.   Once I got the kit, I followed the instructions and I thought I had it whipped… but I really didn’t. 

I went to the range and followed the Remington 700 ML/MLS Owners Manual as I worked up loads.  I found that my rifle shot the best at 80 grains.  Also there was still a bunch of blow back even at low charges, that worsened as I stepped up the load.   As charges increased I started to find fragments of primers in the cavity around the primer holder.  So, for many years I used 80 grains of Triple Seven, black MMP sabots, and .451cal 250gr Hornady XTP bullets.   I deformed primers and had blow back, but the rifle was accurate at 80 grains.  It was the best I could make of it; hotter loads weren’t an option.  

I killed deer, cleaned the rifle, set the screws back to their scribe indexes and had no problems with point of impact shifts.


MY FIRST ATTEMPT (Canadian kit) WAS LESS THAN I HAD HOPED

Leaky Canadian 209 nipple (fail)

I was disappointed with the amount of blow back I was getting, and the labor it took to take the rifle apart and clean it.  I was always a bit worried I missed something in the bolt and would have a failure to fire at a critical moment… say when the shoulder of a Boone and Crockett trophy was in the cross hairs.   Also, after shooting a deer, gutting it, and hauling it out of the woods, I was beat.  The last thing I wanted to do was tear down a rifle and clean it.  But I did.

I had to understand what was happening with the ‘Canadian’ 209 modification if I was going to do better.    The replacement firing pin ended with a large cylinder that had a nipple that fired the primer.    The ‘Canadian’ kit used the original OEM breach plug, but had the replacement 209 nipple threaded into it.   It was a bit tricky to get a primer in and the kit came with a fork to remove the spent primer that was also the wrench to snug up the nipple into the breech plug.  Extra tools to carry in the field didn’t sit well with me, but I put them in my possibles bag.


Leaky Canadian 209 nipple (fail)

There was a small slot across the face for the fork to engage and a large cut out in the side for a spring to hold the primer in place.  When cocked to fire, there was a gap between the striker face and the 209 primer. Nothing held the primer in place besides the spring on the nipple.  Also the primer was exposed to the weather unless I used the OEM plastic cover.   I had read that the weather shroud was not to be used with 209 primers somewhere, and had entered the land of operating outside the manual.

When the rifle fired, the striker sprung forward and struck the primer. With ignition came large pressures that blew the primer out and back against the face of the firing pin.   With the firing pin being only held against the primer by spring pressure, the primer moves aft, unseats, and sprays blow back when discharged.   Not to mention the nipple holding it was slotted so that pressure could blowout the three slots too.   It was obvious why I was getting blow back, deformed and blown up primers.   This explained why it worsened as I worked up powder charges.

So the Canadian 209 modification worked… but was messy, and the primer was exposed unless I took a perceived risk of adding the plastic weather shroud.   The spring that held the primer in took a lot of abuse (and I’ve since learned they break and fail often). I also lost the plastic shroud on a hunting trip and had to purchase another. Plus the Remington 700 ML Owner’s manual says not to use the shroud with 209’s. I’ve seen plenty of reports of guys ignoring this warning and blowing up the shroud which then binds the bolt into the action. None of this set well with me.

I knew that my rifle returned to zero after I cleaned it.  I killed deer, and never had a hang or a miss fire so long as I stayed on-top of the cleaning and maintenance, and didn’t hunt in the rain.  I loved the trigger, and the feel.  But I still wasn’t happy with the blow back and the required tedious maintenance.

I had to find a better way, so I again searched high and low.  Eventually I found the  best Remington 700ML 209 modification!  

And that is the subject of my next Badger’s Den: THE REMINGTON 700ML/MLS, A JEWEL IN THE ROUGH; Can you make it shine? (PART 2)


Copyright BadgerRidgeInd.com 2015 (originally posted at BadgerRidgeInd.com)

Copyright Badger-Ridge.com 2024 (Edited, improved and reposted here)