The Remington VersaMax is a Benelli-pattern gas-operated shotgun that shares component design and operating characteristics with several Benelli models. These similarities extend into multiple Benelli clones, including Stoeger M3000 M3500 series. Thus many parts are interchangeable between these shotguns.
Many reliability problems can be traced to inadequate maintenance, worn components, or details that the original Remington owner’s manual does not adequately explain. The VersaMax is a reliable gun when properly maintained and worn parts are replaced. Many problems are the predictable result of accumulated fouling, worn springs, damaged small components, use of improper/excessive/insufficient lubricants, or maintenance areas that were inadequately explained in the original documentation.
Before working on any firearm, verify that it is unloaded and the safety is on. Follow the owner’s manual for disassembly/reassembly, maintenance and lubrication requirements. This guide is designed to be used in conjunction with your firearms Owner’s Manual.
The most important areas to inspect/clean/replace worn parts in are:
Removable choke tubes must be lubricated with anti-seize grease!
Regular inspection and appropriate lubrication can identify many problems, and extend part life (before they become failures in the field).
Start With Basic Maintenance
Use the owner’s manual procedures to remove the barrel, bolt carrier group, and trigger group. With those components removed, clean the inside of the receiver and put a drop of appropriate gun oil on each rail where the bolt carrier rides. Only use gun oils that remain suitable in cold temperatures, such as Break Free CLP or RemOil. Avoid products that gel or otherwise become unsuitable in cold weather.
When a VersaMax or similar Benelli-pattern shotgun is unreliable with reputable ammunition, and/or has a high round count, diligently work through the following areas rather than assuming the problem is the ammunition:
Failure to eject, extract, or repeated jams, Light primer strikes (primers dented lightly) / mis-fires: Clean and lubricate the shotgun correctly, inspect and correct/replace missing or damaged parts.
Clean Inspect and lube the extractor & the extractor spring. (On Stoeger M3000/M3500 models these are frequently bad out of the box).
Clean Inspect & lube the ejector and spring (in a recess of the receiver)
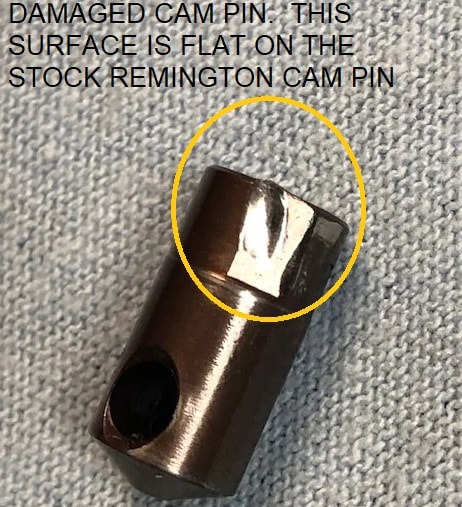
Inspect the bolt cam pin for deformation (replace if deformed)
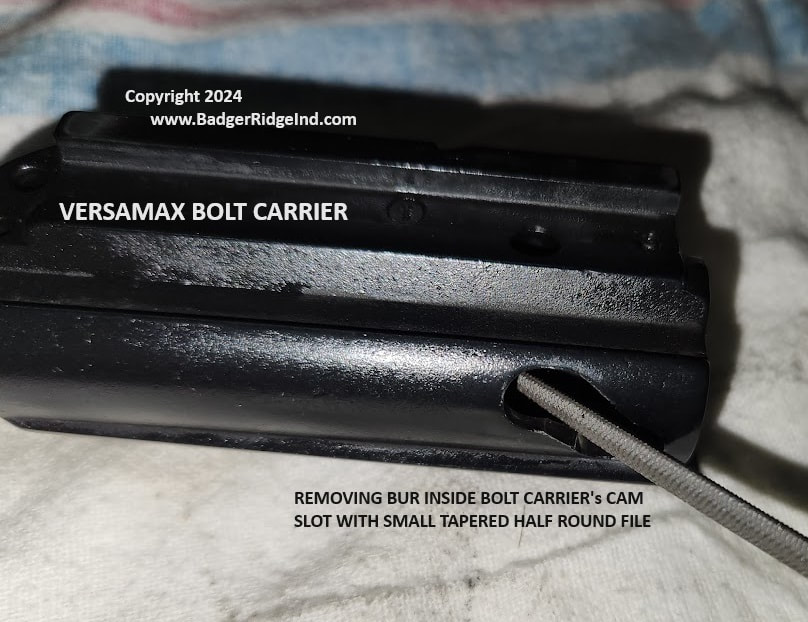
Inspect the bolt carrier and cam-pin slot for burrs.
Inspect the bolt for gouging.
Inspect the hammer for peening
Inspect the firing pin/firing pin spring/firing pin channel for debris or grease that is gelling.
Inspect the hammer spring for wear.
Inspect the hammer-spring plunger/cap for chipped plating.
Clean debris from around the hammer spring/hammer plunger (requires disassembly). Only lube with bonafide gun oil
Inspect the firing-pin retaining-pin O-ring and ensure its holding the retaining pin fully into the bolt.
Inspect the bolt link/rat tail for cracks & Inspect the bolt-link cross pin for deformation.
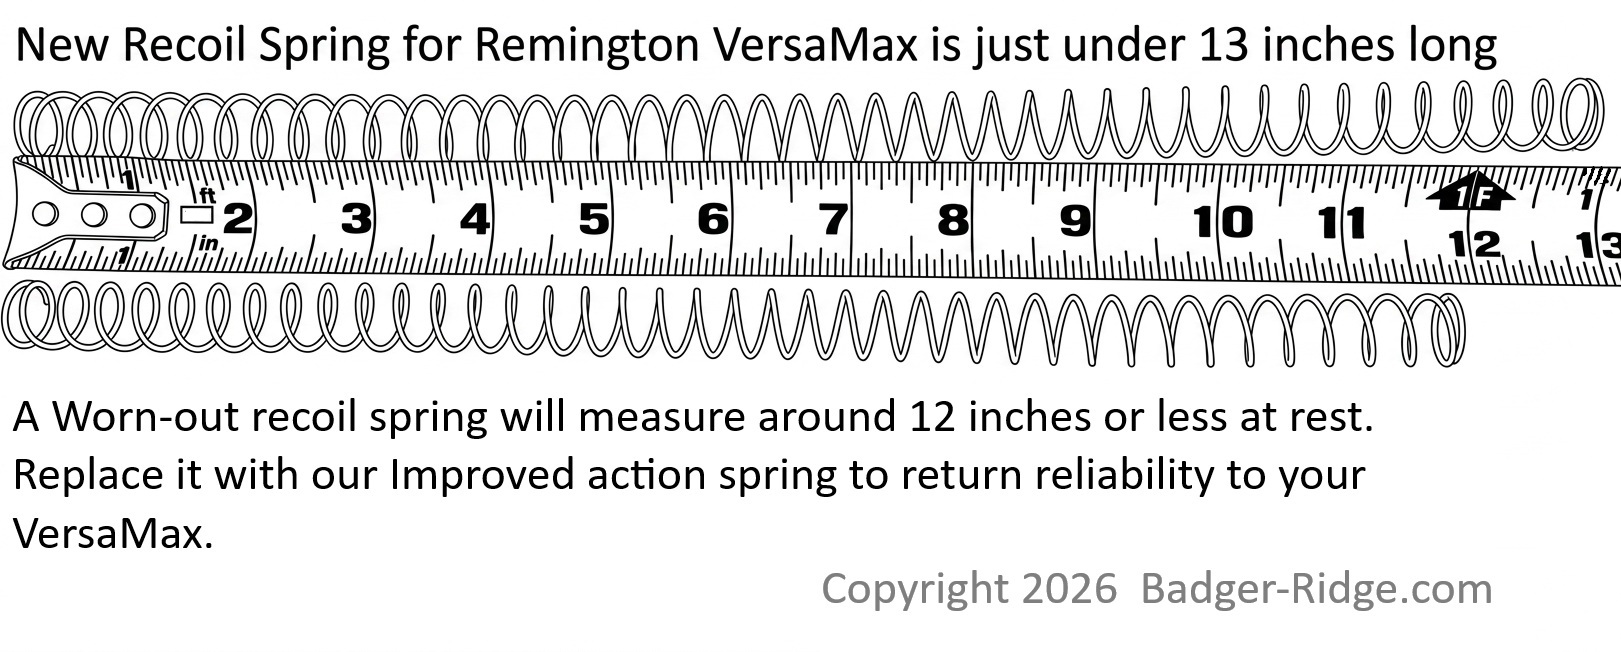
Inspect, clean & lube the recoil/action spring (in buttstock). Replace the action spring if its resting length is approximately 12 inches or less.
Gas-system concerns (unique to the VersaMax and M4)
Make sure the pistons move freely.
Remove carbon deposits.
Do not leave oil or grease on the pistons or inside the cylinders.
Inspect the gas-system-plug O-rings.
Detailed procedures: Bolt Carrier Group
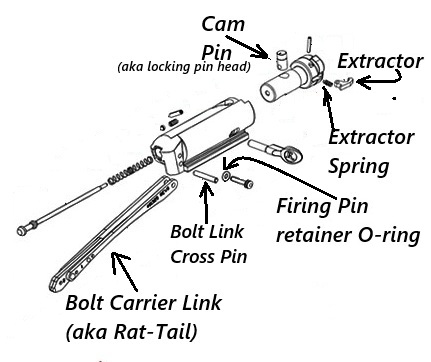
VersaMax Bolt Carrier Group exploded parts diagram (Benelli M4 similar)
The bolt carrier group should be completely disassembled—except for removing the extractor—cleaned, inspected, and lubricated during regular maintenance. Look for wear, deformation, cracks, burrs, gouges, and worn springs.
Cam pin
Inspect the cam pin for deformation. Replace a deformed pin. When reinstalling it, alternate its orientation at each cleaning—flip the orientation line from forward to rearward—to distribute wear between both faces. Lubricate the cam pin generously with appropriate gun oil. Grease can be used in warm-weather operation, but oil is preferable where cold temperatures are possible.
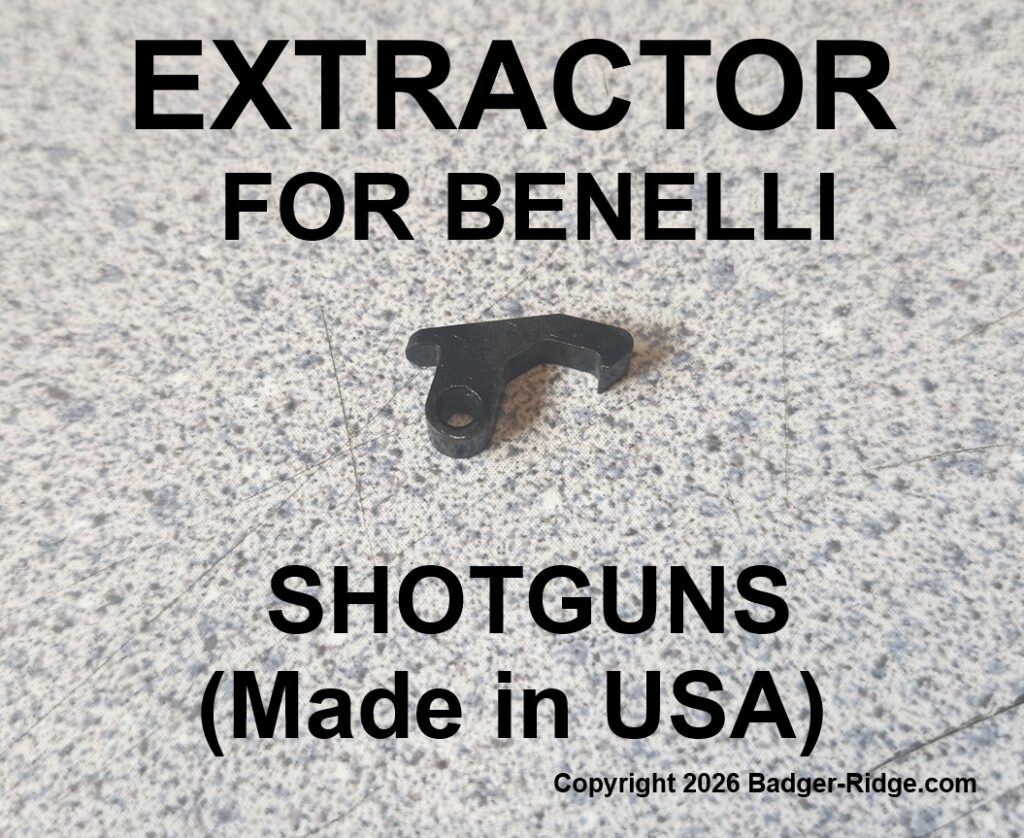
USA made Extractor for Benelli shotguns (Rem VersaMax & more)
Extractor and extractor spring
The VersaMax extractor and spring are generally reliable, but extractors can break and springs wear. Stoeger M3000/M3500 shotguns are more commonly affected by extractor and extractor-spring problems due to poor quality of manufacturing. If a Stoeger continues to jam or fails to eject after proper cleaning Extractor for Benelli, VersaMax & Stoegerand lubrication, the extractor and spring are the most likely causes. A damaged extractor can cause failures to extract or eject. If replacing the extractor, replace the extractor spring at the same time.
Bolt Carrier Burrs and Gouged Bolts
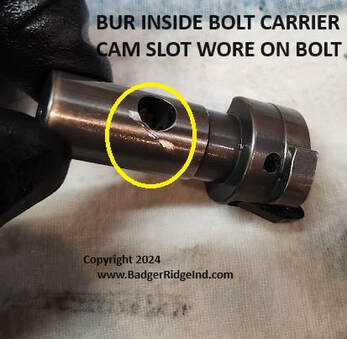
VersaMax Bolt with scar from burr in bolt carrier cam pin slot
Inspect cam-pin slot in the bolt carrier for manufacturing burrs, remove gouges from bolts and polish. A burr can gouge the bolt as it rotates. If a burr is present in the bolt carrier cam pin slot remove it. If the bolt was gouged: first carefully remove the high spots. After lightly stoning or filing away the raised portion of the gouge on the bolt, then smooth and polish the affected area so the bolt rotates freely in the bolt carrier.
File knocking burr of edge of cam pin slot in VersaMax bolt carrier
Bolt link / “rat tail” Inspect the link for cracks or deformation where the cross pin links it to the bolt carrier.
The bolt link, sometimes called the rat tail or bolt carrier link, is a known failure point, particularly on earlier VersaMax versions. When a bolt link breaks, it can also deform the bolt-link cross pin/pivot pin. Replace cracked or broken links and any damaged cross pins.
Inspect this O-ring and replace it if worn so the bolt carrier assembly remains securely together and the retaining pin is not lost.
Lubrication After inspection and repair: Reassemble the bolt carrier group and set it aside while servicing the recoil system and trigger group.
Lubricate the cam pin heavily with proper gun oil (in warm conditions grease may be utilized).
Put a drop of oil on the extractor and extractor spring.
Put a drop on the bolt-link pivot pin.
Note: A common cause of bolt-link failure is debris in the action/recoil spring tube or a worn action spring..
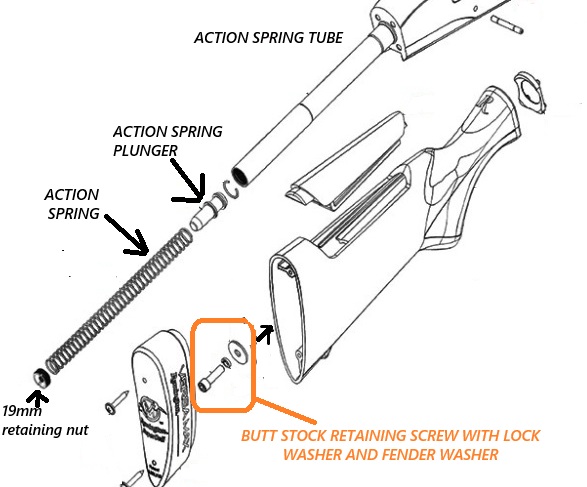
Action / Recoil Spring The recoil spring is located inside the buttstock.
Buttstock parts schematic for VersaMax shotgun
Cleaning, lubing, and measuring the recoil spring is one of the most important VersaMax maintenance procedures, and the original owner’s manual does not explain it!
Remove the two recoil-pad screws with a small Phillips screwdriver (A little lubricant or moisture on the screwdriver tip can help it pass through the small recoil-pad holes)
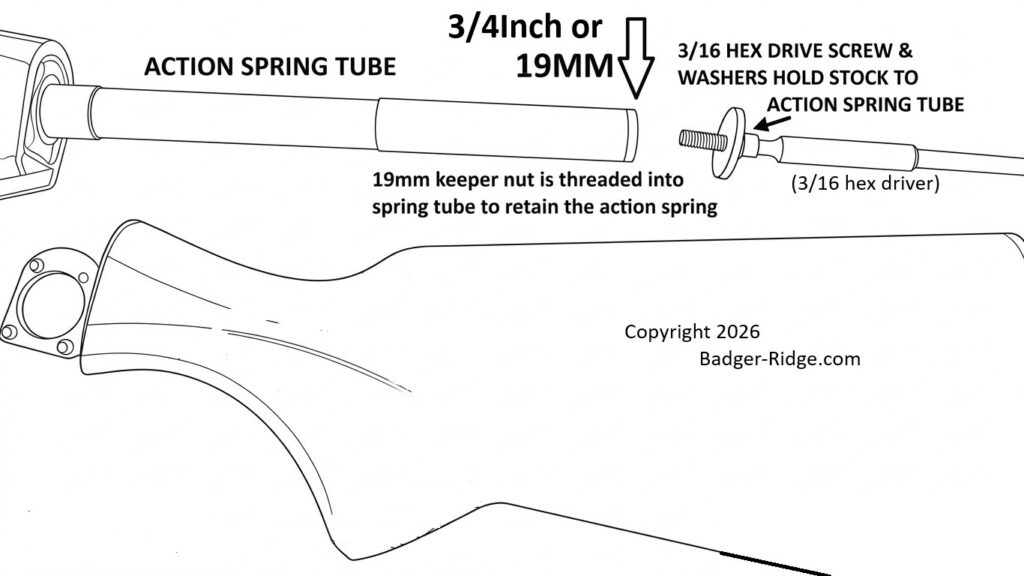
Remove the recoil-spring tube cap using a 3/4-inch (19 mm) open-end wrench. Be aware that the cap is under spring tension.
Remove the recoil/action spring and plunger.
Clean debris from the spring, plunger, and inside of the tube.
Access the action spring by removing the buttstock, then removing the 3/4″ (19mm) keeper nut
Measure the action spring at rest. If it is approximately 12 inches (30.5cm) or shorter, replace it. A new spring (like our improved spring) is approximately 13 inches (33cm) long.
Comparing a worn out recoil/action spring to a new spring (replace when any spring is near 12″ (30.5cm) or shorter)
Lubricate the spring, plunger, and tube with appropriate gun oil, then reassemble in reverse order.
Note: Some VersaMax shotguns may have a different spring-retaining arrangement involving a snap ring (specialized tools may be required). The procedure above describes the most common configuration.
Trigger Group The trigger group initially only requires simple cleaning and lubrication.
VersaMax Trigger Pack diagram
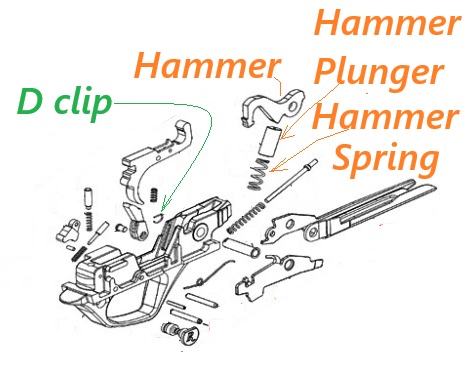
For routine cleaning, remove the trigger group from the action according to the owner’s manual. Invert it over a container and clean out accumulated debris. An aerosol dry-lube cleaner can help flush contamination from the mechanism. Scrub stubborn deposits with appropriate nylon gun-cleaning brushes and rags. After cleaning, apply drops of gun oil to the pivot pins and hammer spring. However as the shotgun accumulates use, the trigger group should also be disassembled far enough to inspect the hammer, and hammer spring clean and inspect hammer-spring plunger/cap (this is not covered by the owner’s manual). We offer the high failure parts explained below in a kit called a “Remelli” kit)
Beware of working on trigger packs: D-clips are easily lost during disassembly and reassembly. Many parts are under spring tension and if not properly handled can shoot across the work space becoming missile hazards.
Problems that develop with use (Three areas deserve particular attention in the trigger pack):
Hammer: Inspect the hammer where it strikes the firing pin. The striking surface can become excessively peened: replace the hammer.
Hammer spring: Hammer Springs eventually weaken and should be replaced when worn.
Hammer-spring plunger/cap: Some VersaMaxs came with chrome-plated hammer-spring caps. The plating can chip and produce abrasive debris that bind the hammer spring. The chipped edges can also catch against the trigger housing and interfere with hammer movement. Any chrome-plated hammer-spring cap showing chipped or missing plating should be replaced. (Again: we offer the hammer, hammer plunger, hammer spring & cam pin in a kit called a “Remelli” kit)
The VersaMax trigger group is very similar (nearly identical) to Benelli trigger packs, so Benelli trigger-pack disassembly procedures can be useful references. If you are not comfortable performing this work, you can pay Badger Ridge to perform this service or have the trigger group serviced by a qualified gunsmith.
Gas Pistons (unique to the VersaMax and Benelli M4)
Combustion gases deposit carbon on these components. Oil on the pistons when fired can combine with the carbon and produce sticky, glue-like fouling that solidifies. Any lube on these can promote malfunctions and lock up the system. A simple functional check on an assembled shotgun is to lock the bolt to the rear, tip the muzzle up and down, and listen for the gas pistons moving freely and clinking to a solid stop. If the pistons move freely, they are not likely to be the source of a malfunction, but they should still be kept reasonably clean.
Do not lubricate the gas pistons or gas cylinders with oil or grease.
The owner’s manual provides generally good instructions for maintaining the gas system. Clean the gas system every time the shotgun is disassembled. A bronze pistol-bore brush can be used to scrub carbon from the cylinders. Oils and appropriate solvents are fine for aiding the removal of carbon with scrub brushes, but all liquids must be removed before re-assembly. Wipe the pistons and the inside of the cylinders completely dry. The gas system should not be left wet with lubricant/oil!
Choke Tubes : Always Use anti-seize grease on removable choke-tube threads (or stuck choke tubes are probable). Do not shoot steel shot through ‘extra full’ or ‘turkey’ chokes.
Badger’s Note: Reposting this information here in a new format: Attempting to be both thorough and brief at the same time. None of this should be new to anyone who has read our blog previously.
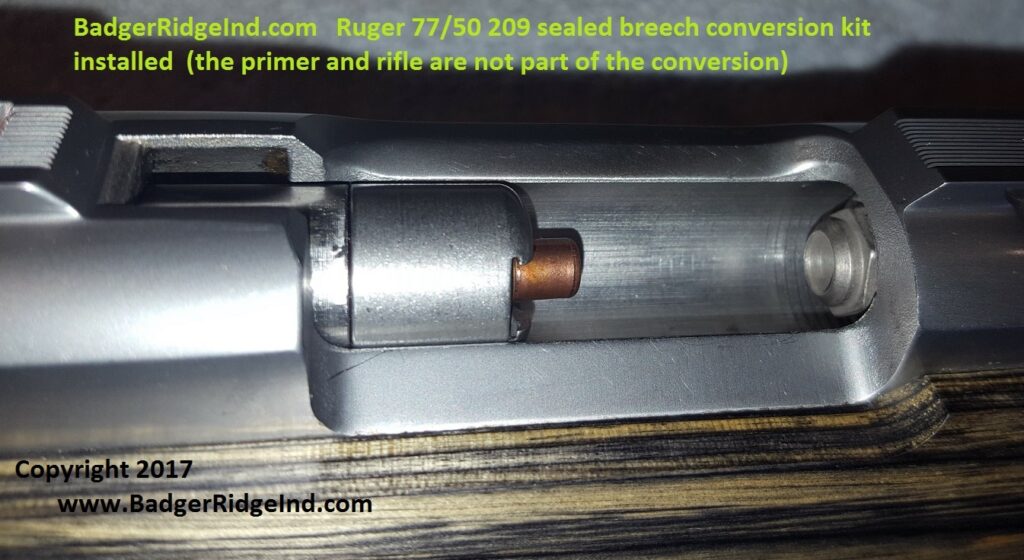
We originally offered a 209 conversion for the Remington 700 ML. Then in February of 2017 we released a similar sealed breech 209 system for the Ruger 77/50! Reposting this anouncement from our old website here to preserve and update it.
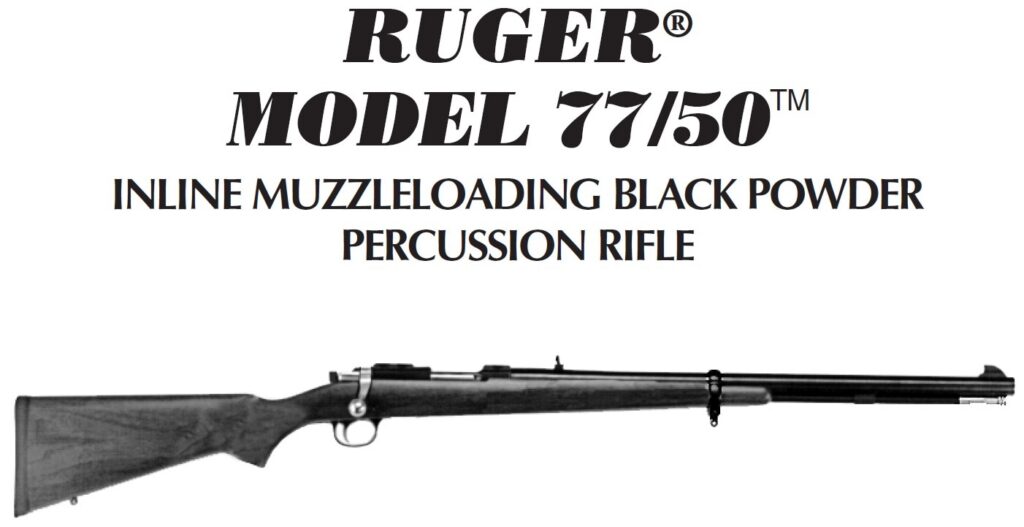
Much like the Remington 700 ML and 700ADL, Ruger sold a muzzle loader that looks a lot like the Ruger 77/44 (and the 77/22): the Ruger 77/50. According to the Ruger website, it was in production from 1997-2004. Judging by serial number data no where near as many were made as the 700ML. The Ruger functioned very similar to the Remington, and even had a breech thread that allowed use of 700ML breech plugs. (Not that we nor the manufacturer are endorsing that. It’s just so similar it’s possible). Thus these rifles had many of the same problems as the Remington 700 ML: Blow-back, frequent misfires, and factory setups that didn’t have 209 options.
In order to develop and prove out our sealed breech 77/50 209 conversion a few 77/50’s were purchased and converted by Fred and myself. Having a couple of centerfire Ruger 77 MKII’s that I’ve hunted with for years, in many ways the 77/50 didn’t feel like a totally new rifle to me, even though it was a ‘totally new’ rifle to me. And while on the surface it works similar to the Remington, and the breech plug threads of both are essentially identical, the 77/50 is a very different rifle to convert.
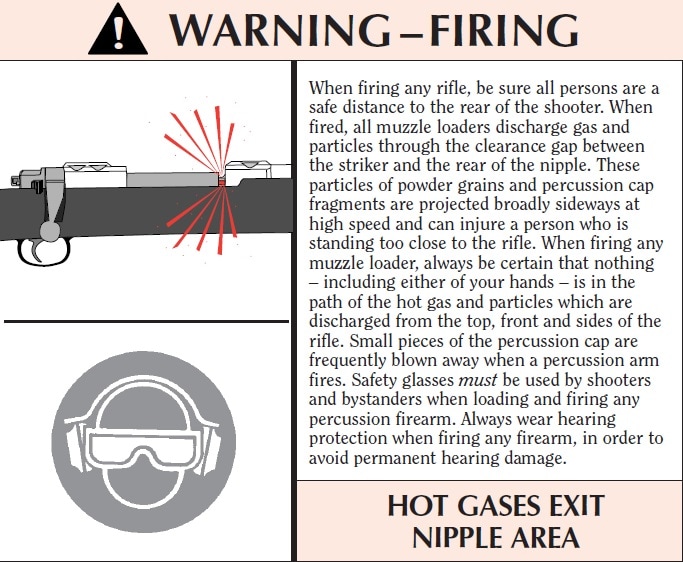
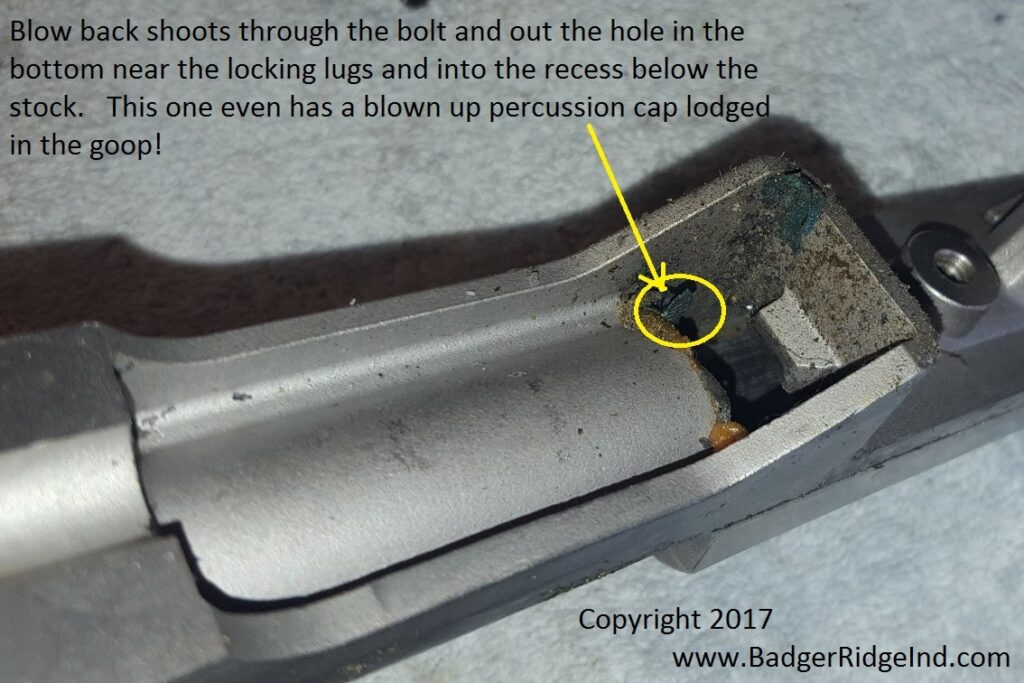
As the rifle came from the factory, or even when modified with a Canadian 209 system, the warning about “Hot Gases Exit Nipple Area” excerpted from the 77/50 manual rings true and must be heeded. Hot gasses and pieces of primers/caps being blown back and around the nipple and the associated fouling are some time referred to as “blow by”. However I find it seems more accurate to call it “Blow Back”. The later version of the 77/50 used a protrusion on the bolt itself to try and direct the blow back to the side of the rifle. And while it does accomplish this, it also directs blow-back into the bolt. The bolt has a vent in the bolt body that directs the blow back that enters it down and into the stock! So as delivered from Ruger, blow back gets in the bolt, and is even directed down and into the inner recesses of the rifle!
This complicates cleaning and over the long term reduces the reliability of the system. So compared to the Remington we had to modify the Ruger’s bolt much more to get a 209 system that seals the breech and is more reliable.
The main reason to switch to our system is not only to use 209 primers, but to seal up the breech area and essentially eliminate all of the blow-back issues. 209 primers are hotter and more reliable source of ignition. Using them to seal blow back into the breech plug vastly simplifies cleaning and makes the rifle safer and more reliable. Our conversion seals out the elements and allows one to shoot Blackhorn 209 powder. Which in my opinion is the best black powder substitute available. The Canadian 209 system and the original cap system are not Blackhorn 209 compatible, and they allow blow-back into all those nooks and crannies.
Remember the warning above: blow-back not only can injure a shooter or by stander, but it can burn the optics mounted above the breech, project corrosive fouling throughout the bolt and action, and wear out a mainspring prematurely. Even worse, the Ruger 77/50 is known to have an additional deficiency: Blow back launches the firing pin rearward and occasionally shears the trigger’s sear!
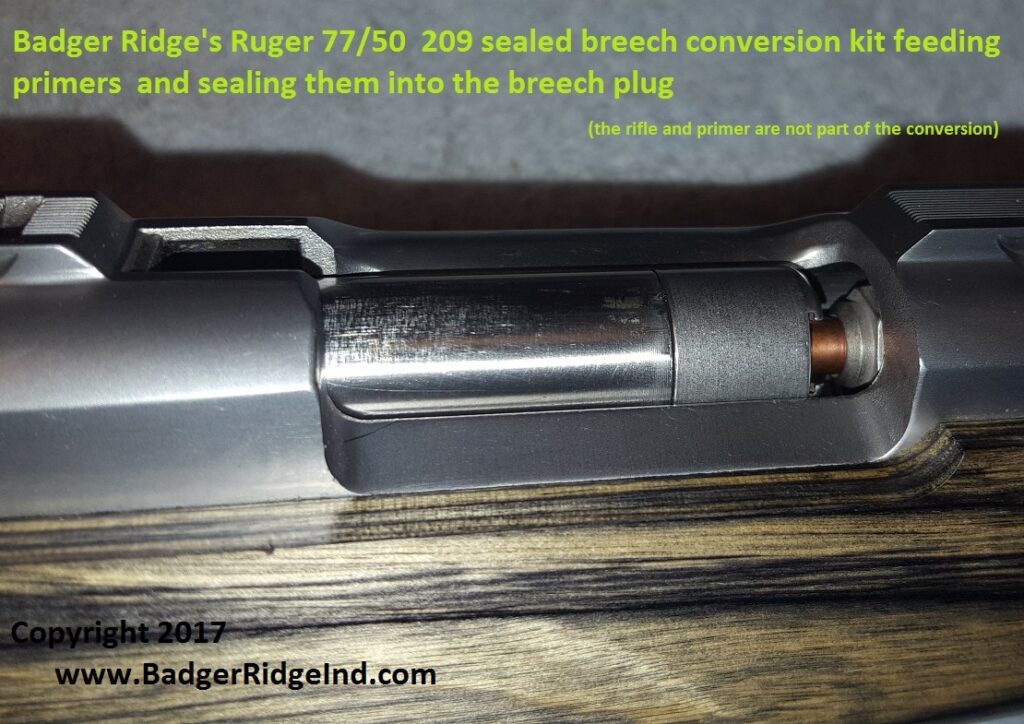
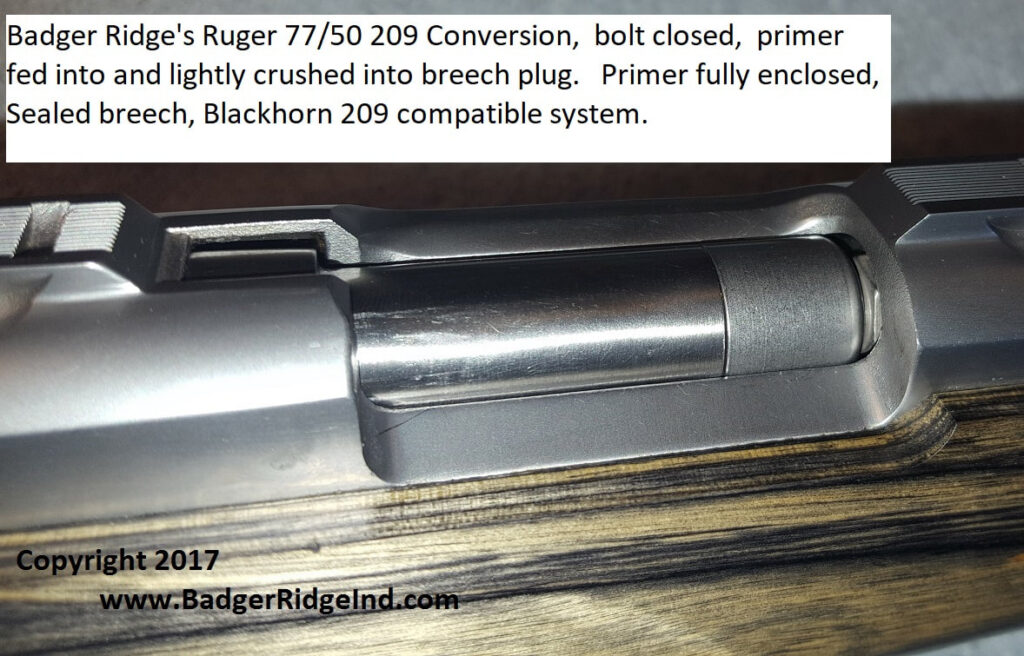
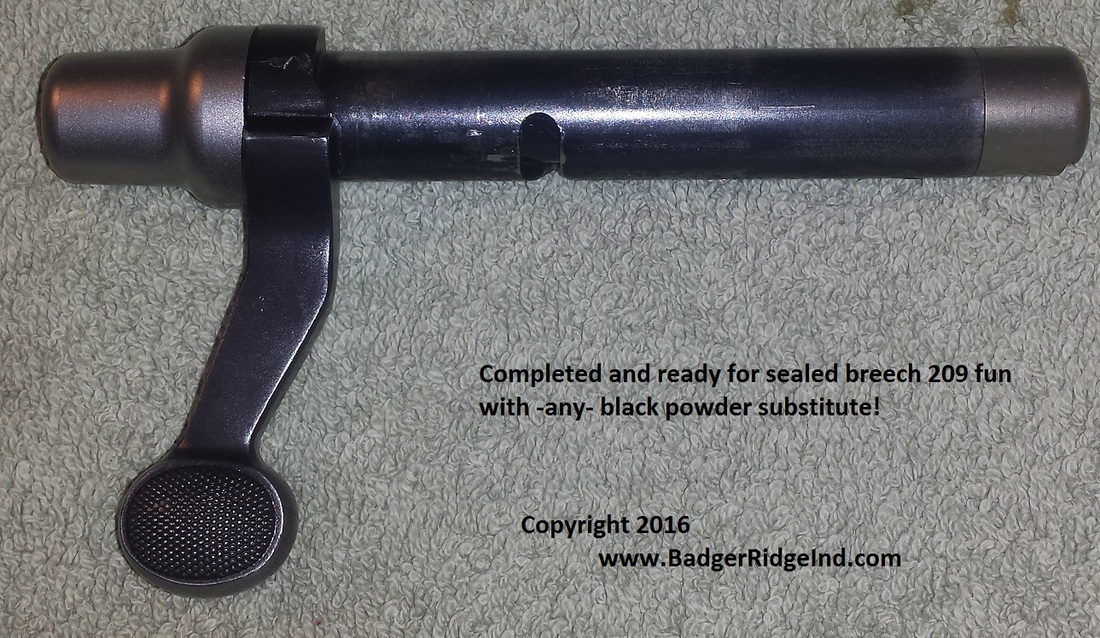
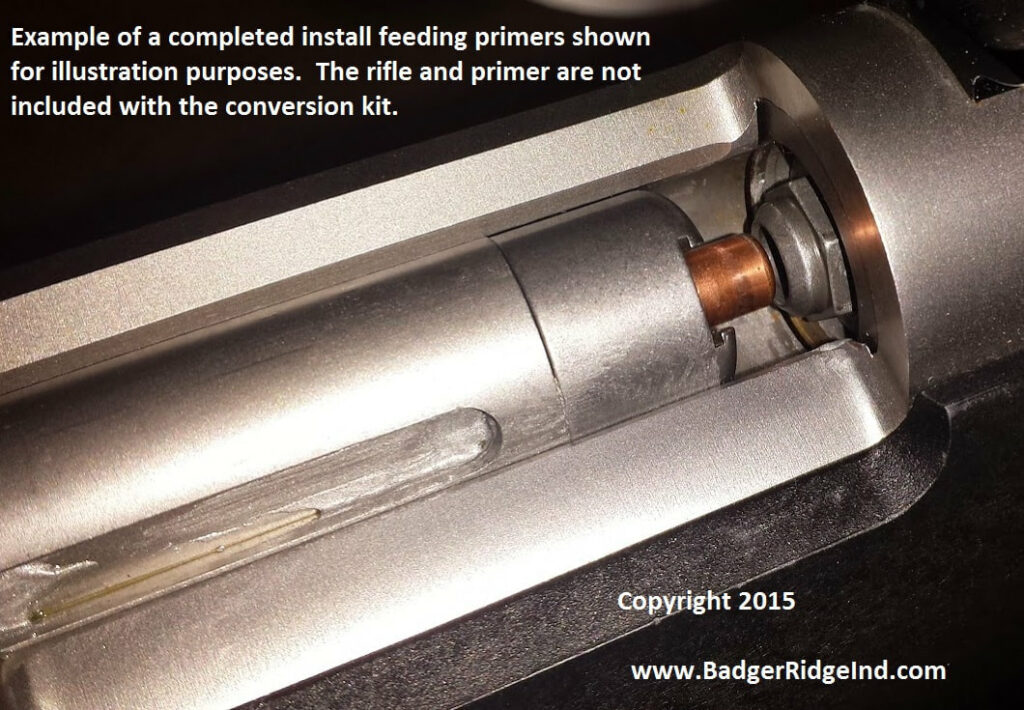
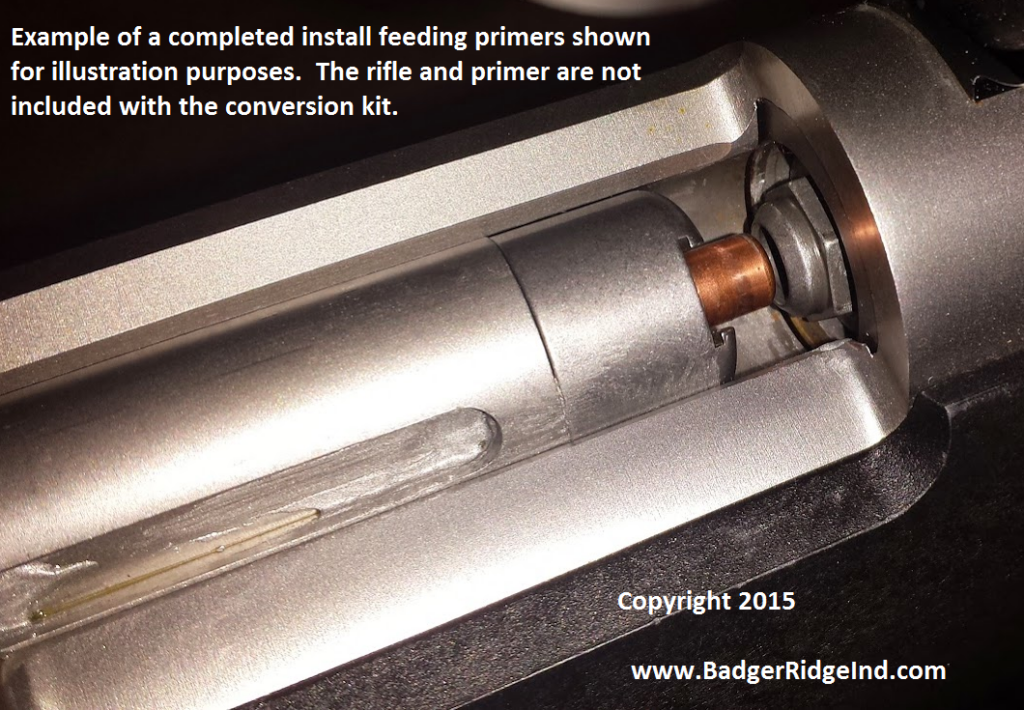
Badger Ridge Converted bolt feeding primers and sealing them into the breech plug
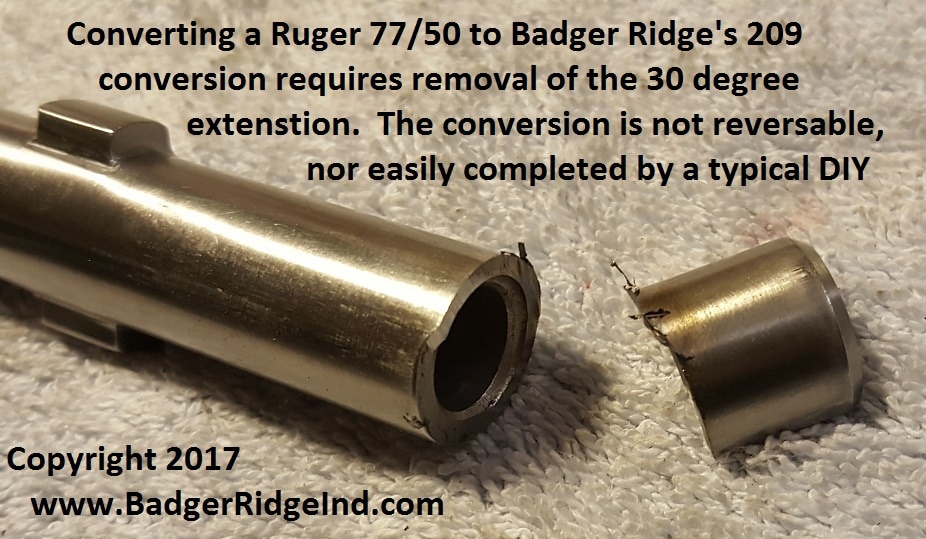
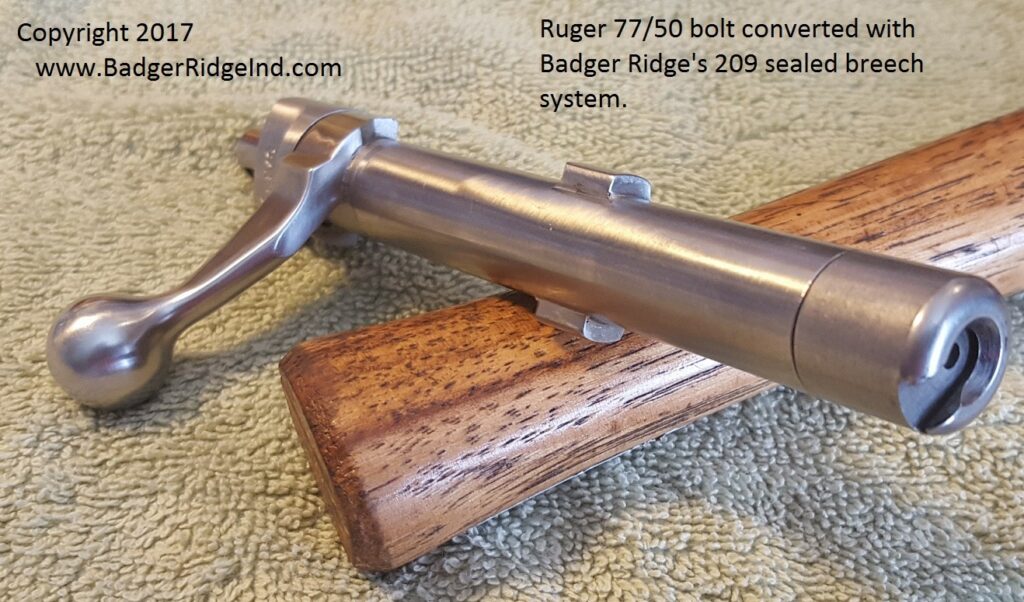
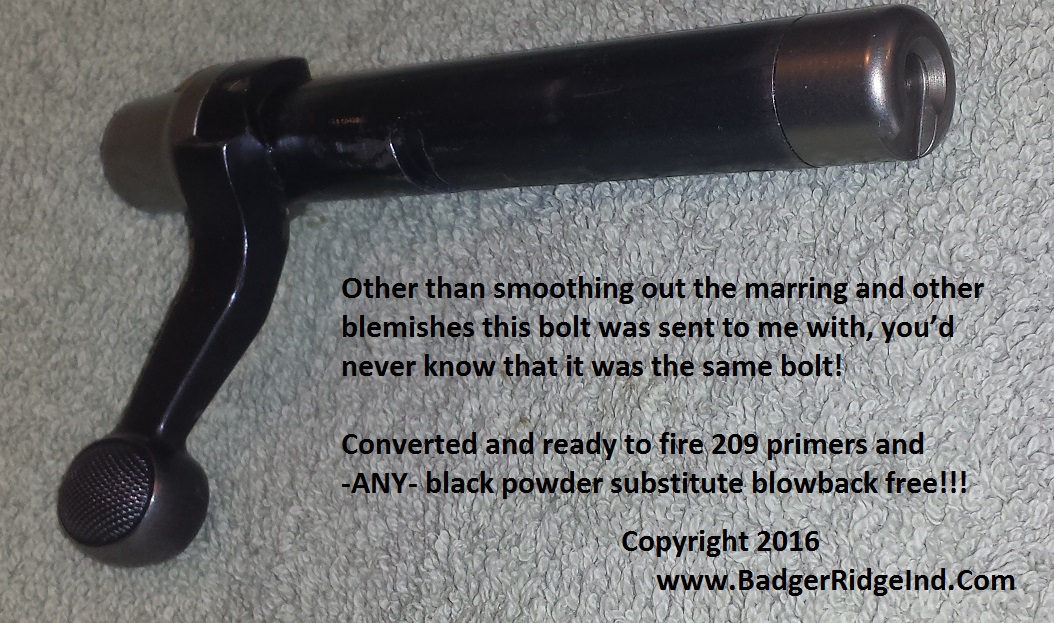
The conversion process requires the bolt to be completely stripped, our new firing pin to be installed, the extended shroud to be cut off, and the nose of the bolt dressed. Then the 209 nose is timed to align it for loading and unloading, pressed on, and firing pin protrusion set. So once complete there really isn’t any going back. But once the converted rifle is shot, I’m sure no one will ever want to go back to the leaky original set up!
Our Ruger 77/50 conversion is through its first rounds of testing but is still in what the DoD would call LRIP (low rate initial production). I’m not comfortable sending this one out for just anyone to install, and for now, will only offer it as a full conversion service. Or in other words, I’m not willing to sell this one as a kit; you will have to pay me to install it.
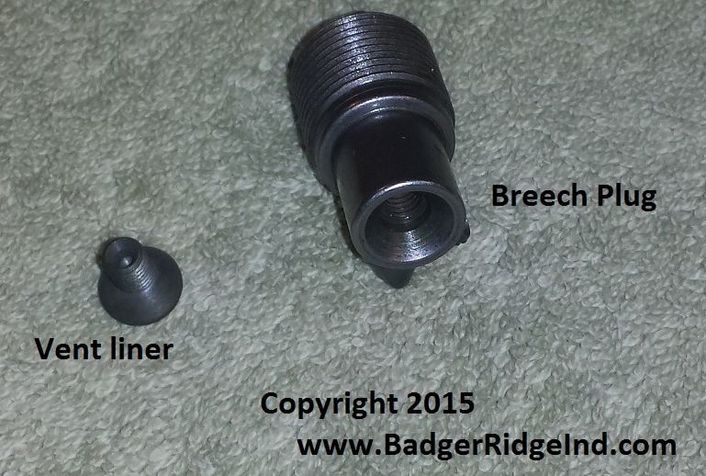
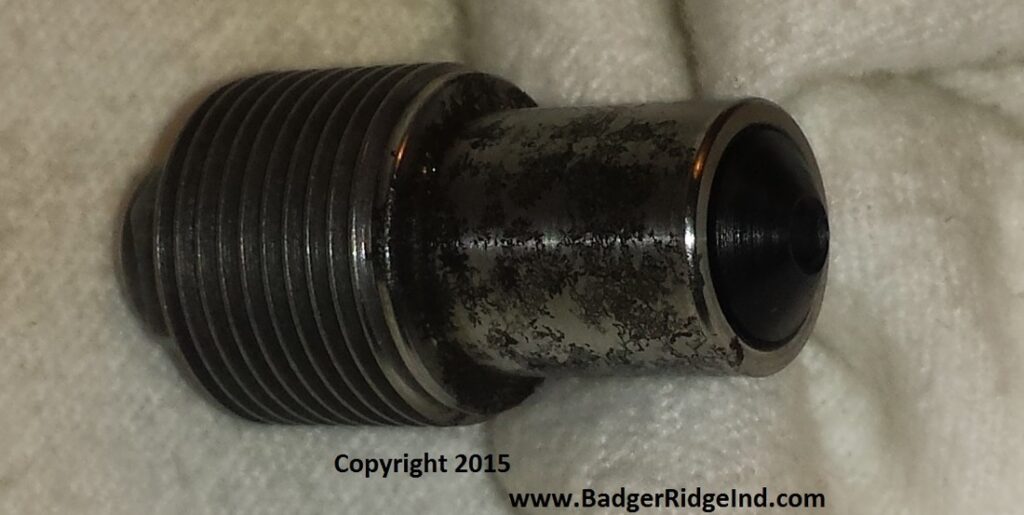
The Ruger conversion uses a very similar breech plug to the one used in our Remington system:
If you are interested in making your rifle work the way you always wanted it to, and Blackhorn 209 compatible, you can purchase Ruger 77/50 conversion as a service (very similar to our Remington 700ML conversion service). Mail us your bolt, we’ll convert, and send it back with the breech plug, vent liner, and other accessories. The details are all in the listing for this service!
We also can ship an entire new 209 converted bolt to you if you want to keep the original leaky system, or are missing a bolt etc. That is more expensive than converting an existing bolt. We do not recommend this unless you hunt out west where leaky non 209 systems are required for special hunts, but on others you can use our sealed breech 209 system.
And as always feel free to use the Contact form to send me your info or call us at 989 795 2526. If you use the contact for we will do our best to email back promptly.
Preserving some of the questions/comments from the original post below:
Comment from Jim Brown 11/14/2017
How easy is it to remove spent primers? Are there issues with primer misalignment with the 209 recess in the breech plug? I am considering this conversion for my Ruger.
Reply from Badger Ridge 11/14/2017
Typically you pull the spent primer from the bolt nose with your fingers or just turn the rifle on it’s side and the primer falls out. No misalignment issues. The nose feeds the primer into the breech plug. It seals by getting a .003 to .005″ crush. So when extracting the primer it comes right out of the breech plug via the bolt action, and by turnging the rifle on it’s side the primer will fall out.
If there is any issue, its only with a discharged primer ‘ballooning’ and sticking in the nose, but every time that has happened to me a dry fire was all that was required to loosent the spent primer in the nose. Then opened the bolt and the primer dropped out when I turned the rifle on its side.
The real issue you need to understand is that every brand of primer has slightly different dimensions. With this system the most critical dimension is length. We will set the bolt to lightly crush Federal primers in our test rifle. 9 times out of 10 this will give the same results for the end-user.
In the 1 in 10 that doesn’t, they either have no crush, or too much crush (excessive headspace or insufficent head space). In the case of no crush, the instructions recommend that you try Winchester primers (as they are longer than the other 3 USA made primers). If you get a seal/light crush with them, then use them. Also you could buy primer pocket shims from us, and shim the primer pocket to use shorter primers.
In the very few cases the head space is insufficeint to cloase the bolt on CCI/Federal/Remington 209’s, the customer sends the bolt back to us. We increase headspace by about .005″ and typically they get a good crush then.
Comment from Jim Brown 12/7/2017
Tom, I am curious. What does the vent liner screw do?
Reply from Badge Ridge (Tom) 12/7/2017
Short answer: The vent liner is a removable flash hole… so that when the flash hole (small hole down the middle of it) is shot out and enlarges, you just replace the vent liner.
Long answer: The vent liner focuses the fire from the primer, and acts as a constriction of back pressure from the burning powder charge… by having its constriction and the large expansion area between it and the primer, back pressure seen at the primer is reduced and keeps from deforming or blowing up the primer. This action tends to produce consistent pressures, which tends to increase accuracy as well.
Flash hole errosion is a problem on all sealed breech 209 muzzleloaders (and that is rarely understood). The vent liner allows one to correct for an erroded flash hole, just by swapping in a new vent liner. Other breech plug designs ignore the problem, or expect you to purchase new breech plugs instead of inexpensive vent liners.
So over all the Vent liner is a key component to keeping blow-back in check, making a reliable ignition system, and aides in getting consistent pressures as well. It performs best when it’s orifice is between .030 and .036… it should be replaced when it hits .036 or accuracy will degrade and pressures seen at the primer will build.
I’m very interested to convert the two Ruger 77-50s that I have (and some Remington ML700s as well). I understand that you do the work on the Ruger bolt(s) but will send the complete works to fix the Remingtons.
Here’s my question: if you aim for a crush on the primers as indicated between the bolt face and the breech plug face, and I install the breech plug, how can you ensure that, or put differently, how will I know I’ve achieved the correct ‘crush’, neither too much nor too little?
I suppose the breech plug could be marked and backed out a quarter or one-third turn or so if too much gap, but how about too little? Re the latter, will that be apparent with too forced a closing of the bolt, but what would that be like or feel like? Would there be any telltale marks on the primer in either instance (after firing), either too much gap or too little?
And finally, you imply (or indeed state) that the breech plug will, over time and use, open up, such that more than .036 it’s time for a fresh one; in other forums, Chuck Hawks’ for instance, he talks of carbonization in the breech plug hole for black powder rifles generally and drilling out the carbon occasionally, without any numbers for reference, but nonetheless. These two views seem inconsistent, can you enlighten?
Thanks, looking forward to hearing from you.
Reply from Badger Ridge (Tom) 1/7/2018
Mr. Quin,
Some good questions. They are essentially answered in the instructions that come with the kit.
First and foremost, never ever back out a breech plug from its fully seated position. Always fully seat the breech plug into clean breech threads. An unseated breech plug is not safe!
The crush is mostly a feel, ie you feel how the bolt closes without any primer in the nose, then you try a primer and can feel the difference. If its so hard to close the bolt that you’d have to strike the handle with your hand or some sort of hammer: DON’T. Or in other words a light crush is all that is needed, and it can be done with gentle but firm hand pressure. Again, nothing more than light hand pressure is needed to get a light crush: pounding and hammers are bad!
If you have ever just neck sized your brass, its the same feel you get after a few reloads. There isn’t any gaps to be measured, either the primer will feed without any crush, will feed with some crush, or it will be very difficult to close the bolt because the primer is too long.
Primers from different manufacturers will have slightly different dimensions. And they will even vary slightly between each other when they come out of the box. If you have precision measuring tools like calipers or a micrometer you can see what the primers dimensions are before you try and feed it, and then measure it after its been crushed to see the variation. This is not exact either, because the primer will spring back some. If you can do this, then you’d be looking for about .003 to .005” of crush.
But remember the goal here isn’t to crush primers; it is to seal them so that blow-back stays in the breech plug. So in effect if you are not crushing primers so much that you detonate them, you don’t have to strike or use extreme force get the bolt handle down, and you are sealing the blow back in when you shoot: you have been successful.
I’ve got a couple rifles, and Fred has had a few too. In developing the kit we tried a few different lengths to set the bolts length to and tried these bolts in multiple rifles… that gave us a good range to set them too (and there is only a few thousandths of an inch window here). So when I convert a bolt, I set it to that tolerance and try it in my rifles. Just from the length its set to, I’ll have a good idea what primer will work in my rifles, I try it in my rifles. We set these so that they work well with Federal 209’s.
So far that has worked well for clients, but I can’t tell 100% you what primer will work best in your rifle. That is because of the rifle’s we’ve bought and tried this on, we have a decent range of headspace figured out.
The issues is I can’t know exactly what your rifle’s headspace will be. But I really don’t need to know it exactly. When you get your bolt back, start by trying Federal, CCI or Remington (they are close enough in length to figure this out). If they crush, good. If not, you can try another brand. Seeing the primers length will vary depending on the brand, and Winchester are pretty much the longest, CCI’s are next (Federal and Remington are close to CCI)… it will either be Winchester that crush well, or CCI/Federal/Remington… probably one of the two groups.
So there is some trial that still must be done by the client.
Bottom line: Read and follow the directions, clean those breech threads, fully seat the breech plug, do not work on a loaded rifle, and don’t beat on things.
Occaionally a customer’s rifle will have excessive headspace. They will need to buy some small washers (aka primer pocket shims) and shim the bottom of the primer pocket to get a satisfactory crush/seal.
If a client is not getting a crush, say with CCI, they could add washers to get a crush, or they could try Winchesters. In my opinion it is better to just switch up to Winchester and if it seals use Winchester primers, and not use the shims…. Keep it simple and less complicated and it will work better in the field.
So essentially we’ve got it down to where the bolt we send will have a good crush with CCI/Federal/Remington primers 9 times out of 10… and our suggestion is to use the primers that crush with just some gentle downward pressure on the bolt handle. If you are the one in 10 that cant seal with CCI/Federal/Remington 209’s, then try Winchesters… or buy some primer pocket shims.
In some very rare cases the bolt won’t close on any primer. If that is the case well work it out and may end up machining off some more metal from the bolt to increase head space.
And with our breech plugs, the breech plug doesn’t open up or wear as it is heat treated stainless steel and prmers are made of much softer stuff. To clean the breech plug is gently reamed with drill bits that are undersized so that the carbon/fouling can be removed but cleaning should not remove metal from the breech plug!
The hole through the center of the vent liner will open up due to the fire from the primer passing through it from each shot. Remember the vent liner is like a screw with a hole down the center and is screwed into the end of the breech plug. When its orifice (inside hole) opens to .036, replace it with a new vent liner. The vent liner are only a few $ each, and the gage pin to know if its .036 or larger are in expensive too (if you add them you kit order). So using vent liners makes the breech plug last much, much, longer.
Comment from B Qunn 1/8/2018
Hello again, thanks for the answers, some more questions.
First, the “209 nose” piece which, once the overhang deflecting piece on the original bolt is cut off, is pressed on
1) is this piece stainless steel?
2) how deep into the bolt is it pressed?
3) how do you set the firing pin protrusion? Do you start out with an overlong pin and install it into the various bolts you get and then cut any excess off?
Also, I see from your setup that if there is backward movement from the primer firing, it bucks against the new bolt face (inside the 209 nose) much more than against the protruding firing pin, which is more like a usual firing pin in size unlike the original which is basically a big flat cylinder end-on, and thus would greatly reduce the reported ‘sear shearing’ over time (unlike the Canadian kit which, although it replaces the original firing pin cylinder with another with a bump on it, to make the primer fire, it’s still a relatively big cylinder end-on, an only held in place by the mainspring, so any rearward thrust could push the firing pin back and may over time deform the sear (maybe)); I like yours.
FWIW the hole in the Ruger bolt is as I see it a gas escape hole, just like the same in the bolt action Mauser/Springfield/Winchester 70, etc. It may have the unintended effect if there is blowback of fouling the works under the bolt or on the trigger mechanism, but its main purpose is safe gas management I would assume; having said that, not having any blowback at all is best, still leaving the hole for unfortunate extraordinary rearward escapes of gas like from punctured primers. I do find it odd that, once the bolt is locked, the gas hole points horizontally to the left into a channel which would allow the gas to go down; I would have preferred it pointed straight down from the bolt , but perhaps that would have exposed the hole even more to day-to-day dirt, etc., directly into the bolt where the firing pin and spring reside, so not good. But I’m glad it’s there, the Remington 700ML doesn’t have one.
I also see that there is a chamfered recess in the 209 nose piece and a corresponding chamfer on the breech plug surrounding where the primer will sit; are these designed to mate up? And finally, elsewhere above or on your site you mention routinely replacing the bolt/striker mainspring with a fresh OEM one on the Remingtons, but on the Rugers you use the original spring having cleaned it – can you explain? Thanks again.
Reply from Badger Ridge (Tom) 1/8/2018
Mr. Qunn,
Some good questions. Most of them are a bit of ‘trade secrets’ and design decisions…. but here we go:
Our Ruger 77/50 kit (just like the Remington 700 ML kit) is manufactured in the US on CNC machines from 416 stainless steel. The nose and the breech plug are heat treated. The vent liner is 17-4 stainless and also made in the USA.
The problem with the 77/50 that I haven’t been able to find a ‘fix’ for is the main spring. I just can’t find them. So we are forced to reuse the original springs. Luckily the new bolts we sell have brand new springs with them, but I cannot find the spring alone. If you know a source please share.
For the Remington I used to buy main-springs direct from Remington, but now have them made in the USA for us in bulk. (we have two versions: one for the original 700ML/Model 7, and a second for our 209 system or the Short Action Rem 700). If someone was to send in a Ruger bolt with a spring that was totally shot, I’d probably end up cutting another spring, or seeing if a 700ML spring would work (the two springs are very close in many ways).
On the Ruger, after cutting the bolt protrusion off, and machining it square and to the proper length, the bolt nose is pressed approximately ½” into the original bolt with designed interference fit. Trust me, the nose is not going anywhere.
The firing pin is purposely manufactured too long: I have to file it to set the protrusion on it similar to the way our Remington Kit works. (see the Remington 700 instructions for the details there).
As for fit between the nose and the breech plug, both the Ruger Kit and Remington have the same profiles. The nose and breech plug have the same very carefully designed tapers that allow them to come very close together to enclose the primer almost fully, but not allow them to touch and still allow pressure a path for gas to escape if there was some sort of rupture.
Like you said, no blowback is best, and we have a design that should seal it into the breech plug. But the path to vent any ruptures in the Ruger bolt body is not modified by our kit: the original a route for gas to escape if a primer was to ruptured remains. So in the Ruger, gas from a ruptured primer could still travel through the hole in the bolt nose, along the firing pin, then down through the bolt body, and into the lower recesses of the receiver: The gas safety route as designed by Ruger is preserved. And like you said, the Remington doesn’t have this vent hole in the bolt body, so if it has a rupture our system relies on the carefully designed gap between the breech plug and bolt nose to give a relief path (which is the same in both our Ruger and Remington systems).
Unlike the Remington, the Ruger Kit crushes the primer, and the Ruger has locking lugs on the bolt that hold the crush. So before firing there is already bolt thrust from the primer crush: when the primer is discharged it cannot move forward or rearward due to this crush.
On the Remington kit the swaging of the primer into the breech plug seals well. But swaging into a tapered hole also allows for some movement forward, deeper into the breech plug, when the firing pin protrudes and ignites the primer. The movement is more notable with lose primers or brands with more taper to them, such as Winchesters. This movement of the primer forward allows the primer cup to bulge in the the bolt face, which is one reason the Remington kit can suffer stuck primers (but not the only reason). The Ruger Kit seems to fare better here. I haven’t had a stuck primer yet, even with Winchester primers (which are notorious in our Remington kit).
I’m 100% sure that the sears in the Ruger 77/50 were stressed and broken by the original design driving the firing pin rearward into them. The Canadian 209 mod worsened this, and the Bager Ridge Conversion completely eliminates blow back driving the firing pin rear-ward. Thus our system should be considered an essential safety and life prolonging modification to every Ruger 77-50.
Yours,
Tom
Comment from B Qunn 1/8/2018
Further to my point on handling rearward escaping gas, obviously the main outlet would be the substantial hole (if that’s the right word, it’s basically the right side length of the action between the ‘chamber’ (if you will) and the rear bridge of the action) to the right of the bolt where the action dips down to facilitate primer loading (in a cartridge rifle, to load the cartridges); the escape hole in the Ruger bolt is just to handle whatever gas enters the bolt, if any, since most will blow up and out to the right which, as far as I can see, cannot be stopped or managed on inline muzzleloaders (on cartridge rifles, the bolt locks up about 1″ deep inside a big hole in the end of the action or barrel and so if gas escapes rearwards there into that chamber from a ruptured case or punctured primer, to manage it, they usually have an escape hole drilled into the right side of this overhang, sometimes both sides; they also have escape holes in the bolt for whatever gas gets inside the bolt).
One additional question: could you comment on whether the likelihood of escaping gas with an inline muzzleloader with a breechplug is significantly more or less than with a cartridge rifle; I assume much less, as with a cartridge rifle you can get either a punctured primer (here too) but you can also get a ruptured case side or bottom, whereas here you have the breech plug between you or the action and the powder burn, and surely a threaded breechplug is many times stronger than brass cartridge cases, so you only really have to worry about a punctured primer, and your system limits that, as well as reducing the likelihood of over-time sear shear. Agree?
Reply from Badger Ridge (Tom) 1/8/2018
There is a lot to this question.
I think simply: center fire rifles are designed to operate at higher pressures, and achieve those pressures faster (ie they have a faster pressure curve and higher peak pressures). As most of them are bottlenecks: They typically have smaller bores that don’t have the same volume as your standard 50cal muzzle loader. This tends preserve more pressure as the projectile moves down the bore, and tends to drive the compubustion of their powders to higher pressures. This is a feature of bottle necks, that muzzle-loaders and straight wall cartridges lack.
Your muzzle loader contains its lower pressures, and builds them more slowly by having a larger bore, using different propellants, and containing the combustion gases to the rear with a stainless steel breech plug. The breech plug is much stronger than brass center fire rifle cases, but does have holes machined into it. Those holes always allow some pressure to seap through rearwards.
All that said these are two different systems with differing ways to handle the pressure.
What I know is
1. The original leaky system blew that pressure all over you and through the action 2. The Savage 10ML2 did a great job of keeping the muzzle loader back pressure encased. 3. Our kits work a lot like the Savage 10 ML2 (but our stuff is not for smokeless powders!!!!)
If you follow the rules (ie no smokeless powder, use witness marks, only load with known good components, etc) you will be as safe as you can. Its when folks start trying to ‘get more’ out of their rifles by breaking the rules, that they only “get more… danger.”
Comment from B QUINN 2/1/2019
Thanks for all these comprehensive answers to my comprehensive questions (yes, I show up once a year bidden or not). Re your last paragraph, what are “witness marks”? Are these the markings you make on your ramrod to show when you’ve seated a bullet, etc.? Or something else? Thanks, and I still have the Rugers and the Rems, and hope soon to proceed with the upgrade kits. Life has a way of getting in the way, as you know.
Reply from Badger Ridge (Tom) 2/1/2019
Witness marks are marks on ram rods. When the ram rod is placed all the way into the barrel and abuts the breech plug: if the witness mark aligns with the end of the muzzle it will indicate if the rifle is charged or not (depending on where you put the witness mark). I personally make marks that indicate where the barrel aligns when empty. Any other alignment means the rifle is loaded.
Editors Note: This was posted to old website in January of 2017. Reposting and editing it here. Ruger 77-50 shooters will see many similarities. Though this post is directed towards Remingtion Owners, and was made many years ago, it show the issues all the plunger guns suffered and why its best to upgrade them to our sealed breech systems.
Nomenclature from Remington 700 ML/MLS Owner’s Manual
From what I’ve been able to gather there is a good bit of variation on how people learn about our awesome 209 conversion. While we have a lot of repeat customers, and folks learning about us through word of mouth, most arrive here after an internet search. Frequently newcomers are having problems with their rifle and looking for replacement parts or guidance on how to troubleshoot their woes.
If you are tired of blow-back (aka blow-by), blowing up 209 primers, priming/de-priming tools, having misfires, hang-fires, bloopers, or trouble setting off Blackhorn209: Our kit is the fix, but it’s not a $20 solution.
Badger Ridge’s Remington 700ML/MLS sealed breech 209 system
I understand the desire to find a $20 fix, but for the 700 ML/MLS, especially with the many years they all have on them now, there isn’t a $20 fix. A lot of folks who end up here realize quickly that our kit is the right solution, but for others they are stuck on the $20 fix.
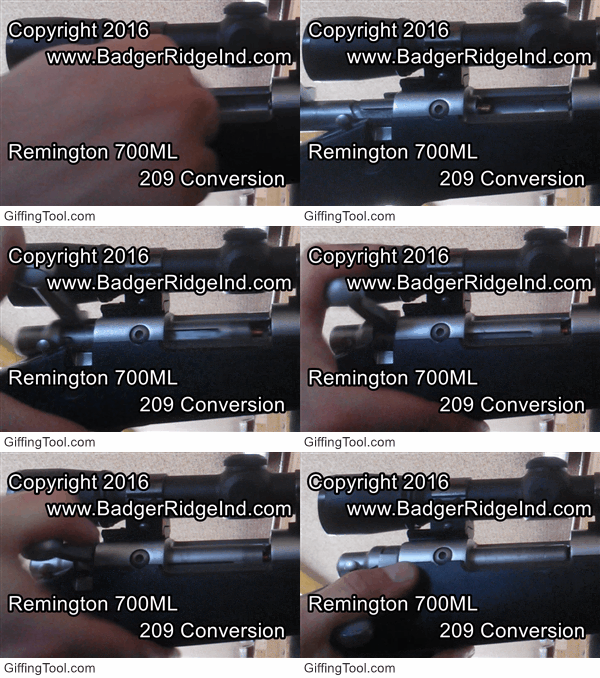
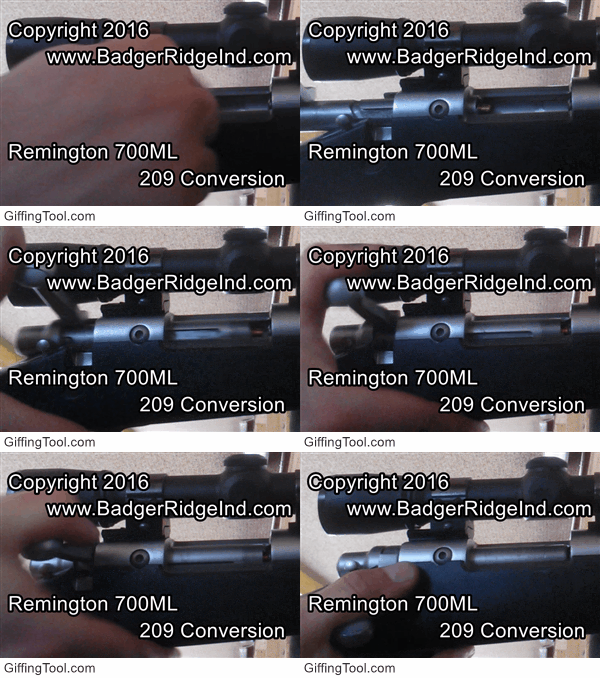
Animated Gif Loading primer in Remington 700 209 sealed breech
A good analogy is if this were cars… and folks have what they think is just and out of ballance tire. They are skeptical when I tell them an entire drive train overhaul is required; they are looking for wheel weights to stop a wheel vibration.
However the drive train is so bad it throws wheel weights the moment you drive it over 25 mph. Please understand that the truth is: the reason it’s throwing wheel weights is that it has a bad drive train!
We can fix it, and you’ll love your rifle afterward. Trust me; take the time to understand the problem isn’t the wheel weights!
Rem 700 MLS feeding a 209 primer into a sealed breech system
You get what you pay for!
There are so many little flaws in the original system: blowback getting into the bolt, shooter’s eyes, and burning the scope are chief among them. Then they get amplified with age, corrosion, use, and abuse; as soon as one is fixed another will creep up. Then the rifle doesn’t go bang when desired. So it doesn’t make sense to spend a dime to keep the original system running.
The only exception is when someone hunts out west where some hunts prohibit 209 primers or sealing of the breech. But those who have Ruger 77/50’s we offer entire 209 converted sealed breech bolts and breech plugs so they can switch to sealed breech on hunts where it’s legal, and keep their original system for hunts that it is not. One rifle can meet both requirements with a bolt and breech plug swap. We used to offer this for Remington 700 ML hunters, but our ability to make new bolts for a Remington evaporated.
What I would do if forced to keep the original system running:
My goal here is to help you understand where the original goes wrong, and unless you hunt out west in Idaho or Oregon (the only two places that won’t let you use 209’s and seal them up)… this should also show you why you need to dump the original and use our 209 conversion.
But here we go:- If legal I’d use 209’s; if the rules prohibit 209’s then i would use musket caps. I’d dump any #11 percussion cap system. 209’s and musket caps are hotter and more reliable than #11’s.
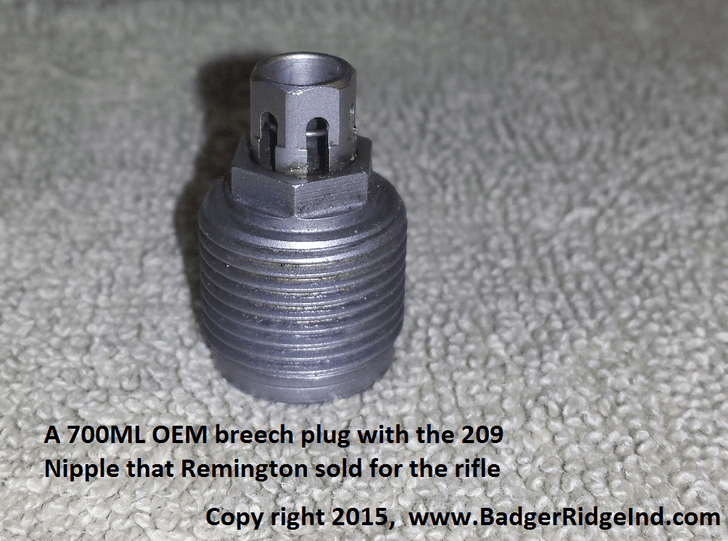
To use musket caps: The nipple can be removed from the breech plug with wrenches. One must be careful not to damage any threads. New breech plugs are available if the nipple won’t come out (from others… we don’t support much of these old slam fire/plunger systems). I’d put a small dab of anti-seize (or choke tube lube) on the threads of the new nipple so I could replace it later when it mushrooms. And it will mushroom.
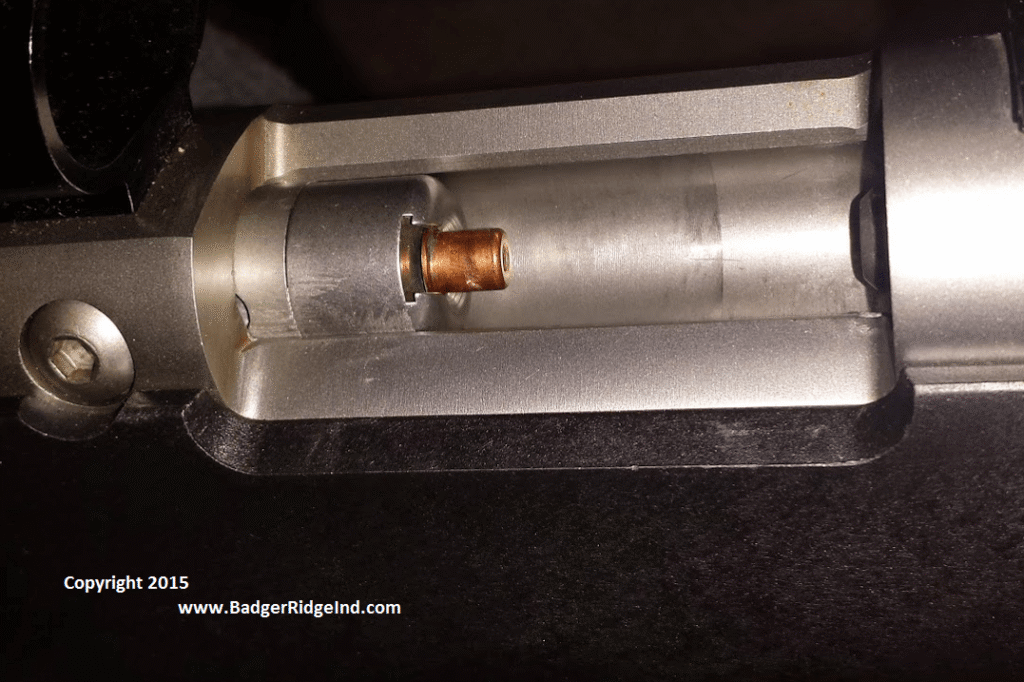
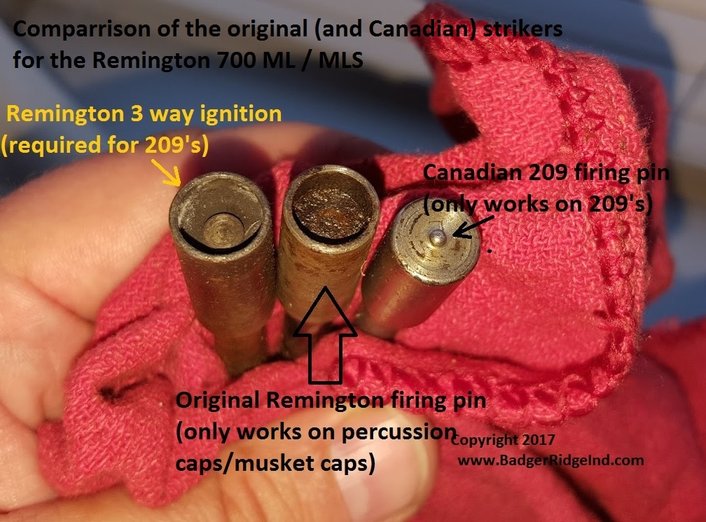
Unless someone has owned the rifle since it was new, they don’t know what sort of swapping and fiddling has been done to it. Not all strikers are equivalent, nor do they all work with the same primers/caps and nipples. Remington had two different firing pins for the rifle. Their first version only did percussion caps (or musket caps), then they released the 3 way system where one pin could discharge all three (209’s, #11’s, & Musket Caps). Plus the Canadian mod is out there as well, but it only does 209’s (don’t try it with musket caps or any other percussion cap).
3 styles of firing pins from old leaky systems fitted to Remgington 700 ML/MLS
I’ve seen rifles with the original flat firing pins installed with 209 nipples. The folks who had this set up contacted me complaining that the rifle wouldn’t fire! Of course it won’t fire with the wrong firing pin! Remember, the Remington 3 way ignition system had a raised central area for discharging the 209’s, and also worked with both types of caps. But it needs to be coupled with the proper Remington style 209 holder.
The Canadian strike pin won’t work unless its coupled with it’s unique primer holder.
Canadain Leaky 209 nipple
The original Remginton 209 system is known for blowing up primers and needing special picks and tools to remove the pieces, de-prime, and reprime the rifle.
Who wants that when our system will let you do it all with just your finger tips?
Whatever leaky original system used, it’ll need priming de-priming tools as well. Who wants to try and find all that for a reload in the field?
Before trying to do anything with an plunger style set up:
– I always ensure the rifle is unloaded and empty, and in a safe area I shoot some caps/209’s to ensure the rifle will set them off. Remember even caps/primers will shoot things out the barrel with enough energy to hurt, maim, or blind. So if you decide to to this, ensure the rifle is unloaded per the procedures in the manual, keep the rifle pointed in a safe direction, and at a proper back stop.
–Crud and misshaped/mushroomed nipples prevent caps/primers from properly seating. Then when the striker hits them instead of detonating, it pushes them forward towards a proper seat. Then once seated, a subsequent strike, or repeated strikes can set it off. Sometimes the nipples/primer holders get so mashed there is no saving them. I’d clean out any crud, and correct misshaped nipples (I’d say its usually best just to replace with a new nipple… and again that’s not something we sell).
You need to understand: If the first strike doesn’t set off the cap/209, I’d try a second, third, fourth, or fifth before trying another cap/primer. If a subsequent strike on the same cap detonates it, this is pointing you to look for a misshapen nipple/primer holder. If multiple repeated strikes does not set it off, it could be a horribly bad nipple or it could be the bolt/mainspring (but with a good tear down, correction to any corrosion, goo, fouling, proper lubrication and new mainspring, I’d suspect the problem lies in the the nipple).
The repeated strikes a nipple receives eventually mushroom and mis-shape it. Even the 209 holders/nipples suffer this fate. Though the Canadian system will probably outlast the Remington vented 209 primer holder because its mad of more stout stuff. But distinction is still just ‘degrees of bad’… I wrote about how bad the Canadian conversion was in one of my first posts to this blog.
– Each time the original system is fired, blow-back pulses the mainspring back and away from the nipple. At higher loads it can even drive back the firing pin into your thumb if you were to place it near the tang! (It hurts… trust me) These cycles and extreme compression coupled with the heat and corrosion then deteriorate mainspring life. Blow back coats the firing pin assembly in a corrosive sticky mess.
If I was running any of these plunger systems: I would tear down and clean after each time the rifle is shot, and I’d do a complete tear down and get everything out of every nook and cranny after each season.
Blow back will find its way into the inner recesses of the bolt plug and cocking piece… trust me on this. I’ve torn hundreds of 700 ML bolts down. I’d replace the mainspring on the original system every few years. Again, I can do that for you if you like.
Why don’t we sell any replacement parts for the original system nor the Canadian? I don’t like to sell things I don’t believe in nor use my self. Though the main spring is the same and we will replace it for you regardless of what system you use. I don’t want to be on the hook to keep something running that is flawed at its core, so I don’t sell or support it beyond changing mainsprings. But I’ll gladly replace the old leaky system with our sealed breech 209 system for you.
Our 209 system seals the blow back in, which vastly reduces bolt strip downs and cleaning. With our system one only needs fingers to prime/de-prime, and the only parts that wear are the 209 primer (which is discarded after every use), the vent liner which is cheap and easy to replace (and the rifle will still go bang when its time to replace it), and arguably eventually someone will have to replace the mainspring. Mainsprings always have a finite life. It is true on any center-fire rifle; springs will eventually wear out.
However the mainspring lasts much longer in our conversion because it is spared all the extra cycles, heat, and corrosive blow-back of the original. Also even if someone was to fail to seal the blow back in with our system (i.e. it seeped around a primer somehow), the bolt nose and the 209 primer itself essentially block any blow back from making it inside the bolt. With our system a shooter only has to tear the bolt down and clean it as often as they would a center fire rifle… which is not that often, perhaps as often as replacement of the main spring is required on a center-fire 700.You don’t have to take my word for it, you can read our customer feedback section and see for yourself in the video below.
Originally posted to our old website in August of 2016. Reposted and updated here.
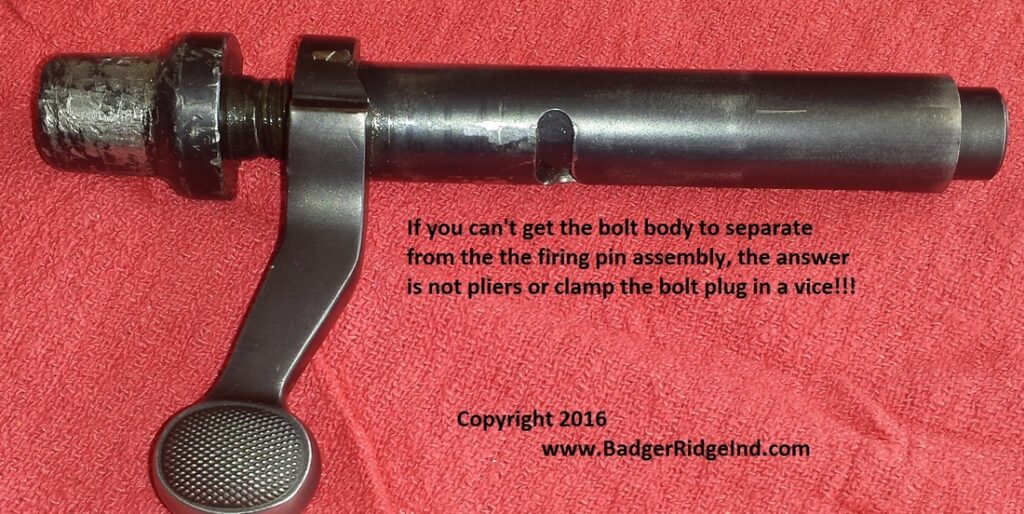
A few days ago I got a call from a very nice fella out west. He wanted me to send him an entire new bolt. Always wanting to help, I assured him I could build and send him a brand new bolt for his Remington 700ML, but I wasn’t convinced he needed to spend that much. I inquired further. Seemed he was having some trouble because the bolt was frozen and wouldn’t come apart. He said the worst part was that he let a “gunsmith” that promised to convert it to 209’s take a crack at it, but he had failed, damaged it severely, and promised him there was no hope for it.
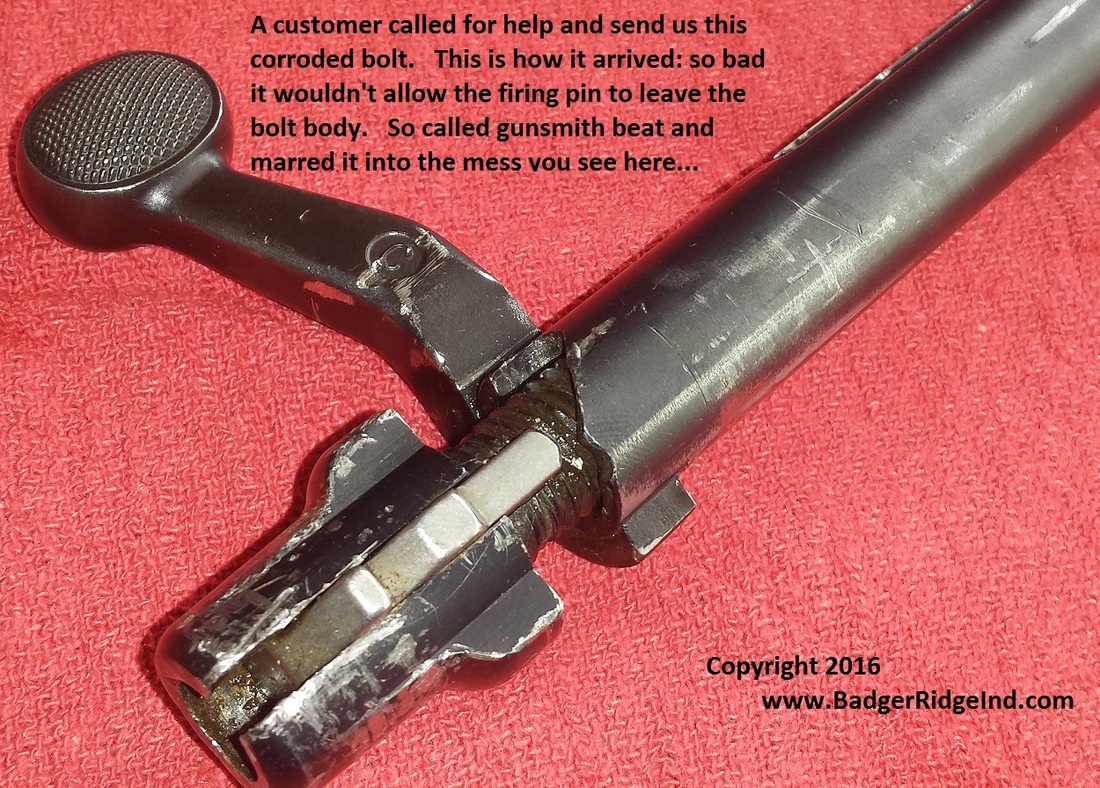
Jammed up frozen solid Remington 700 ML Bolt – How a bolt needing serious TLC arrived
He explained that the bolt plug was torn up and not serviceable and the cocking piece was frozen in it. I let him know that the standard 700 bolt plug would work, and I had them on hand. Once I saw the bolt and got into it I’d know what was usable.
After chatting more with him he decided to take my advice. Instead of purchasing a complete new bolt (much more expensive) he purchased a conversion kit with installation, sent me his bolt, and let me have a crack at it. I explained that If I couldn’t all the parts he sent, I’d figure out how to use some parts. I was confident I’d probably have a way to get it done if he bought what I needed to fix it (from me). Or in otherwords, if I could fix it and it took a bit more of my time or replacement parts I stock, I’d let him know what he owed me and we’d work it out.
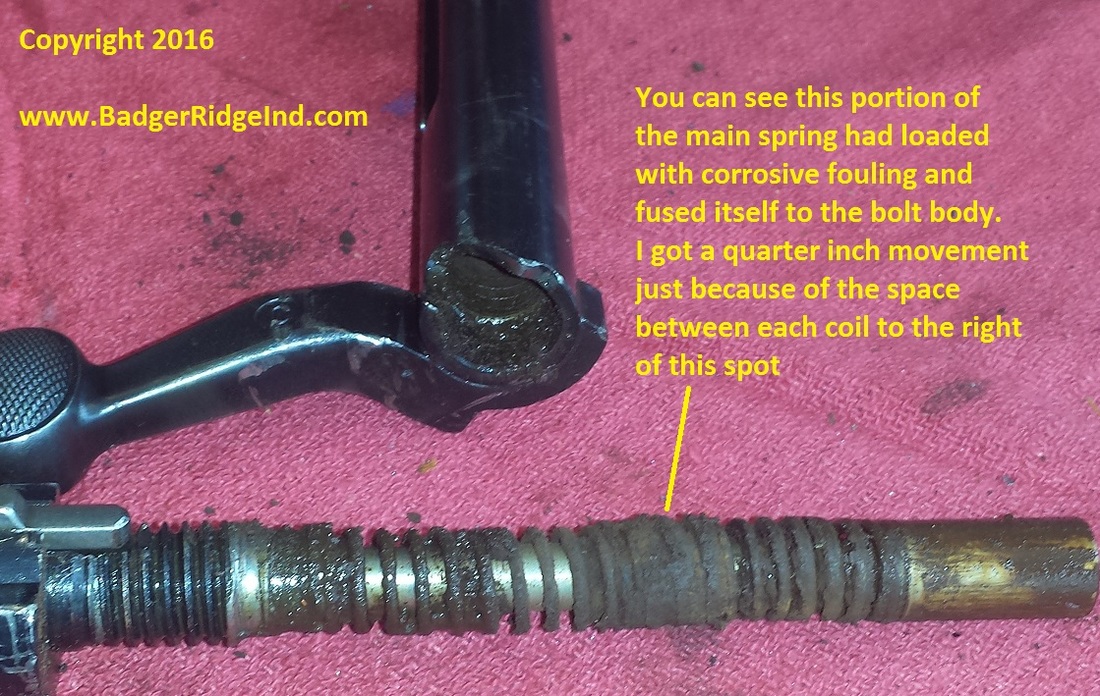
When the bolt arrived a few days later it was clear that the bolt plug was unscrewed from the body but the firing pin was stuck inside the body, and the body was packed solid with old fouling and years of corrosion. Seeing the firing pin would rotate but not move in nor out, it was free of the mainspring but the mainspring was bound to the bolt body.
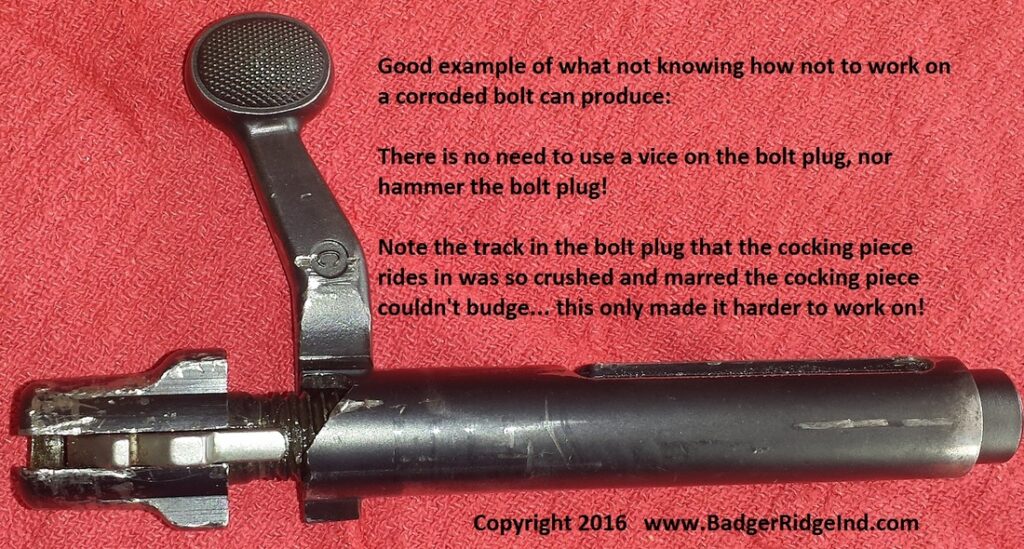
The customer was right: whoever clamped down on the bolt plug had squished it so much the cocking piece couldn’t move. They also hammered on the back and deformed it. Getting the cocking piece to protrude enough to expose the cross pin was going to be a chore! But first things first, got to get the mainspring to move in the bolt body. It was corroded solid and wouldn’t budge.
So I started the over night soak in penetrating oil. And got on with other things.
A good example of what happens when you don’t konw what you are doing: There is no need for claming things in a vice and beating them until they are deformed.
After having my coffee and breakfast the next morning I went out to the shop while it was still cool and got to work. I removed the bolt from the penetrating oil soak, wiped it clean, and put the bolt in my vice with some rubber jaw pads (so I wouldn’t add to the marring). Then some persuasion was applied by a hammer directly to the face of the stuck firing pin. I used an old firing pin out of my junk bin as a punch. I got the firing pin to move along the axis of the bolt body and compress the mainspring just a bit. That was all I needed.
Still firmly held in the vice with rubber jaw pads, the nose up, and the plug down, I tied on some wire onto the bolt plug. Then hung a very heavy weight on it to counter act the main spring and always have a ‘firm hand’ pulling the firing pin out of the body. Then I added some more penetrating oil and a few more taps. Followed by rapidly lifting and dropping the weight to create a pumping action via the mainspring. The movement increased ever so slightly as the crud pumped out. The penetrating oil filled the tip of the bolt with brown-orange corroded mess which I cleaned out and replaced with fresh penetrating oil, and repeated the love taps and lifting and dropping the heavy weight. Each tap sprayed a bit of penetrating oil, but who doesn’t love the smell of penetrating oil in the morning?!?!?!
I repeated pumping, cleaning the crud, and refilled with fresh oil. I continued until I could get about a 1/4″ of movement on it, but then it just wouldn’t go any more. So I went “nuclear” on it!
I made up a jig out of scrap to hold the bolt body between the bolt plug and the body. Made sure it contacted the body, and not the handle (the OEM bolt body handles are only silver soldered on… if you put too much pressure on a handle it will pop clean off!) Then I put it in my 12 ton hydraulic press, placed a tip of an old firing pin between the ram and the firing pin and pressed. It wouldn’t budge pass the 1/4″ of travel I had earlier. So I backed off the ram, and then repeated applying pressure… by the third or fourth cycle it broke free! I had the firing pin loose and had pushed the cocking piece through enough of the the bolt plug the ‘gunsmith’ had pounded shut that the firing pin assembly would uscrew.
Some times you got to nuke ’em from orbit.
Once the cocking piece was pushed free of the bolt body I just unscrewed the firing pin.
Now that I had it apart it was clear that the bolt had a old “Canadian” 209 conversion. I wrote about how disappointed I was with the “Canadian” 209 conversion I purchased over 12 years ago in one of my first posts to this blog. It seems that someone used the rifle but didn’t clean up afterwards, then eventually the corrosive blow back fused the mainspring to the bolt body. [I’ve done a bunch of bolts frozen solid from this neglect in the 10 years that have passed since I originally wrote this, none were as hard as this one . Folks seem to know not to deform things with hammers and vise jaws.]
Remember our 209 system seals the blow back into the breech plug, so you don’t get the crud inside the bolt body! This drastically reduces the chances of missed maintenance locking your bolt up solid. Plus installing our system replaces most of the parts that get damaged from such neglect.
Luckily once I got it all cleaned up, there was only some light pitting on the inside of the bolt body. I spent more time cleaning up all the marring and mashed bits on the body with a fine file than I spent cleaning up the massive amount of gunk. Oh, and I had to chase the 1/2×13 threads with tap to fix where all the pounding on the bolt plug previous to me had damaged them. But that also cleaned out all the gunk that had collected in them.
Getting the cocking piece out of the damaged bolt plug was a minor challenge. First I just cut the firing pin’s large end off (that normally strikes the primer) and pulled off what was left of the main spring (that’s not a typical move, just one I had to improvise to fix this bolt). Then I opened the groove in the bolt plug that the cocking piece rides in with a wedge and some love taps. The cocking piece moved freely now, but was still captured in the bolt plug because the previous “gunsmith’s” pounding on the rear peened over the back of it. So I reamed it out with some large drill bits until the cocking piece came out with the little bit of firing pin still connected to it. Then it was a simple placing of the firing pin in my vice and driving the cross pin out. The cocking piece was in really good shape despite all the mayhem that had ensued around it.
The two images above are the “After” pictures. The one below is a before so you can compare with out scrolling.
Moving comments from the original post over here to preserve them and their advice.
Comment from Ray 12/12/2017
I have a frozen 700ml stainless bolt. Can anyone recommend someone that can fix it?
Reply from Badger Ridge
We can probably help you at Badger Ridge. If the bolt is out of the rifle, I’d suggest that you just purchase installation of a kit and send it in. I’ll figure it out and contact you if I need more for parts or labor… but usually I just get it done.
If you want to talk more, give us a ring at 989-795-2526, or fill out a contact form.
Comment from: John Willis 3/23/2017
I have one that want rotate to remove from gun, Customer brought in to see if I could free the bolt. does not seem possible without damage. Any hopes
Reply from Badger Ridge 3/24/17
If the bolt is out of the rifle, just order installation and send me the bolt. I’ll figure it out… but from reading your post I’ll assumw the bolt is in the action and won’t budge. What is wrong is mostlikely the firing pin probably is fused to the bolt body via corrosion and is preventing the firing pin to be cammed rearward when lifting the bolt handle.
How’d I’d try to free a bolt that is stuck in the action:
First: Remove the barreled action from the stock, and remove any scopes mounted.
Second: Stand the action muzzle up, action down in a tall skinny containter (like a 2 liter bottle with the top cut off) and fill it with penetrating oil, ATF, etc. Pour the oild down the bore of the barrel so it soaks the bolt and breech plug from inside and out. Make sure the oil level is a good 2 or more inches higher than the seam where the barrel hits the action lug. Let it soak a good week or so.
Then once you are sure its fully soaked, make sure the bolt stop cam follower screw is installed and engaging the slot in the bolt body (it helps with the camming action). Then wiggle the handle up and down multiple times and it should loosen. You may need to blast crud out from the bolt body and force more oil in as able. The goal is to incrementally gain more and more movement on the handle. Once you cam it up you should be able to pull it rearward and then remove the bolt by removing the cam screw
Next you will probably need a set of vise jaws and a mid or deep well 7/16″ socket and an impact gun to remove the breech plug (they typically get corrorded into the breech when someone puts the gun away dirty and neglected.
Hope it helps. If you need more contact me at 989-795-2526 or our contact form and we can email about it.
Comment from Doug Barnes 9/14/2022
I have a 700m firing pin cycles but won’t strike 209 primer when I open and close bolt it cycles but won’t strike primer can you help with this parts are no where to be found?
Reply from Badger Ridge 9/15/2022
Just purchase a our system with installation, send us the bolt. Whatever is wrong with your existing sytem will nearly certainly be correct by switching to our supierior set up.
If you need more contact me at 989-795-2526 or fill out our contact form to start an email conversation.
This was originally posted at our old website back in July of 2016. Reposting and updateding it here
We sell our Remington 700ML 209 conversion to folks who hunt all 50 states and even Canada. And I must say that I’ve seen some states make folks jump through a bunch of hoops, while others don’t. Its all tied to each state’s rules varying drastically. Some are simple, common sense, and easy to follow (and I expect easy for their game wardens to enforce). Others, require someone to have a law and engineering degree to determine what they can take to the field for any given hunt.
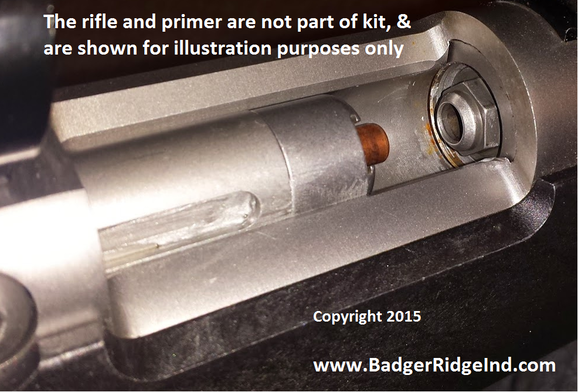
Rem 700 MLS feeding a 209 primer into a sealed breech system
So if you are considering our conversion, I hope to help those who live in those troubled states with some simple facts:
1. Our system uses 209 shot shell primers 2. It completely seals the 209 primer into the breech plug 3. These rifles we convert use inline actions 4. You can use any Black Powder or black powder substitute with our kit (Pellets, loose powder, whatever… just follow the Remington manual/directions on the bottle for quantity of powder to use) So for most states and most hunts, you won’t find a better option than our 209 conversion. It will take the old Remington 700ML/MLS and Ruger 77/50 and turn them into reliable big game harvesting brutes. However you are responsible for researching the rules for your individual state.
To figure out the answer’s for your specific state the biggest questions to answer in order are:
Do the rules allow 209 shot shell primers?
Do they prohibit sealed in-line ignition systems?
As far as I know Canada, and most of the US allow sealed breech 209s.
As of this writing Idaho & Oregon are the only jurisdictions prohibiting sealed breech 209’s (and that is only on some dedicated muzzle loader hunts… ie you can use a sealed breech muzzle loader during the regular firearms seasons in many states). There are other special hunts in other states (Pensylvania, Montana, etc) that don’t allow inlines much less 209’s… but we’ll ignore them (because they already ban the 700 ML/MLS and Ruger 77/50’s just for being in-lines).
So long as you can use 209’s and seal them up, you won’t find a better option for your Remington 700 ML/MLS or Ruger 77-50 than what you find here.
If you have a Ruger 77-50 and hunt somewhere where you can use sealed ignition on one hunt but not another, we sell entire bolts . This lets you swap between sealed 209’s and the original leaky OEM system (We used to offer this for Remington’s too, but that is out of stock for the foreseeable future).
Further down the rabbit hole: Trying to better understand our clients’ needs, I’ve spent the hours reading the various rules the 50 states have for muzzle-loader hunts. I lack the literary skill to describe the dull throbbing pain those regulations produced in my skull. I appreciate simple common sense approaches to regulations, so I feel it’s time to get on my soap box:
It seems traditionalists with lofty notions have hi-jacked hunting regulations in some states, and verbose rule writers dominate most others. To me, hunting regulations should be simple and boil down to promoting the safe and effective harvesting of the right number of game animals in a jurisdiction. I believe in individual freedoms, and always felt hunting, and the choices I made while hunting were a great expression of that freedom. So I don’t understand why anyone would stand by and allow their state to -force- people into using ignition systems, powders, or projectiles that would be anything other than those most probable to make a safe, quick, humane kill. I’m all for those who want to do it like their forefathers did. But to force anyone to hunt in that manner, especially if it is less effective, is nuts. There is a reason we developed better ignition systems, better powder, and projectiles: its called progress. Today we have better options that kill better, make better wound channels, and tend to produce less lost or wounded game. These same better ways are safer, and don’t blast the shooter with blow back and primer fragments. Those traditionalist ideals seem to have produced regulations that go counter to safe, humane kills, and true liberty.
Some would argue that complex regulation that forces old, out-dated, less effective means, reduces the number of game taken. I can see restricting someone to a single shot rifle with open sights doing that, but other wise, I doubt that prohibiting modern sabots, hand gun bullets, etc will reduce the number of game shot at.
So I’d argue that the rules that force traditional solutions probably increase the number of animals wounded and lost. And thus they probably reduce the number of game that get drug out of the woods. On the surface that produces statistics that say the number of animals taken was reduced. The significant difference being: the wounded animals that are not recovered are not recorded as kills. Wounded animals typically suffer a slow painful death. Making regulations that encourage wounding game is a shame. It’s especially shameful quoting tainted statistics to make the case.
I haven’t seen a state with ideal regulations but I think Wyoming’s was as a simple as they get. You can be sure sure you are in compliance, and game wardens know what to enforce:
“For taking of bighorn sheep, elk moose, mountain goat, black bear, grizzly bear, deer, mountain lion, antelope or gray wolf by the use of a firearm a hunter shall use:
Any muzzle-loading rifle or muzzleloading pistol handgun of at least .40 caliber and firing a lead or expanding point bullet using a charge of at least 50 grains of black powder or its equivalent.”
And while I don’t endorse the stuff below that prohibits multiple barrels, or restricts propellants (some rifles are designed to use smokeless powder: they produce more energy, and thus are more humane killers). Anyways I am partial to how Utah’s reads and gives solid guidance on projectile selection to promote humane kills:
“To hunt big game with a muzzleloader, your muzzleloader must meet all of the following requirements:
It can be loaded only from the muzzle and can use either open sights, peep sights, or fixed or variable zoom scope. It can have only one barrel, and the barrel must be at least 18 inches long.
It cannot be capable of firing more than once without being reloaded.
The powder and bullet — or powder, sabot and bullet — cannot be bonded together as one unit for loading.
It must be loaded with black powder or a black powder substitute. The black powder or black power substitute cannot contain smokeless powder, but may contain some nitrocellulose.
To hunt big game, you must use a lead or expanding bullet or projectile that’s at least 40 caliber in size.
If you’re hunting deer or pronghorn, your bullet must be 130 grains or heavier, or your sabot must be 170 grains or heavier. Truly over all, I favor Virgina’s rules; I wish all 50 states would adopt them as I feel they are a good balance on allowing freedom of choice but guaranteeing common sense, killing power (sorry muzzle loading pistol guys), and safety. I think they do a good job of bringing clarity to folk who are familiar with the issues and variety of rules from across the nation:
If you’re hunting elk, moose, bison, bighorn sheep or Rocky Mountain goats, you must use a 210-grain or heavier bullet, or a sabot bullet that’s at least 240 grains.”
Truly over all, I favor Virgina’s rules; I wish all 50 states would adopt them as I feel they are a good balance on allowing freedom of choice but guaranteeing common sense, killing power (sorry muzzle loading pistol guys), and safety. I think they do a good job of bringing clarity to folk who are familiar with the issues and variety of rules from across the nation:
“Only muzzleloading firearms, .45 caliber or larger, loaded from the muzzle of the gun. Muzzleloading firearms must be single shot, capable of firing only a single bullet or saboted bullet (.38 caliber or larger). Flintlock, percussion, or electronic ignitions are permitted. It is unlawful to have in immediate possession any firearm other than a muzzleloading gun while hunting with a muzzleloader. (See exception for valid concealed handgun permit holders on page 18.) It is unlawful to use muzzleloading pistols. Must use at least 50 grains of black powder or black powder equivalent.
Smokeless powder is allowed in muzzleloading firearms designed for it. Never use smokeless powder of any type in any quantity in a muzzle-loading firearm that is not specifically designed for it. Scopes are permitted. For the purposes of transportation in a vehicle, muzzleloading firearms are considered “unloaded” when all powder has been removed from the flashpan, or the percussion cap, primer, or battery has been removed from the firearm.
For complete safety, shooting into soft ground should empty a muzzleloader”
I’m sure any state could care less about my opinion. If you live in a state with crazy muzzle loader regulations that just don’t make sense, I urge you to engage your legislature and adopt a simple solutions that promote quick safe humane kills over traditional ideals like those I offer above.
Regulations change, and errors can be made, this post was old when I reposted it: Please read your states rules and don’t rely on anything I posted here as being infallible.
I’m goint to perserve one of the back and forth comments this spurred by putting them below:
Comment from John Mohler 7/20/2020
I know it’s only been a few years that you wrote this but I just ran into it.
As someone who has been involved in drafting hunting regulations let me help you out with this.
Traditional weapons seasons are just that. The natural progression of muzzleloaders has lead to what we call centerfire bolt action rifles with metallic cartridges. If your muzzleloader, and all its progress, allows you to effectively take game at 500 yards then you are free to use it in the general firearms season with all the centerfire hunters who think themselves capable of shooting at these distances.
A State has to draw the line somewhere and that line should be based on the effective range of a weapon. Muzzleloader seasons should be restricted to those firearms with a max effective range somewhere between 100 and 150 yards.
Reply from Badger RIdge (11-20-20)
Thanks for taking the time to write. Your opinion is noted. You seem to be defending making bad rules. Then put the goals rule making accomplishes. Those don’t have to be competing objectives. So I’m not sure you understand the point of this article:
1- The rules vary so much between states, that it is difficult to get a 50 state solution. This shouldn’t be. The simpler states’ regulations work (and do what you are saying about limiting range, shots fired and such [which are good wildlife management goals]). But good states rules are simple and easy to follow. Seems like the examples of good rules I gave accomplish the goals of game management, safety, and promote out of state hunters coming and enjoying the state’s game. As out of state hunters tend to pay more fees and bring more $… seems like that would benefit all, and lessen head aches, even from a bureaucratic perspective.
2- Limiting/Prohibiting sabots doesn’t do anything good. Sabots just allow one to use jacketed hand gun bullets. Which don’t do anything other than give good controlled expansion at both high and low velocities. This benefits the game receiving the projectile (it dies a more humane death over a wider range of projectile velocities), and generally improves the ratio of wounded to harvested animals. If there is some bad thing about sabots that I missed, please be specific in address it. Also if sabot’s are bad or give you any real advantage in accuracy or range, please explain why 47 out of 50 states allow them (on top of the entire country of Canada). Also please explain why the current long range muzzle loaders wining competitors aren’t using sabots nor BlackHorn209 powder? (They are using bore riding bullets pushed through forming dies and smokeless powder). Sabots and blackhorn209 are good, and better than traditional blackpowder and patched round balls, but don’t give you lazer like 500yd accuracy.
Limiting newer (and arguably safer) powders like BlackHorn209, and projectiles (sabots and modern handgun bullets) from being used is just silly. They are certified muzzle loader safe, and are safer and better than Black Powder. Why is it OK to use one but not another? Please explain to me how you are helping your residents by forcing them to use less safe powders? (just look at the MSDS and handling precautions of the various powders and you will see BlackHorn209 is much safer)… Or forcing your hunters to get creative in their projectile selection (beyond simple guides on how heavy of a projectile to use or minimum charges, banning sabots, or any other particular projectile is counter productive).
If you think I’m wrong, please prove it, rather than just stating opinion.
I think you will find that rules prohibiting Sabots is truly tied to very vocal ‘traditionalists’ monopolizing the rule making.
I’d hope that as a rule writer you’d value simple effective rules. I know I did when I was flying military aircraft: simple rules helped promote safe, standard aircraft operations across the globe. However when they are verbose, overly specific/restrictive, complicated, or different in a different jurisdiction they do nothing but give a good feeling to the bureaucrat writing them, and complicate the safe operation of potentially dangerous devices.
Tom from Badger Ridge
PS: after we tackle sabots, then you can explain how a hotter more reliable and sealed combustion system (209 primers that are sealed) are anything detrimental… they are just plain safer and more reliable. You don’t get crap blown in the face (unsafe) and don’t really increase effective range…
With our Remington 700 ML 209 conversion kit, we get very few complaints or requests for assistance compared to the number of kits sold and installed. The few instances usually are tied to not fully comprehending the kit’s components and how to maintain them. Of these, most center around the Badger Ridge Hunter 209 Breech plug. There is a good section in our FAQ on the breech plug and how to maintain it.
The other complaints center around not understanding the subtle differences when using Blackhorn209. This was posted to our old website back in May of 2016 (moving it here to preserve and update it)
TROUBLE SHOOTING AND COMMON MISTAKES
You must read and understand the Remington 700ML owners manual prior to using our conversion kit. Using our 209 conversion replaces the breech plug; so you have to apply what the Remington 700ML Owner’s Manual says about nipples, flash holes, and caps to flash channels, vent liners, and 209 primers.
Failure to Fire, Misfires, Hang-Fires, Bloopers, etc:
Typically these sorts of malfunctions are caused by one or a combination of: -1. Using weak ‘muzzleloader’ 209 primers with Blackhorn209 -2. Obstructions or contaminants in the flash chamber (improper maintenance) -3. Failure to seal and compact the charge when using Blackhorn 209. -4. Not replacing the mainspring during conversion/poorly installed conversion, improper firing pin protrusion, using oils/grease that gel when cold, failing to properly reassemble after maintenance, etc.
First and foremost: The mainspring should be replaced during conversion. The original configuration subjected the mainspring to lots of corrosive blow-back, heat, and extra cycles. All quickly reduce its effectiveness. If not replaced, light and inconsistent primer strikes are probable. Also if the firing pin protrusion was not set properly, or there is a bur, rust, or crud causing the firing pin to hang up, failures to fire are probable. We always replace the mainspring as part of our installation service and include a new mainspring with our kits. If you did it yourself and are having trouble with detonating the primer: Take the rifle to a competent gunsmith to remedy these or any other unsafe or abnormal condition, or buy our bolt cleaning and mainspring replacment service and we’ll take a look at it.
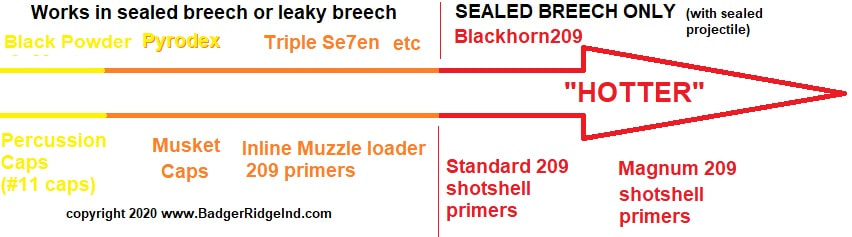
Use only standard shotshell, full powered 209 primers with Blackhorn209. The primer must be sealed!!!
Properly sealed discharged 209 primers, this is what a fired 209 primer should look like
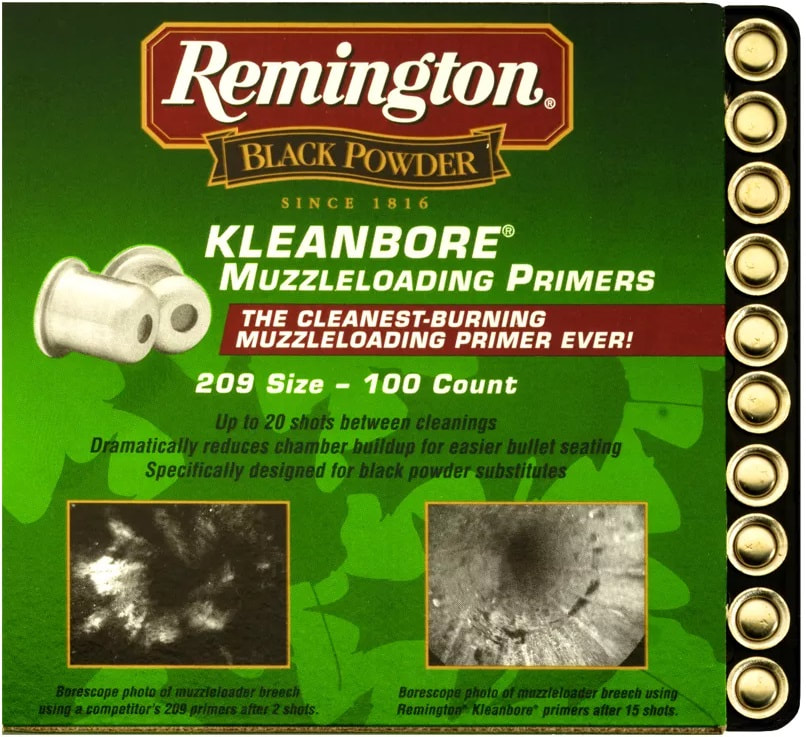
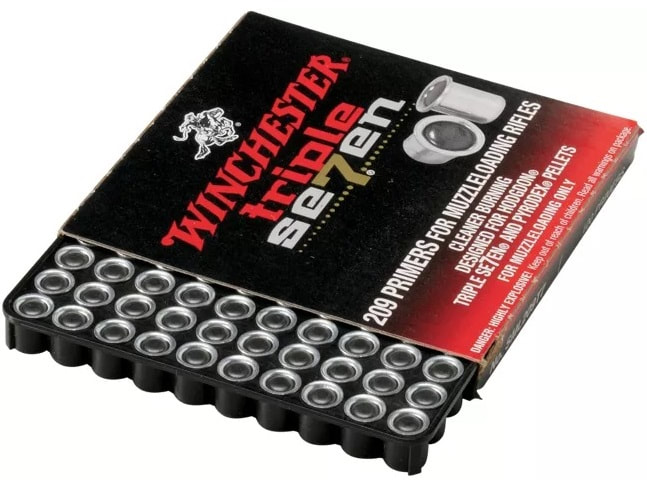
Besides leaking at the primer. It is critical that you understand: Any primer that says “inline Muzzle loader” or is titled by a black powder subsitue, or says it has reduce fouling or a “KleenBore” is too weak for BlackHorn209. I wrote a lenghty blog post about this if you want more details.
These Remington KleaBore muzzleloader 209 primers are too weak for BlackHorn209
These Winchester 777 muzzleloader 209 primers are too weak for BlackHorn209 powder
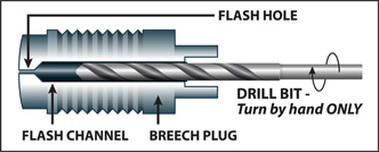
Remedies for obstructions or contaminants in the flash chamber/improper maintenance: — Clean the flash channel of the breech plug with a 7/32 drill bit (only use your fingers and light pressure… do not remove metal!!!) Use standard bore cleaning solvents and round brushes to dissolve and scrub away any remaining contaminates.
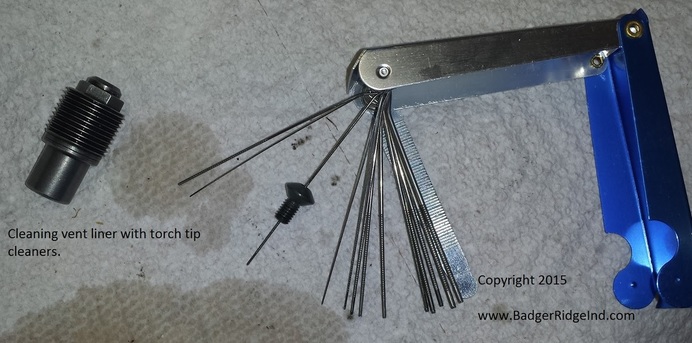
–Clean the flash channel of the vent liner with torch tip cleaners. Break cleaner works well to remove oils and greases and any remnants, some guys use IsoPropal Alchohol (IPA). You should see a nice round flash hole when you hold the breech plug up to a light source, and the expansion chamber between the flash hole (vent liner) should be free of debris, dry and clean.
Breech plug, vent liner removed. Vent liner being cleaned by torch tip cleaner.
Remove any lubricants, greases, or oils in the flash channel prior to loading. — Keep anti-seize only on the threads of the breech plug and vent liner; anti-seize or any other lubricant will reduce primer heat and cause ignition problems when in the flash chamber, or face of the breech plug.
— Swab out any excess oil left in the barrel with a dry patch before loading. You can swab it out (typically with an evaporating solvent), or sometimes even blast it out with an aersol can (like brake cleaner).
— After doing the stuff above: Some guys will take an unloaded rifle, and prior to loading, pop one primer and watch to ensure flame/lots of air shoots out the end of the muzzle to ensure the flash path is clear and dry.
In cold climates avoid greases and oils that gel or congeal when cold — We use and recommend only dry PTFE lubes on the firing pin assembly
If you are using full powered primers and doing the above maintenance and still having issues only when using Blackhorn209 (typically diagnosed by successfully and repeatedly igniting a load of other easier to ignite black powder substitute), the cause is most likely a poor seal on the primer or projectile.
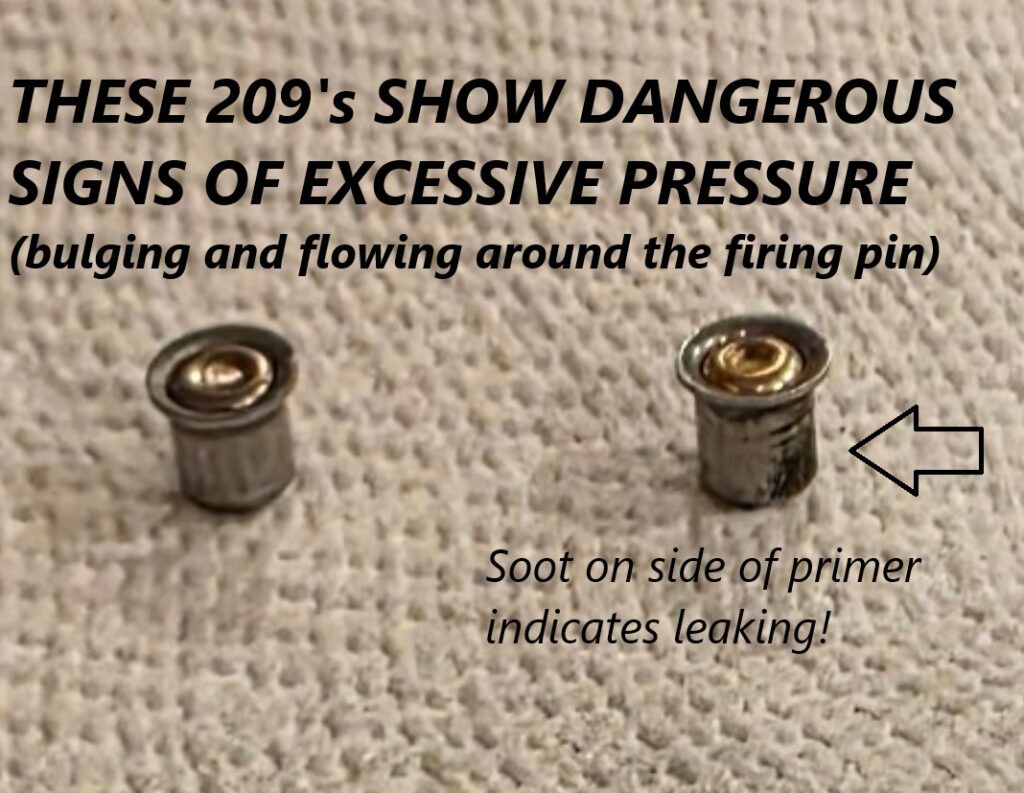
Over Pressure and leaking 209s
Poor primer seal can also be diagnosed by having soot or blow back on the sides of the 209 primers; only the primer’s face should have soot on it (check out the picture above)
ONLY SABOTS AND HORNADY BORE DRIVERS HAVE A SOLID REPUTATION OF SEALING THE PROJECTILE:
Most other conicals (PowerBelts, Federal B.O.R. Lock, minie balls, etc) will not adequately seal and will give bloopers and misfires!
BOTTOM LINE METHODS TO GET RELIABILITY WITH BLACKHORN209
— Seal Primer: full power 209 shot shell primer swaged and sealed properly into the breech plug; one should feel some resistance when closing the bolt with a primer in the nose. This is because the primer is being swaged into and sealing the breech plug. Failure for the primer to seal is commonly caused by over or excessive breech plug tuning, or poor primer fit. Correct by changing to a larger size brand of primers (Winchester are the skinnest, CCI-Federal-Remington are next, then foreign tend to be bigger), or purchase a new breech plug & do not over tune.
— Change projectile: Powerbelts, Bore Locks, Minet, Lubed conicals, Minnie-balls, etc do not fully seal (aka obturate) until the powder charge expands and presses them into the rifling grooves. Use snug fitting sabots with properly sized bullets with Blackhorn209. Some report great results with the Hornady Bore Driver bullets.
— Change powder: Black Powder and its other substitutes will combust easily and work OK when not completely sealed, but Blackhorn209 needs a good seal for proper ignition. Changing powders when one has a a poor seal is circumventing the problem rather than fixing it.
So in summary:
1> You need to make sure your 209 conversion kit is properly installed 2> You still have to clean the crud out of the flash channel like you would any muzzleloader, it just requires a few different tools. In many ways it is easier than taking care of a side lock. Dry PTFE lubes work great on the firing pin and action at all temperatures (hot and cold). 3> When you change to Blackhorn209 those weak 209 black powder primers aren’t going to do it. 4> And the old school, easy load, seals with combustion, projectiles don’t work well with Blackhorn209 neither.Keep it simple: Use our kit with modern sabots and properly sized bullets, standard 209 primers that swage and seal, and you’ll nearly certainly be malfunction and blow back free.
This was originally posted at our oldwebsite many times. Reposting it here.
We’ve been selling and installing our great 209 conversions for years now. And I’ve noticed my questions and sales following trends influenced by the various hunting seasons and their associated rules. This time of year many folks are getting ready for Colorado’s muzzle loader season, typically focusing on harvesting an elk. So I frequently edit and re-post this one. The commentary here was also added the to the FAQ (Frequently Asked Questions).
Close up of Remington 700 MLS feeding 209 primer into sealed breech
Q: I hunt in Colorado, sabots are not allowed for hunting during muzzleloader season in Colorado. I want to use your awesome 209 conversion, but you say you recommend sabots with jacketed handgun bullets. What are my options?
A: Short answer is our kit will work great with any projectile. I’ve found Pyrodex, Triple Se7en, and black powder work best with non sabot projectiles. So I suggest that you use our kit and any muzzle loader safe powder (besides BlackHorn209) for your Colorado hunts with Colorado legal projectiles.
UPDATE TO ADD: Some folks are reporting good results with the new Hornady Bore-Driver bullets and BlackHorn209 powder. They have a substantial plastic base on them that seems to seal well and function with BlackHorn209. You may want to try it out yourself.
Long answer:
I realize not all 50 state have the same rules. And some state’s rules are just plain silly. I wrote a blog post about that.
The main thing to remember here: the powder you chose must be compatible with the projectiles you use.
Animated Gif Loading primer in Remington 700 209 sealed breech
Our kit will seal the breech, which keeps the crud out of the bolt and action no matter what muzzle loader safe propellant you chose. Our kit is compatible with all muzzle loader safe propellants: pellets, loose powder, etc. Also using 209’s will give you more ignition heat and thus more reliable ignition over caps. And seeing our system keeps the crud sealed into the breech plug, the 209 is ignited reliably too. But the powder and projectile choice is up to the shooter. Read the manuals/instructions and follow them when developing loads.
Blackhorn209 powder is different from Pyrodex & Triple7even: To be reliable BlackHorn209 needs to be fully sealed; i.e. sealed at the breech (which our kit does), and sealed at the projectile. Minnie balls, minet, power belts, B.O.R. Lock MZ and other easy loading projectiles that are legal for Colorado muzzleloading, don’t usually seal until the powder combusts and forces them into the grooves. This deformation sealing the bore after combustion is called obturation. The problem is BlackHorn209 doesn’t burn well until it’s sealed and can build pressure. So it’s likely to have bloopers, miss fires, and hang fires with obturating projectiles. Sabots seal well to start, thus if you are using BlackHorn209, it’s recommended to use sabots.
Though the new Hornady Bore Driver bullets are reported to seal well and work with BlackHorn209, I haven’t tried them myself.
Never use smokeless powder in your Remington/Ruger! It says it right on the barrel!
Because Colorado doesn’t allow sabots during the muzzle loader seasons I would stay away from Blackhorn209. (or with a lot of trial, I may try the Hornady Bore Drivers).
Otherwise, If I was hunting in Colorado, I’d use our kit, choose a heavy projectile (250gr or more) that seals on ignition: Hornady BoreDriver, Thor, minie ball, lead conical, etc. But without a lot of testing, I wouldn’t use BlackHorn209; I’d try Triple7even, or Pyrodex. Although they are not as easy to clean, and will foul the barrel, they are very easy to ignite even when not sealed, and will obturate the projectile. Black powder will work just fine with these sorts of projectiles too.
I do have a few clients that report success with Blackhorn209 and magnum primers (CCI 209M or Federal 209A) using Hornady FPB’s or its aforementioned replacement: Bore Driver… and also with Thor bullets. I also had one that said the Thors worked well at the range, but didn’t fire when he had a nice bull in his sights. He said it was extremely chilly that morning, his rifle was cold soaked, and the Blackhorn209 wouldn’t go bang. He was very frustrated. I’ve heard the same report from folks using Powerbelts: worked ok at the range, but when cold soaked their rifle woulsn’t go bang: I suspect it was because the projectile shrunk with the cold, and the copper jacket or plastic skirt wasn’t quite as malleable. Also cold powder is just a bit harder to get burning, and thus that setup was unable to obturate the looser projectile and keep the BlackHorn209 burning. So I wouldn’t use BlackHorn to hunt with most obturating projectiles.
Thus without a lot of testing (like putting a loaded rifle in a freezer, pulling it out and shooting the combo… repeatedly). I would stick with Pyrodex or TripleSeven for Colorado muzzle loader hunting: they will go bang with an obturating bore riding projectile when you need it, even when it is very cold.Or I would use Hornady Bore Drivers (they have a big plastic base and seem to seal well).
Just about everywhere else, I recommend sabots because they have been accurate, easy to load, and jacketed hand gun bullets have always been very effective for me. Whatever powder you chose, the velocities your muzzle loader will produce are essentially the same that good jacketed handgun bullets are designed for. They tend to kill quickly and bring home game. Sabots are allowed in most states, so that’s what I usually recommend.
Long-term: If I voted in Colorado, I’d pressure my legislature to change the muzzleloader rules. Removing the most effective projectiles (jacketed handgun bullets are great in muzzleloaders), and the most modern muzzleloading propellant (Black Horn 209) from use is bad for the game receiving the projectile. I believe the no sabots rule promotes wounded/lost animals.
Your muzzle loader not going off when you want? Blackhorn209 giving you trouble with reliable ignition? I think we have some answers to what works and how we got here.
Orginally posted to our old website on 9/25/2020 (updated and reposted here to preserve it
Loading a 209 sealed breech system on a Remington 700 MLS
Welcome to the Badger’s Den! If an internet search brought you here searching for Savage, Remington or Ruger muzzle loader solutions, don’t worry you found the right place! Stay with us! Keep scrolling, Click here, or Look at the banners at the of the page or the right side etc for what you are looking for!
For this installment I’d like to discuss the different types of 209 primers you can use in your muzzle loader and how we got to the point where you have to understand what is compatible with what in order to have a reliable shooter. I’ll also be adding this to our FAQ (Frequently Asked Questions).
Q: Why do you recommend I don’t use muzzle loader primers in my muzzle loader? Why did the “muzzle loader 209 primer” I tried with Blackhorn209 fail but the standard or magnum 209 primer worked? Why does Western Powders (makers of Blackhorn209) say to use magnum primers, but you say I can use standard primers or magnum primers, but not “inline muzzle loading” 209 primers? Why does the primer say it’s non corrosive, but you say I need to clean my muzzle loader soon after shooting because it will corrode? I’ve got a stainless muzzle loader, do I really need to clean it after shooting?
A: These are all Good questions with seemingly contradictory information.
If you want the short answer, and you have a Remington 700 ML/MLS or a Ruger 77/50, the short answer is: buy our conversion kit, use full powered standard or magnum 209 shotgun primers and pair them withSabots and Blackhorn209. Clean your muzzle loader thoroughly after shooting.
The short answer also can be summarized as: not all muzzle loader and gun cleaning stuff is compatible with all other muzzle loader and gun cleaning stuff. Read and follow each item’s directions. Our kits seal the breech, so our kits are compatible with any muzzle loader powder. Using our kit helps simplify much of the compatibility issues.
If you want the long answer, please keep reading:
Remington 700 Modified with our 209 system feeding a primer into the breech plug to seal it up and improve performance and reliability
The long answer is, well… long:
First lets talk about primers in general and then some history of modern muzzle loader and black powder substitute development. Then BlackHorn209 muzzle loader powder.
Yes: modern primers (and percussion caps) have been non-corrosive for years. Corrosive primers formerly used fulminates, like mercury fulminate: their residues are corrosive, but for quite some time most western countries have used other non corrosive stuff (like lead styphnate). The Eastern Block countries were slower to adopt non-corrosive primers, which is why you are likely to run into old ammo from them that has corrosive primers. So today primers are still labeled corrosive or non-corrosive… FYI corrosive primers that use Mercury Fulminate attack brass and make it brittle. You want to avoid trying to reload any brass fired with corrosive primers… especially if it has had the residue on it for a while.
Regardless of the primer/cap, Black Powder and most substitutes produce corrosive residue (aka fouling). In the unique case of Blackhorn209 it’s fouling is not corrosive, but it is hygroscopic (which coats the bore with water that promotes corrosion). So you need to clean any muzzle loader using Black Powder or a substitute soon after firing.
Some manufacturers responded to this by offering coatings, like cerakote, nickle, etc… others use stainless steel to protect the gun from the corrosive fouling. Regardless of steel or treatments that may slow the corrosion, cleaning after shooting is still required to protect the metal from the effects of these residues. Also breech plugs and their components (along with bolts in leaky breech setups) can be fused into the rifle by the fouling alone. Then factor it the fouling’s corrosive tendancys: if not properly protected before firing and properly cleaned after firing a breech plug is likely to get stuck.
Breech plug left uncleaned and covered in BH209 residue (has been cleaned and scrubbed now)
Further complicating things is that Black Powder and most of its substitutes’ fouling builds with each shot, and tend to be sticky. This fouling will bind and cement stuff together, like breech plugs into barrels. Blackhorn209 is the exception here. It has no more fouling on the 500th shot than after the first, and its fouling is not sticky nor does it tend to lock stuff together. See the breech plug above… it corroded but didn’t get stuck in the rifle after being neglected (it didn’t stick liekly because of the BlackHorn209 powder). But I’ll get into Blackhorn later.
Crud rings became a problem when the venerable standard 209 primer’s with so much more priming compound than percussion caps were introduced to muzzle loading. The crud ring forms near the breech (with Black Powder and all its substitutes… except Blackhorn209). It’s caused by the organic residue of Black Powder (and its first substitutes) mixing with the inorganic residue of the priming compound.
These are cooler muzzle loader primers that reduce crud rings (but don’t work well with BlackHorn209)
Reduced powered inline muzzle loader 209’s (Remington “Kleanbore”, Winchester “777”, CCI Inline muzzleloader, etc) were created to combat the “crud ring.” Standard shotgun shells are loaded with smokeless powder and smokeless needs a bunch of priming compound to get it burning reliably. So standard 209’s are pretty darn hot. With “muzzleloader” 209’s, the basic idea is to introduce less inorganic priming compounds because Black Powder and most of its substitutes are reliably ignited by lower charges than a typical shotgun 209 produced. Reducing the inorganic contaminates makes less of a crud ring and makes it easier to clean the crud ring (when cleaning between shots). So that makes these “muzzle loader” primers hotter than a percussion/musket cap, but cooler than a standard 209 primer.
These are Winchester’s muzzleloader primers (they don’t work well with BlackHorn209)
However, the logic runs a bit circular when looked at retroactively… guns were designed to use 209s in order to leverage their hotter ignition and hence become more reliable (and of course they were marketed as such and the industry made money). Then more black powder substitutes that were easily ignited, but had organic chemistry were introduced (777 etc, they were marketed as better than Black Powder and the market made money). But the guns became harder to reload/clean because of the crud ring… so the manufactures created “Inline Muzzle loader 209” primer’s that aren’t as hot but works well enough to ignite most powders and reduce the crud ring (and are marketed as cleaner, but not as less powerful… and the industry makes money). This frequently confuses folks new to the sport… intuition says use the primers labeled ‘muzzle loader’ in your muzzle loader. Also a general desire to always have the most powerful stuff would mean folks wouldn’t buy the “muzzle loader” primer if they knew it was less powerful: So who would label their primers as less powerful? Folk would want to get the more powerful standard or magnum primer and use that wouldn’t they?
So thats starts some confusion and varying advice on what to use in your muzzle loader. We hope to make it clear what to use and why… so keep reading to find out the rest of the story!
Some folks stuck with the more powerful standard primers,,, and occasionally found that if they were shooting easy loading projectiles (aka obturating projectiles that don’t seal well or lodge tightly in the barrel until deformed by powder combustion: power belts, bore lock MZ, minie balls, etc), that they lost accuracy with the magnum or standard 209 primers, but when they tried the muzzleloader primers the same loose bullets and powders grouped well. They reasoned they were un-compacting the powder charge before it got fully burning with the more powerful primers. There’s so many factors, who knows what the cause is, but the remedy seemed to be using the low powered primer when that rare case arose where full powered primers would not shoot accurately. This also reduced the crud ring.
Still, I always suggest folks try standard or magnum primers first. If they can’t get a good group, –and they are not using BlackHorn209--, then try the primer with the name of the powder they are using or another muzzleloader specific primer (ie try full powered primers first; if you are shooting 777 and it won’t group, try the Winchester 777 primer… or any other low powered muzzleloader 209 primer). Getting a difficult to clean/load situation from a crud ring? Switch to reduced powered primers.
Why do I suggest that you try magnum or standard 209’s before “muzzleloader” 209s? First, the muzzle loader specific 209’s have always been about double the price of standard 209’s. I assume that is because they just don’t make as many. Second, if you can get it to work with more heat, then that seems better to me as more heat will compensate for other issues when you are in less than ideal situations… like its raining or snowing on a hunt and a big buck appears in front of you.
Note this is showing primers related to how ‘hot’ they are and how hot (or sealed up) a powder needs to be reliable. A hotter primer can ignite a powder lower on the scale (A standard primer easily igntes black powder).
Of course if they are using our kit to seal the breech, I always suggest they stay away from obturating projectiles and use sabots with Blackhorn209 and full powered or magnum primers. Our kits work with all 209’s, and all black powder/substitutes. The real question is whether the propellent you chose is compatible with the projectile you choose.
Blackhorn2009 is not compatible with obturating projectiles (projectiles that don’t seal until deformed by the burning/expanding powder charge) and is not compatible with weaker “muzzle loader” primers.
After reduced power “Muzzle loader 209’s” came out Western Powders introduced BlackHorn209 (which is nitrocellulose based) and needs at-least a standard 209. Nitrocellulose is inorganic and cleans up with solvents that also dissolve priming compound residue… so no more soap and water/Windex, no more crud ring, no more fouling in the barrel that builds up with each shot (though you can still get priming compound built up and blocking a breach plug’s flash channel… you may need to pull and clean the priming compound residue from your breech plug every 5-10 shots or so).
So now-a-days we have “muzzle-loader” primers that are not hot enough to set off nitrocellulose powders (like typical shotgun shells use). And now we have a great powder called BlackHorn209 that has a good bit of nitrocellulose in it and thus needs standard or magnum 209’s to go “bang”. However the intuition of some folks is to use the stuff labeled the same as the purpose… got a muzzleloader, so you use “muzzleloader” 209’s… right? Definitely wrong when using BlackHorn209.
Why bother with BlackHorn 209? Its just a better solution! First, it makes a lot less smoke… you shoot an animal, you have a ton less smoke to look through and watch it run off/fall over dead. Also, because it doesn’t build sticky fouling: It doesn’t require cleaning until the end of a day, and it cleans with standard gun cleaning stuff like Hoppies etc. Standard gun cleaning stuff was made to clean up priming compound residue and nitrocellulose fouling, copper fouling, lead fouling, plastic fouling etc, but these modern cleaners do not work as well with Black Powder fouling (along with most of its substitutes).
BlackHorn209 performs better. It tends to be more temperature stable than BP and its substitutes… ie it doesn’t swing as high or low as they do with large temperature swings… (not saying it isn’t affected by temperature… just saying it doesn’t swing as much). And is generally regarded safer as its harder to detonate than black powder. Just look at its MSDS if you want the specifics. If you were to chrony 300gr projectiles with equal volumes of BlackHorn209 against any other Black Powder or substitute, you’ll find BlackHorn209 has an edge in velocity. All of this is why I use and recommend BlackHorn209 with sabots and modern jacketed handgun bullets. Bottomline: you have to use standard or magnum primers with BlackHorn209.
This further gets hard for the novice as most stores typically stock muzzleloader only things in the ‘muzzleloader’ section, but if they have a reloading section that is where they put the standard or magnum 209 primers. Then guys who just want to shoot, hear that BH209 is better, or see a new thing on the shelf, and buy some along with the ‘Muzzleloader” primers in the same “muzzleloader” section. Then try to shoot it in a leaky breech or with a projectile that isn’t sealed setup… and it fails.
They get mad and rail against BlackHorn209 powder. Remember nitrocellulose needs to be sealed/fully contained to burn properly, the simple answer is sabots… and standard or magnum primers. Some may interject that there are other more experimental ways to seal a projectile. Yes there are but I won’t address them as they are not mainstream.
Back of a Blackhorn 209 bottle. Note what it says about primers, compatible sealed breech systems, and min/max loads
Remember the issue isn’t the powder. It’s because the gun is leaky… and/or they didn’t clean the flash channel and burnt primer compound is clogging the breech plug, and/or the breech plug wasn’t made to shoot blackhorn209, and/or the weaker muzzle loader primer is used… and/or the projectile isn’t sealed (like Bore lock MZ’s or powerbelts in some rifles)… In those cases: Blackhorn209 bloopers, misfires, or hang fires, and folks get upset and blame the powder… when they should be blaming themselves for not reading/following the instructions on the bottle of BH209, and/or walking over to the shotgun shell reloading section and grabbing full powered or magnum 209 primers. Or googling it and finding a thread here where I explain how to get it to work in an old muzzle loader built before BlackHorn209 was on the scene (like having us retrofit a vent liner into your old breech plug)… or…
Then you get to today: where some of us make a living helping folks through the mess and getting them to simple effective sealed breech solutions. As most of the mistakes have been made, and most of the answers are in the product’s instructions, or posted/explained/sold here.
As for Western Powders (now owned by Hodgon Powder Company) recommending magnum primers for use with BlackHorn209… all I can do is wager a guess. (I don’t work there nor can I speak for them). I –think– its a combination of: that is what they tested, and tested, and tested. Factored against: if you want it to reliably go off for the best customer experience, have them get the primer with the most priming compound that may correct for a user error (like not fully sealing the breech or projectile, not fully removing oils and contaminates, not cleaning well, etc). Also if hunting in extreme cold, I do recommend magnums myself. Though I must admit, I’ve never myself seen an issue setting off Blackhorn209 with standard primers that were sealed into our kits when using sabots, but I don’t get a lot of negative temperatures to test in (nor do I really want to go out in those temps and shoot a lot).
Perhaps on another installment we’ll discuss how all the 209 primers vary in dimension depending on the company producing them! (important for sealing up 209’s into the breech!)
Also don’t forget that all breech designs are not equal. Leaky breeches not only cover the shooter, the gun’s internals, and any optics in that same nasty fouling, but are hard to maintain and not as reliable as sealed breech systems. Keep reading through the Badger’s Den for answers and explanations on leaky breeches, why and how we seal them up.
Developing a load for your Remington 700 ML/MLS muzzle loader (originally posted to our old website on 11/26/2015) reposted and edited. A lot of this applies to the Ruger 77-50 but this post was written before we started supporting that rifle too.
I often am asked what loads I recommend for Remington 700 ML’s with our 209 conversion kit. When I compose my reply I try to stick to generalities, because it doesn’t matter much what I like, but what shoots well. And you can’t know that without some serious range time. Thus I like what makes sense to me and my rifle shoots well.. but that is in my rifle. Will it work in your rifle? Maybe.
Really what matters is what delivers the damage desired to your target. Also here, I’m not an expert, but I consider myself fairly well read. So I stick to generalities that make sense to me and in developing loads for my rifles what I read seemed to hold true.
Lets handle this in a manner I learned from a wise counselor. In such matters there are typically not absolutes, but ranges. And I like to stick to these three ranges: Good, Better, and Best. Of course if something is “Better or Best”, it fulfilled the requirements of “Good” and did better or was the best. Also “Good” could probably be called “Good Enough.” To keep it simple, I’ll just stick with “Good” on this post. For me, in regards to firearms, “Good” really means safe and effective.
So for owners of a Badger Ridge 209 converted Remington 700 ML we need to start by looking at what the Remington Owners Manual says about performance and safety in regards to bullets, primers, sabots, and powder. If you’ve never read the owners manual, you should! Right now! (Same is true for you Ruger 77/50 owners… read your manual!)
The excerpt below is from page two of the Remington 700 ML Owner’s manual, “Safety is Critical to Performance” (I added the bold and underline for emphasis):
“A superbly crafted gun is only as good as the hands that hold it. You can never be too careful. Shooting accidents are often caused by careless oversights such as failing to control the direction of the muzzle, failing to fully engage the safety, leaving ammunition in the chamber or using improper loads.These oversights can result in the destruction of life, limb or property. There’s no calling back a bullet once it’s been fired, so it’s critical that you know the principles of safe gun handling and storage before you ever take your new Remington firearm out of the box.
The proper use and performance of your firearm depends on correct assembly and maintenance, so it’s critical that you familiarize yourself with the information in this instruction book. Even if you’re a veteran shooter with a collection of Remington firearms, take the time to read this literature. Not all firearms are the same. That means the first step in safe handling is to learn the features and requirements of your new Remington.“
Ok, that’s a lot of good stuff there, but lets emphasize that if you use an improper load you are making an unsafe act. You may get a way with an unsafe act for a short time… until you don’t. I don’t consider any unsafe act as “Good”, thus it could never be “Better” nor “Best”
So what is an acceptable load? Well first lets see what the manual says about loading… and here we have to remember that the manufacturer of the rifle never tested it with powders like Blackhorn 209 (most blackpowder substitutes were not available while the rifle was was in production. Back then there was essentially only black powder and Pyrodex.
Also there are many good options for bullets, sabots, etc now that were not available when the Owners Manual was written. Factor in that with our 209 conversion you have changed the priming method and breech plug and you should realize that you do need to run what it says through the filter of progress in regards to percussion caps, and powder.
Please take the time to read the excerpt below. Below is excerpted from Page 6 of the Remington 700 ML Owner’s Manual... (my comments will be in bold and in parenthasis)
SPECIAL SAFETY RULES FOR MUZZLELOADERS
In addition to the Ten Commandments of Firearm Safety, there are several guidelines specific to black powder guns that muzzleloaders must observe at all times to ensure their safety and the safety of others. The following is a brief overview of these guidelines. For full details, thoroughly read this instruction book.
MUZZLELOADING SAFETY RULES
1. NEVER smoke while using your muzzleloader or while near any quantity of black powder or PYRODEX.® (Same is true for any powder)
2. BEFORE LOADING, MAKE SURE THE FIREARM IS NOT ALREADY LOADED. To make sure it is unloaded, insert the ramrod provided with the rifle into the bore to the breech plug and note its position at the muzzle. It should be approximately 1/4 inch below flush with the end of the barrel if the rifle is not loaded. (Badger’s Note: that is with the OEM breech plug, with our breech plug your ram rod should sit just above flush with the muzzle on and uncharged rifle).
NOTE: Nothing can be attached to the ramrod while using it in this way. USE ONLY THE RAMROD PROVIDED.
3. ALWAYS CHECK AND CLEAR THE FLASH HOLE THROUGH THE NIPPLE BEFORE SHOOTING. ALWAYS CHECK THE BARREL FOR OBSTRUCTIONS BEFORE LOADING AND SHOOTING. Before checking for an obstruction, put the safety mechanism in the ‘S’ position and open the bolt assembly and remove the percussion cap and residue from the nipple. Water, snow, mud or any other material can obstruct the barrel and cause barrel damage. (with a 209 conversion you must realize the same is true, but instead of caps and nipples we have primers, flash cambers and vent liners)
4. USE BLACK POWDER OR PYRODEX® ONLY TO LOAD YOUR MUZZLELOADING FIREARM. Never use even small amounts of smokeless powder, even if it is black in color. The use of any other propellant may cause injury or death to the shooter or bystanders and damage the firearm. (So by using other black powder substitutes you are operating under the engineering of the powder manufacturer, not the rifle manufacturer. If you read page 12 you will see why Pyrodex is OK… so you’ll have to read and understand the same for whatever black powder substitute you may choose… like Blackhorn 209. )
5. NEVER EXCEED THE MAXIMUM RECOMMENDED POWDER CHARGE CONTAINED IN THIS BOOK. To do so could result in injury or death to the shooter or bystanders. (Pages 16 and 17 state 120 grains (by volume) as the max, older versions of this manual had a 150 gr by volume for the MLS or “Magnum” version… I recommend you stick to this safer, more conservative 120gr by volume max… also if you choose Blackhorn209 you see it’s manufacturer lists 120 gr by volume max as well).
6. NEVER POUR POWDER DIRECTLY FROM A POWDER FLASK OR CONTAINER. A sudden powder ignition from a lingering spark could cause the entire flask to explode. Use an individual charge from a powder measure when loading your rifle. Read and follow your powder manufacturer’s procedures for powder storage.
7. NEVER USE THE WRONG AMMUNITION COMPONENTS. Only use ammunition components that exactly match the caliber markings on your firearm and are meant to be used together. Use only pure lead or Remington® brand loading components when shooting lubed conical bullets. Do not use any other lead alloys with lubed conical bullets as they may be too hard for proper and safe use in your muzzleloader. (so when you use other bullets you are not under the engineering of Remington, but your own or the bullets manufacturer… only use 451-452 bullets in a 50 cal rifle with black sabots… etc)
8. WHEN LOADING, BE CERTAIN POWDER, PATCHES AND PROJECTILES ARE IN THEIR PROPER SEQUENCE AND THAT THEY ARE COMPLETELY SEATED AGAINST ONE ANOTHER. Serious personal injury or death can result if space is left between them. To provide a reference mark for future loadings, mark the ramrod at the muzzle once a projectile has been loaded to the proper depth. NOTE: Be sure to recheck the ramrod mark if you change loading components or alter the ramrod. See Picture 13 on page 15. Never attempt to shoot out a projectile that is not firmly seated against the powder charge or does not seat to the proper depth. Remove these projectiles following the instructions on pages 18 and 19. (witness marks are key to safety!!!)
9. ALWAYS USE COTTON PATCHING. The use of non-cotton patching could build up a static electric charge possibly creating a spark that could ignite the powder.
10. NEVER POUND THE RAMROD. Black powder and PYRODEX are impact sensitive and could ignite from impact. Keep the ramrod directly away from your face or body. (Another reason I like Blackhorn209 is that detonation from impact is much less probable when compared to Black powder or Pyrodex… that is why you have to use full power 209 primers to set it off!)
11. KNOW THE RANGE OF YOUR FIREARM. Muzzleloading projectiles have a range of more than one-half mile.
12. IF THE FIREARM FAILS TO FIRE, BE PREPARED FOR A HANGFIRE. Keep the muzzle pointed in a safe direction and wait no less than one full minute before opening the bolt. A spark may have reached the powder without any sound. The rifle could fire at any moment during this minute. If the rifle does not fire within a minute, carefully follow the directions on how to handle a misfire on pages 15 and 16. (With 209’s this is typically caused by failure to properly maintain the breech plug and vent liner… see our FAQ and owners instructions for our kits for more info here).
13. RENDER YOUR FIREARM INOPERABLE WHENEVER YOU ARE NOT SHOOTING. Never place the percussion cap on the nipple until just before firing and remove it immediately if you do not fire. Never carry or store a loaded firearm in a building or a vehicle. Unload it by firing it into a suitable backstop before returning to your vehicle, entering a building, crossing or climbing up or down any obstacle that may prevent you from keeping full control over the firearm, such as a fallen tree, fence, treestand or slippery area. Failure to follow this rule may cause serious injury or death to the shooter or bystanders.
14. BLACK POWDER LEAVES HEAVY CORROSIVE RESIDUES. A thorough cleaning and lubing are absolute necessities before storage and prior to loading and shooting. Follow the cleaning instructions starting on page 19. Always carry loading and cleaning equipment with you in the field. (Another reason Blackhorn 209 is better, no fouling, and a less corrosive residue that cleans up with standard gun cleaning solvents)
15. NEVER USE THE WEATHER SHROUD FOR REPEATED SHOOTING. It is intended for single shot usage. Always disassemble and clean the bolt assembly after shooting with the weather shroud. See page 22 for bolt assembly cleaning instructions. (Our 209 conversion totally eliminates this component)
16. WARNING: Discharging firearms in poorly ventilated areas, cleaning firearms or handling ammunition components may result in exposure to lead, a substance known to cause birth defects, reproductive harm, cancer and other serious physical injury. Have adequate ventilation at all times. Wash hands thoroughly after exposure.
WARNING: Failure to follow any of these muzzleloading safety rules may cause personal injury or death to the shooter or bystander and damage to property. Do not use a muzzleloader firearm until you fully understand and practice the Ten Commandments of Firearm Safety and the safety guidelines specific to black powder shooting, to your black powder firearm and to your black powder ammunition components. If you are unfamiliar with black powder firearms, seek professional instruction from a qualified organization such as the International Black Powder Hunting Association, National Muzzleloading Rifle Association, National Rifle Association or your State Hunter Safety program. If you have any questions about the safe use of a Remington® black powder firearm, write to us at Remington Arms Company, Inc., Consumer Services, P.O. Box 700, Madison, NC 27025-0700 or call us at 1-800-243-9700.
Ok… that’s a lot of words there, and you really should read the entire manual and understand it… the only problem is that the OEM system had serious blow back and by using our conversion you must keep in mind that some of it has changed. So back to the original point, what is “Good” and what is “Better” and “Best”?
Considering what the OEM Manual said above, I think with our conversion we could re-write all that. For a Badger Ridge converted 700ML I think you could throw out #15, and summarize that the basic safety above could be condensed to:
1. NEVER SMOKE while using your muzzleloader or while near any quantity of black powder or Black Powder Substitute.
2. BEFORE LOADING, MAKE SURE THE FIREARM IS NOT ALREADY LOADED (Make a witness mark on your ramrod, then use the ram to check if it’s unloaded. If you are not sure look for light through the breech plug, or pull the breech plug and look through the bore of the barrel.)
3. ALWAYS CHECK AND CLEAR THE BREECH PLUG and VENT LINER’S FLASH CHANNEL BEFORE SHOOTING. ALWAYS CHECK THE BARREL FOR OBSTRUCTIONS BEFORE LOADING AND SHOOTING.
4. USE BLACK POWDER OR BLACK POWDER SUBSTITUTES ONLY TO LOAD YOUR MUZZLELOADING FIREARM. Never use even small amounts of smokeless powder
5. NEVER EXCEED THE MAXIMUM RECOMMENDED POWDER CHARGE of 120 grains (by volume)
6. NEVER POUR POWDER DIRECTLY FROM A POWDER FLASK OR CONTAINER INTO THE BARREL: USE A POWDER MEASURE.
7. NEVER USE THE WRONG AMMUNITION COMPONENTS.
8. WHEN LOADING, BE CERTAIN POWDER, PATCHES AND PROJECTILES ARE IN THEIR PROPER SEQUENCE AND THAT THEY ARE COMPLETELY SEATED AGAINST ONE ANOTHER. USE A WITNESS MARK!!!
9. ALWAYS USE COTTON PATCHING FOR ROUND BALLS, or SABOTS MADE FOR YOUR CALIBER BARREL AND BULLET or CONCICALS MADE FOR YOUR CALIBRE BARREL.
10. NEVER POUND THE RAMROD.
11. KNOW THE RANGE OF YOUR FIREARM. Muzzleloading projectiles have a range of more than one-half mile.
12. IF THE FIREARM FAILS TO FIRE, BE PREPARED FOR A HANGFIRE.
13. RENDER YOUR FIREARM INOPERABLE WHENEVER YOU ARE NOT SHOOTING. Never place the primer on the bolt nose until just before firing and remove it immediately if you do not fire.
14. BLACK POWDER AND MOST SUBSTITUTES LEAVE HEAVY CORROSIVE RESIDUES. EVEN BLACKHORN 209’s LIGHT RESIDUE WILL PROMOTE CORROSION. Proper and thorough cleaning and lubing are absolute necessities before storage and the bore must be clean and dry prior to loading and shooting. Always carry loading and cleaning equipment with you in the field.
15. ONLY SHOOT IN A WELL VENTILATED AREA, PROPER RIFLE RANGE, ETC., AND WASH YOUR HANDS
Again, before you read on you really should read the entire OEM manual, with emphasis on Pages 12-17.
But at this point I’m sure most have dozed off or skimmed down to the conclusion, and honestly that worries me… you really need to read and understand all of this before you try to load, prime, or fire your rifle… but here’s what i think is ‘at least good’ for bullet, primer, powder selection for a Remington 700ML with a Badger Ridge 209 conversion:
GOOD (Ordered from “Good Enough” to getting better in my opinion)
Bullets :
Lead round balls of appropriate size, with cotton patching, and proper lubrication (50 cal: 179Gr)
Lubed conicals, Minet projectiles, power belts, bore-locks, etc (but probably not with Blackhorn 209 as they don’t always get the best initial seal)
Modern Conicals (like the Hornady Bore Driver, or some of the Thor’s… )
Plastic sabots sized for the caliber of the barrel, with lead or jacketed bullets of a size that matches the inner portion of the sabot (200 to 400 gr) (work well with black powder or any black powder substitute)
Powder:
2F (FF) or FFG black powder
Pyrodex RS, or other ‘stinky chemistry’ black powder substitutes (Either pelletized or loose powder)
TripleSeven (pelatized or loose powder)
Blackhorn 209 (only loose powder… in my opinion loose powder is better as you can dial in a load)
Primer:
Black powder specific 209’s (only use with any black powder/substitute except Blackhorn209)
Standard modern shot shell 209 primer or Magnum Shotshell 209 primer (will ignite any blackpowder/substitute)
Just some of the bullets and sabots I’ve acquired while determining what is best… the box of lead round balls hasn’t been touched in almost 20 years!
Its not hard to do BETTER:
First, I absolutely recommend that you forget round balls; they have horrible ballistics and poor performance in larger game, especially at longer ranges.
BULLETS: You probably will want to stick with sabots and jacketed hand gun bullets; handgun bullets are designed to be accurate, and expand at velocities your muzzleloader will produce. There are lots of pointed hand gun bullets now like Hornady FTX’s that have improved ballistic coefficients. There are also jacketed ‘muzzle loader’ bullets that frequently come with sabots that work well. 200 to 350 gr bullets are typically used in modern inline muzzleloaders with success. You may find that pointed bullets require special loading jags or their points get damaged and accuracy can suffer. My Remington’s have always liked heavier bullets (250gr or more).
I recommend you stay away from .458 (rifle) bullets as many have thicker jackets and do not expand and perform as well at muzzleloader velocities. But if you can find .458 bullets that are made for a muzzleloader then you may have a great bullet. Also some 451/452 Handgun bullets may have thicker jackets: they won’t work well at muzzleloader velocities (The thicker jacketed handgun bullets are typically labeled “MAG”… stay away from bullets labeled “MAG”).
POWDER: Any modern black powder substitute is better than black powder in my opinion. I found that Blackhorn 209 works the best: I get the best accuracy, faster velocities, no fouling between shots, and its easier to clean up. It does cost more, but sometimes that’s how it is: quality costs.
If I couldn’t get my hands on BlackHorn209, or couldn’t swallow the cost, I’d use loose Triple7even powder.
Rem 700 MLS feeding a 209 primer into a sealed breech system
PRIMERS: Any standard 209 primer can work with our breech plug if properly tuned. Some folks play with primers after working up a load and have reported improved accuracy just by changing brands. However as each brand of primer has different dimensions, by switching primers you make suffer a leak or need to re-tune a breech plug, or buy a new breech plug for that specific brand of primer. So, again your mileage may vary. My KISS answer: get whatever standard USA made 209 you can could find a lot of stick with it.
But, hands down I’ve found the older copper standard CCI primers worked the best. Mostly because they always fed and have never stuck in a bolt nose on me. The new CCI 209’s are silver and I haven’t played with them much to endorse them. So I’d use whatever USA made primers I could find and stick with them: CCI’s (standard or magnum), Federal (standard or Magnum), Remington STS, or Winchester.
Anyways, I’ve had primers , even CCI magnums stick at low powder charges and require a dry fire to remove. Winchesters are the worst in our Remington 209 conversions as far as sticking in the nose. However, a dry fire has always removed any stuck primers for me.
My rifles shoot good enough, with my older CCI’s, so I’m not fiddling with primers until I shoot through my stash: I’m sticking to what I know works.
Bottom line: Any Standard (or Magnum) 209 shot shell primer will ignite any black powder or substitute. Blackhorn209 won’t work reliably with ‘muzzleloader’ 209’s (777, Kleanbore, CCI Inline Muzzleloader, etc), so you see I don’t recommend messing with muzzleloader primers in general. They do work just fine with all black powder and substitutes besides BlackHorn209.
WHAT I’VE FOUND TO BE BEST (in a 50 Cal)
Black MMP Sabots, 300 Grain, 451/452 Jacketed Handgun bullets (like Hornady XTP’s and ‘non MAG’), and somewhere between 80 to 100 grains by volume of BlackHorn209 powder, standard 209 primers (Federal, CCI, Remington, Winchester… not ‘muzzleloader’ 209s).
Why do I recommend this as best?
As for conicals, power belts, bore-loc’s, minet’s etc… I personally I’ve seen better terminal results on game with sabots and good jacketed hunting bullet, but some of the new conicals (ie not most of the powerbelts) are a good option too as far a terminal performance. The only conical that works well with BH209 seems to be the newer Hornady Bore Drivers.
My opinion on PowerBelts: You could use powerbelts (just not with Blackhorn209), but they do have a bad reputation for under performing on game in many situations. Besides not working well with BlackHorn 209, I have always done better staying away from them; I’ve read a lot of bad things about some of these as all but one version of the powerbelt doesn’t have a good copper jacket that controls expansion, while holding the bullet together. However your rifle may like them, and they are ‘good enough’. Just remember: Blackhorn209 has trouble with these sort of projectiles that require the initial expansion of the powder charge to seal them to the bore… especially in a Remington 700ML. If you are using Blackhorn209 you should stay away from these and use sabots!
Advice on choosing a sabot for better or best results: You will probably have the best accuracy with the thinnest sabot petals. I’ve read in various books that its because the sabot separates from the bullet ‘cleaner’ and quicker with thinner petals… I’ve also heard its because the thinner petals allow for better concentric alignment of the bullet to the bore. Honestly, thinner petals just seem to work; I don’t claim to know why, nor do I really care about the ‘why’. I believe it be true because I’ve seen it prove out at the range: Use the sabot with the thinest petals for best accuracy.
Remember what I said about .458’s above… they will give you thinner sabot petals, so you proably can get them to shoot well, but are they the bullets with thinner jackets that are made to expand? (Too many 458 bullets are thick jacketed and made for centerfire rifles used on large/dagerous game). If you know the bullet is made to expand at low speed and you can find sabots for them in your .50 you may have good results.
While 458’s are a mixed bag, as long as you stay awy from the “MAG” 451/452 handgun bullets you can pretty much be assured you’ll get prpoper expansion: so that’s why I say that 451/452 jacketed handgun bullets are better: I can be really sure they will expand properly.
So my recommendation of what is best, is counter to what some would like… ie the smallest diameter bullet, with the highest BC, going at the fastest speed (requires thick sabot petals). From what I’ve seen accuracy is all about thin sabot petals. And its accuracy that lets you reach out and hit distant targets where you want. High velocity and fast flat shooters help at range, but only if they are accurate to start.
I know my 50 cal rifles shoot black MMP sabots with 45 cal bullets better than they do green MMP sabots with .44 cal bullets… or with harvester crush rib sabots… but not by all that much. I haven’t proven this with my .54 yet, but so far it shoots purple MMP sabots with 50 cal 300 grain FTX bullets very well. So well I don’t know if I’m going to do any more development… I’ll probably just use it as a loner/back up rifle and hunt it as is.
All that said, I have clients that swear their 50 cal rifles love the 44 cal bullets with MMP green sabots.
I have one 50 cal rifle that likes 250gr XTP’s the most. It shoots them noticably better than 300gr XTP’s, or 250 or 200gr FTX’s… I wish it didn’t because I like the idea of slightly flatter shooting (of the pointed FTX). I still load it with 250 gr XTP’s when I’m shooting at deer… because that is what that rifle shoots best. At this point I think I’m rambling and you can see that we may be splitting hairs when it comes to BC’s and velocities in muzzleloaders.
So your mileage may vary!
Bottom line: Stick with Sabots, handgun bullets, full power 209 primers, and Blackhorn 209 and you’ll definitely be doing better and perhaps even best…
How do you get thebest out of your rifle? I suggest you take a few of the better options above, go to the range, apply the safety rules and procedures you find in the Owner’s Manual and see what your rifle likes.
Your way forward: If you don’t own any muzzleloading components yet, I encourage you to convert your Ruger 77/50 or your Remington 700 ML to our 209 kit, and pick up some MMP Sabots from us. Then go to your local sporting goods store and get a box of correlating size quality handgun bullets, 209 Primers, and Blackhorn 209 (along with standard black powder accessories like a powder measure, flask, starter, etc).
Read the owners manual and the directions on your powder bottle. Then go to the range and work up your loads as they direct.
Hope this helps and sets you on a good safe path. Truth is that you have a lot of choices to make. In general, if you pick better components and loose powder. Then work up per the manuals, you will probably quickly find out what works very well if not best.
Always follow the ten commandments of shooting and special muzzle-loader safety rules
Comments from our old website I though were worthy of moving over with this article:
Comment from John 9/8/2020 Many years now with the 209 conversion. LOVE IT!!! I highly recommend it. I shoot Black 50 Cal MMP sabots and 45 hand gun bullets with 100grs loose powder and at 100 yard 1″-1 1/2″ 3 shot groups.
Thanks again for a great upgrade.
John
Reply from Badger Ridge 9/9/2020
Thanks for the positive feedback! We appreciate your business!
Comment from Bruce Hicks 3/31/2020
I am interested in your 209 conversion kit hows the grouping after conversion Thank You Bruce
Reply from Badger Ridge 3/31/2020
While we make no claims on accuracy, the kit does tend to improve it, as sealing up the leaky breech tends to produce more consistent pressure, which usually translates into more consistent velocity, and hence better groups. But really there are so many factors in accuracy (namely the guy behind the trigger), that we cannot make any claims.
Comment from John Brackin 10/11/2017 I just had my older Remington ML700 converted with your Badger Ridge 209 conversion kit. Are you are saying that this older Remington can safely shoot 100 grs. of BlackHorn 209?
Reply from Badger Ridge: 10/11/2017 Yes, 100gr by volume is in the safe charge range, per the Remington Manual, and the information on the powder bottle. Both state starting load of 80Gr by volume; maximum load of 120gr by volume. My rifles have never shot best at any charge over 100gr by volume.
Comment from Nicolai 9/24/2022
Happy customer here, reporting in on great success with the Cheddite CX2000 209 primers, that are readily available. I spent 5 minutes time tuning ing the breech plug per the instructions, have had zero blowback, zero bulging in the primers. In fact all I need to do is tip the gun to drop the fired primer from the bolt face.
This old remington 700ml now fires 100% of the time with 91 grains of Blackhorn 209 (by weight) with the Powerbelt Platinum 338 grain projectiles. I shot a few 270’s and did not enough the same level of accuracy.
Thank you gents.
Reply from Badger Ridge 9/24/2022 Thanks for the positive feedback.
First, you are using way too much BlackHorn209. 91gr by weight would be an over charge. Go by volume (80-120 gr by volume is the range listed on the bottle). By my math you are 10 gr by volume over… nuts… an over charge can’t be good, much less better, nor best.
Again: All of my rifles have always shot the best between 80-100 gr by volume of BlackHorn209
Also, after about 100-110gr by volume with a 338gr projectile… you will probably be throwing unburnt powder down range… whats the point in that?
Those foreign primers are tricky to get to feed, swage, and seal. That’s why I recommend only US made primers: Glad you got them to work and are satisfied.
Also, I’ve had a customer use a very similar load, and it worked fine when it was 50-60deg F (while he was at the range). He then went out west, was in the mountains with a cold soaked gun, and the Blackhorn209 wouldn’t ignite. I believe it was because the powerbelts don’t seal as well as sabots. And Blackhorn209 needs to be fully sealed or it won’t ignite… especially when its cold and it doesn’t have a 100% sure seal.
The trouble is that there are lots of variables, and one of which is that ‘powerbelts’ have many different versions with different features.
Bottom line: I’d suggest using the Hornady Bore Driver over any Power Belt. Your mileage will vary: best of luck! Hope you bag a bunch of big ones!
Comment from Steven 11/1/2020 I purchased the Badger Ridge conversion kit for my Remington 700ML. The 209 primers get stuck in the slot on the bolt. Is there a defect in the bolt or do I need to try different primers
Reply from Badger Ridge 1/2/2021
Sorry I missed that you posted this question and didn’t post back sooner! (I was hunting out west when you posted!)
Primers stick in the nose in two different situations.
The most common is spent/fired primers sticking in the nose. The instructions tell you how to deal with this: dry fire on the spent primer. The second strike of the firing pin loosens the stuck primer. Everytime I’ve had one balloon (typically winchester primers) a dry-fire on the spent primer loosened it and it fell out. I even made a video with some sticking primers that shows this. (And its written in the instructions).
The other time primers stick in the nose is when there are burs from the manufacturing process that grab unfired primers. I test every nose with a primer, look for burs and remove them to prevent this from happening to customers, but I’m not perfect. If you are having unfired primers stick in the nose, look for the burs and remove them (I use a dental pick and small jewelers files), or send it to me and I’ll do it and send it back.
Yours,
Tom www.Badger-Ridge.com
Comment from Mike Cervantez 3/26/2019
Tom,
Great article. I just purchased on of these muzzleloaders still the box from a friend. I am just a beginner at muzzle loading so this purchase is just a beginning. I have a question about loads. If the heaviest load is 120 grains, do manufactures make pellets in increments of 10 or 20? Or, is this only for powder loads? I know the pellets come in 50 and 100 grains. I have read about guys shooting 150 grains through these firearms but I am not taking that chance. I am good with 100 grains.
Thanks Mike
Reply from Badger Ridge 3/26/2019 I’m far from an expert on pellets: I use loose powder because I’ve found it best to be able to dial in my load. All my rifles have shot best somewhere between 80 -100gr (by volume)/ I specifically love Blackhorn209 (which only comes in loose powder).
I’ve only seen 50Gr pellets myself. I’d never risk my life and limb on something I heard on the internet: 120gr by volume is the max for the Remington 700 ML/MLS per Remington’s documentation. Can’t get 120gr when adding in increments of 50gr.
Plus your rifle doesn’t have enough barrel to burn more than about 100grains of any sort of powder/pellet. If you were to shoot higher quanties over snow, or in front of a high speed camera, you’d find lots of unburnt powder/pellets going down range.
Comment from Dan Wescott 9/5/2019 I bought a used 700ML and started with 80 grs of triple 7 powder but was shooting low with original open sights with 223gr powerbelts. I live in Colorado and can’t use sabots here so I’m looking for any information on non sabots that work best for deer or elk. I can easily switch powder to Blackhorn, but can’t switch to sabots. (Wish I could). My rifle has not been converted to the BR209. Any help is appreciated.
Reply from Badger Ridge 9/7/2019 Our conversion kit works great with all powders. Like you mention you have to use a powder that is compatible with your propellant, so if you are not using sabots, BlackHorn209 is not recommended. However Hornady Bore Driver bullets are Colorado legal and seal well (and seem to work well with Blackhorn powder).
I wrote a lengthy blog post here about Colorado rules and what I’d do:
Short answer: Personally I’d use Hornady BoreDrivers or even Thor’s (I don’t care for Powerbelts… they have a bad reputation in terminal performance).
Comment from Mark Ervay 12/9/2019 I have owned the 700ML since they first hit the market. Shot many sabots through my gun using 2 pellets (100gr equiv) with horrible results on accuracy. The plastic casing was burning up and causing the bullet to tumble. I then talked to hardcore muzzleloading guy and he told me the scrap all that and go to loose powder (Goex) and I used Hornady Great Plains.
I used like 85 gr of powder and dead on accuracy with that setup. I switched to the Horaday FPB 350 bullet and 100gr powder with the CCI Mag caps and not one misfire. My point here is you need to find what works best for your gun. I will not switch to 209 primers as long as the caps are working fine for me.
Reply from Badger Ridge 12/9/2019
Feel free to keep shooting what works and is safe. I’d wonder what bullets you were using with what Sabot… the Remingtons like 240gr or heavier bullets (usually the black sabots with 45 cal 300gr XTP or equivalent will work best in these rifles).
Anyways, when you get your first misfire with the original leaky set up, I hope its at the range and not when you have a nice trophy in your sights! (I get calls from guys all fall who had their first misfire or two when a nice buck was in their sights). When you get tired of crud blowing back into your face and all over the place, are ready to simplify clean up, and go with a better more reliable system we’ll be ready to help you!
Comment from Pell Kennedy 10/24/2022
I’ve had the bolt nose kit on my 700ML since it came out and it’s great…except for putting the primer in place with my arthritic 72-year-old fingers! I drop a lot of them! Is there any kind of gizmo, a capper, to hold the primer and make it easier to put in place?
Reply from Badger Ridge 10/25/2022
I don’t know of any tool that would do what you are asking.
One of the design goals was to not require any tools to prime/de prime. To remove the primer I usually just roll the rifle on its side and catch them as they fall out. But you’ve got my wheels spinning as I have arthritis, but not so many trips around the sun… I may come up with something. When I do I’ll post about it here in the Badger’s Den.
Origianlly posted on 17 Sep 2015 to our old website
Gabe R, from California took the time to write the email below, so I thought I’d share:
Tom:
Good evening . I finally got a chance to try out the new Badger Ridge Primer system a couple of weeks ago. Here’s how it went:
I made a trip out to the local desert and used the following components for my test: Western Blackhorn 209 powerHornady .452 cal. 300 gr. XTP bulletsHarvester .452 cal. E-Z Load premium High Pressure SabotsW209 primersWinchester W209 primers were used for a couple of reasons:
1. They required the least amount of reaming to fit the breach plug (as compared to Remington and Cheddite), 2. I have about 5000 on hand so these saved me a trip to the local sporting goods store.
Overall, the results have been very promising with the three tests yielding the following average velocities:
80 gr. powder – 1552 fps* 100 gr. powder – 1795 fps* 120 gr. powder – 2000 fps*
All loads were chronographed using Competition Electronics, ProChrono Digital.
There was no soot or blow-by on any of the fired primers, however there were some issues when using 80 -100 gr. of Blackhorn powder. In two cases, the primer backed out and became stuck in the bolt face. These were cleared by dry firing the spent primer. There were no issues when firing 120 gr. loads with all six primers easily dropping out of the bolt face when the rifle was canted to the right.
*I asked Gabe, and he reported he shot one 3 shot group at 80gr and 100gr, then two 3 shot groups at 120gr to get his average velocities.
Your are welcome Gabe! Thank you for your candid feed back from the field. I trust our Remington 700ML 209 conversion will serve you well, and wish you the best of luck on your hunts!
Also it is common for the Winchester primers to blow out the back of the primer cup (aka balloon) and frequently require a dry firing to remove. That is why I recommend and use Federal, CCI, or Remington. Also these three are similar enough in size that if you tune for one of them, you can probably switch to another without any leaks.