Here at Badger Ridge we offer all sorts of specialized solutions. Our motto is “Simple Effective Solutions”. Our business model is to find un-serviced “nitches” that we can understand and service well via a website and the post office: we aren’t looking to go toe-to-toe with any of the bigger names in industry. We are not interested in opening a storefront. However the title of this post is a serious question: “What More Do YOU Want?” Let us know by calling or submitting a contact form.
That said, if you have an idea or a need and you bring it to us we’ll listen and consider if we can meet the need and if we can sell it to others. We’ve got lots of little things we are working on when we aren’t fulfilling orders and raising our family. Some of those little things have sat for quite some time and frankly they bug me, but that’s the truth of it. Anyway, let’s discuss the things we have brought to market: let’s focus on what we have delivered when potential customers have called and wanted something like what we have done, but a little bit different:
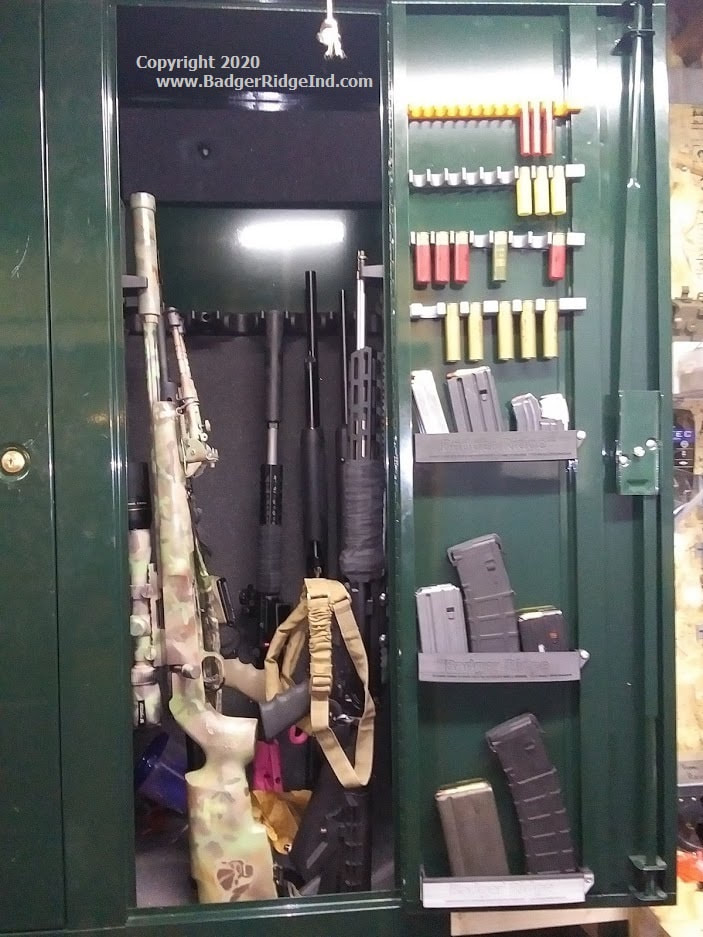
Gun cabinet Organizers & Custom gun room accessories
This group of items got started during the COVID lock-down. I was stuck in the house and needed something to do. When I went to the gun cabinets so I could go shooting, and saw that I was short of stand off’s for my Stack On Cabinets so I made some. Then eventually, I realized the over under and side by side didn’t sit well in the barrel rests and made a solution there too.
I realized that I had too much stuff floating around that really needed a place…. and all the unused space in the door: I went to work on door shelves, ammo holders, pistol magazine, and pistol holders.
Then when others saw what I did they made suggestions for AR-15 Pmag holders, AR-10/AR-308 Pmag, and AKM Pmag holders. Others had different brand cabinets and trusted me with their barrel rests and stand offs and I made clones of them along with other options. So if you have a Sports Afield cabinet/safe, Sentinel Gun Cabinet, or old skool Stack-On gun safe we can help.
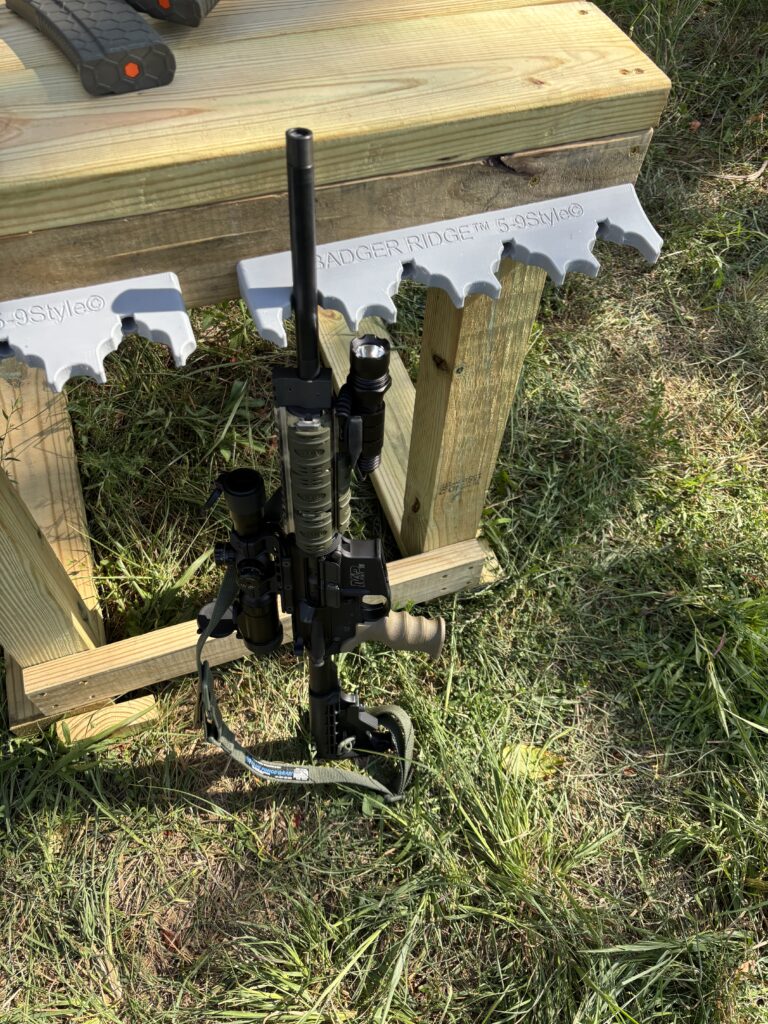
Shooting bench barrel rests
After all the options for gun cabinets and safes, guys were building gun racks, shooting benches, and custom gun rooms. They contacted us wanting better options. One of the first things we did was modify the Stack-On gun cabinet barrel rests to allow more space between the guns: we call them custom barrel spacers/rests. They use standard Stack-On scope stand offs. However others liked the profile of 5-9 Barrel rests they could get in foam, but didn’t like the foam. So we looked at them and improved them: check out our hard plastic 5-9 barrel rests if you are building a bench or a gun rack for your trap range.
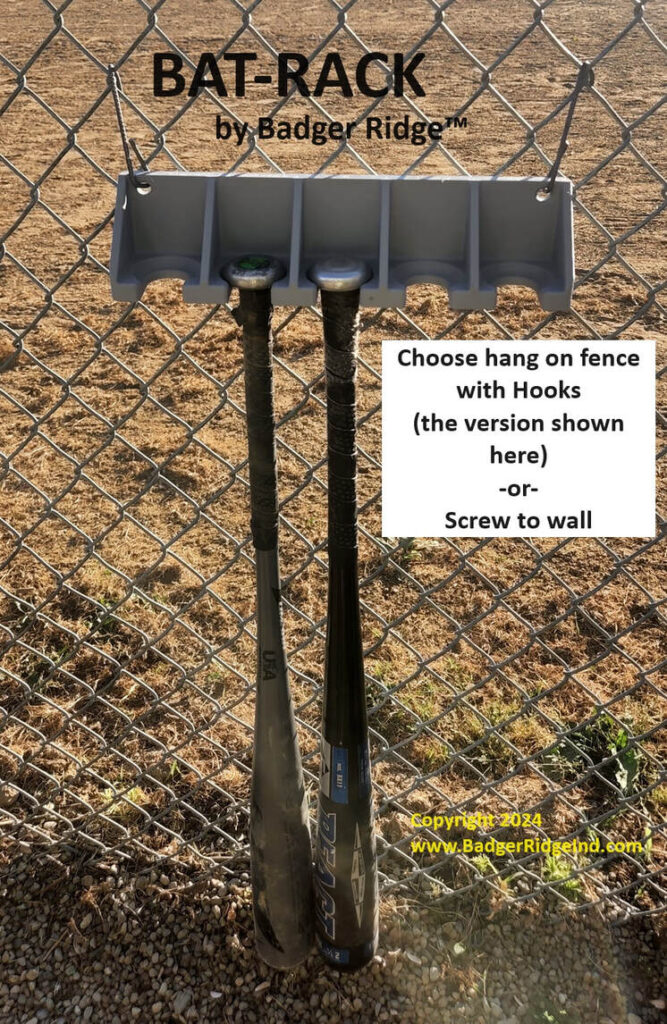
Baseball Bat-Rack
My son loves to play base ball. Few of the fields around here have racks in the dug out to keep the bats organized and out of the dirt. I had to fix that too:
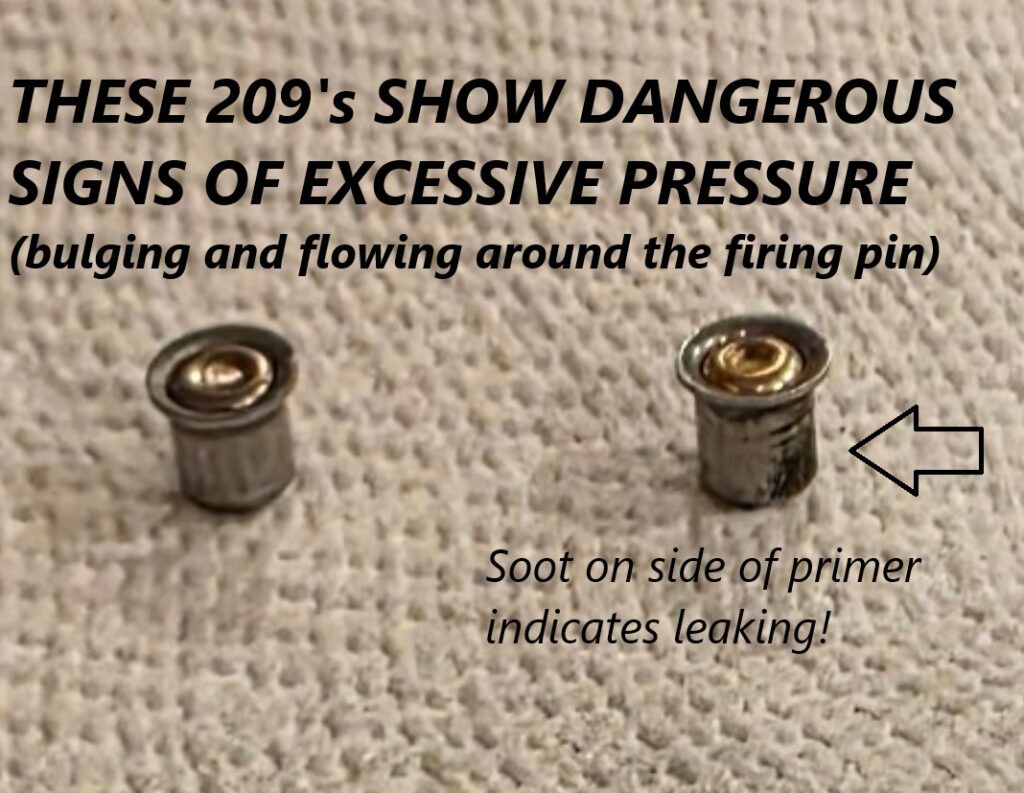
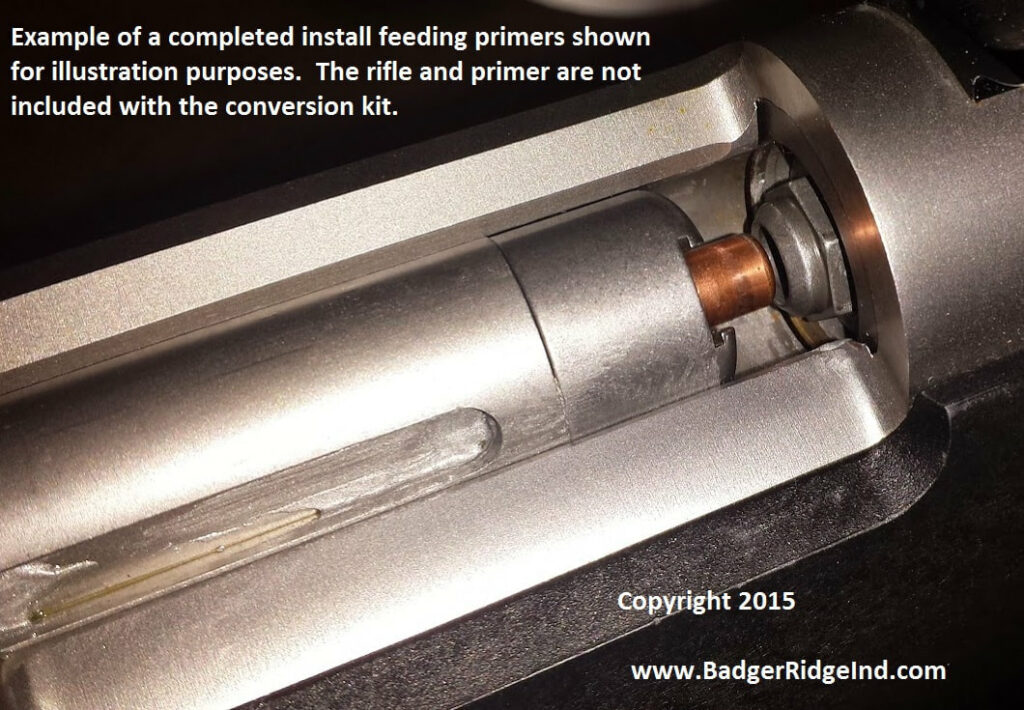
Remington 700ML/MLS sealed breech 209 system
This sealed breech 209 system for the 700ML/MLS is our bread and butter 209 conversion. Multiple pages of this website are devoted to it. If you have a Remington 700 ML/MLS muzzleloader, you really want to use this system (whether you know it yet or not).

Ruger 77-50 Sealed breech 209 system
The Ruger 77-50 is somewhat similar to the Remington 700 ML/MLS… so folks started to bug us to make a sealed breech 209 system for the Ruger 77-50 too. It’s too complicated of a conversion for most, so we don’t offer Ruger kits: you have to send your bolt to us. However we do have the ability to produce already converted 77-50 bolts. Typically only folks who hunt in Idaho & Oregon need to keep the old system running (they are forced to use the original system in those two states and are the most common people to just buy a new bolt as it it the most expensive option).

Vent Liner retrofit
The Remington 700 & Ruger conversions use Savage type vent liners. So we also listed them for sale under Savage Muzzle loader category. When folks kept calling asking for help with other muzzle-loaders and getting them to shoot BlackHorn209 or just shoot more accurately, we realized their was a need. We found many folks had forgotten to put anti-seize on their Savage 10ML/ML2 vent liners and corroded them into the breech plug. Most Knight muzzle loaders have vent liners silver soldered or epoxied into their breech plugs. All these needs had a very similar solution: drilling out the vent liners and chasing the original threads, or just drilling countersinking and threading a breech plug to take vent liners.

So we met all these needs by offering to our vent liner retrofit service. If you have an old rare Savage 10ML (that uses the primer modules, not bare 209 primers), we recommend our retrofit service to update the breech plug to use the new 10ML-2 vent liners.
Savage 10 ML (the original not the 10ML-2) Modules and de-priming system
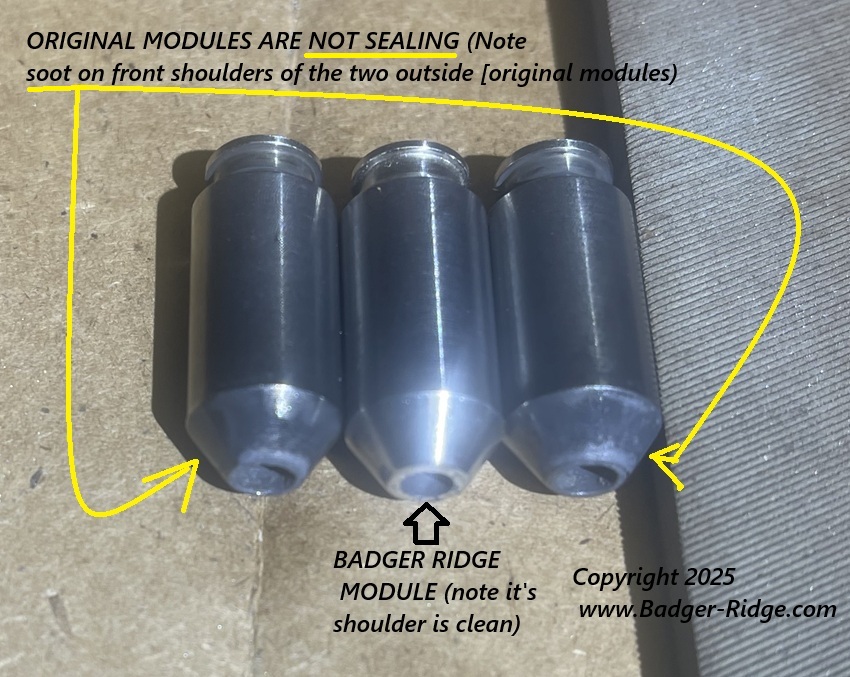
And while helping savage 10ML owners with their vent liners issues by retrofitting 10ML-2 vent liners, customers began begging us to produce and sell the special 209 modules the 10ML uses. Customers trusted us and sent in components to examine. Upon examining the modules we found that their seemed to be lots of variation in them. This variation in the originals produced carbon leaks/build up inside the breech plug. So we tightened the tolerances. Our modules seal better, but they require diligent cleaning of the breech plug. Also sometimes you have to custom fit our module to your rifle. Once you do, you will find it works better than the original. We also improved the rim: most users report that they snap into the extractor and feed better than the originals too.
Then folks started asking for the same module but made to use large rifle primers. Everyone loves the new LRMP (Large Rifle Magnum Primer) in these new modules.
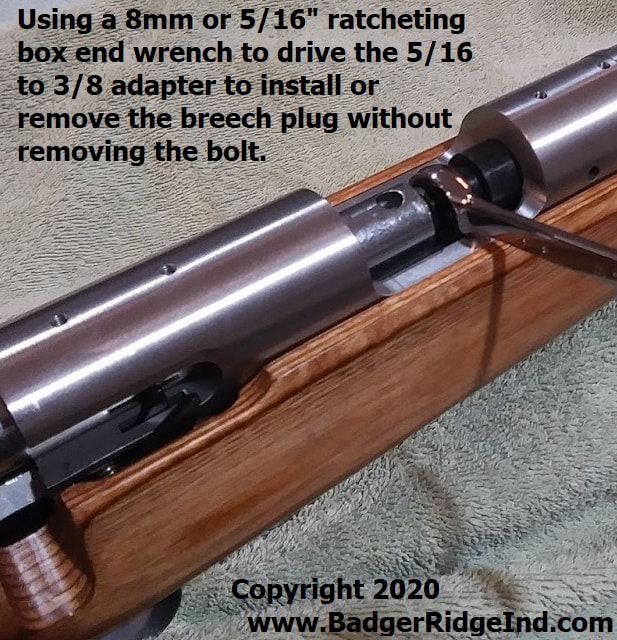
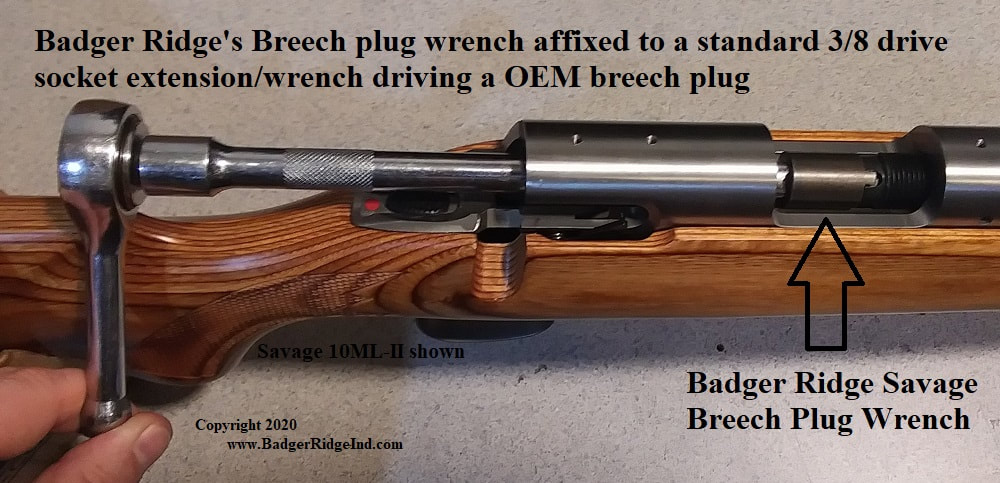
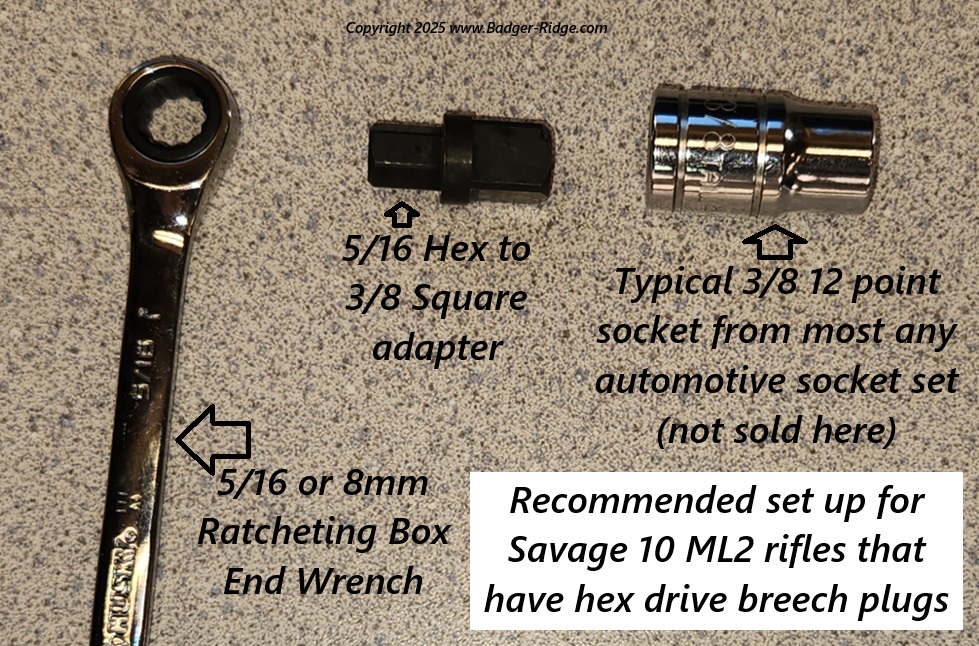
Savage Breech Plug Wrenches
Folks called saying they bought a Savage 10ML2 but it didn’t come with a breech plug wrench. People also begged for a better option to remove their breech plugs without having to mess with the tension on their action screws. So we made the Savage 10 ML EZ breech plug removal tool system. Our tool is compatible with standard 3/8 ratchets, or you can get the entire system and remove the Savage 10 slotted breech plug without having to remove the bolt. If you have a hex drive breech plug, just omit the breech plug wrench, but get the other two pieces and pair them with a 12point socket and you can take the breech plug out with out removing the bolt. Thus: You can install and remove both types of Savage breech plugs with our simple effective system.
450 Bushmaster/M14/M-1A gas system shims
These shims have become one of our best sellers. They started because I needed to time a muzzle break on my 450 Bushmaster. Then a customer wrote in thinking they’d shim M14/M-1A gas systems. He was right. Then GunBlue490 decided to try them and made a video about it. Buy with confidence!
Austin and Halleck Owner’s Manual & Main Springs
We started trying to make a sealed breech 209 system for these old accurate but unreliable rifles. The first design had issues. We hope to revive the project, but everything else seems to get attention first. We do however offer the owner’s manual for download and replacement main springs.
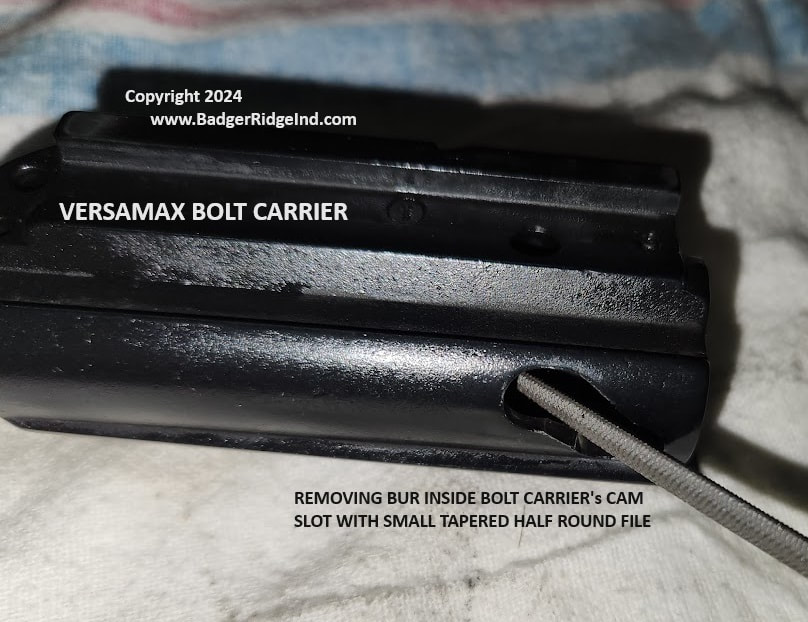
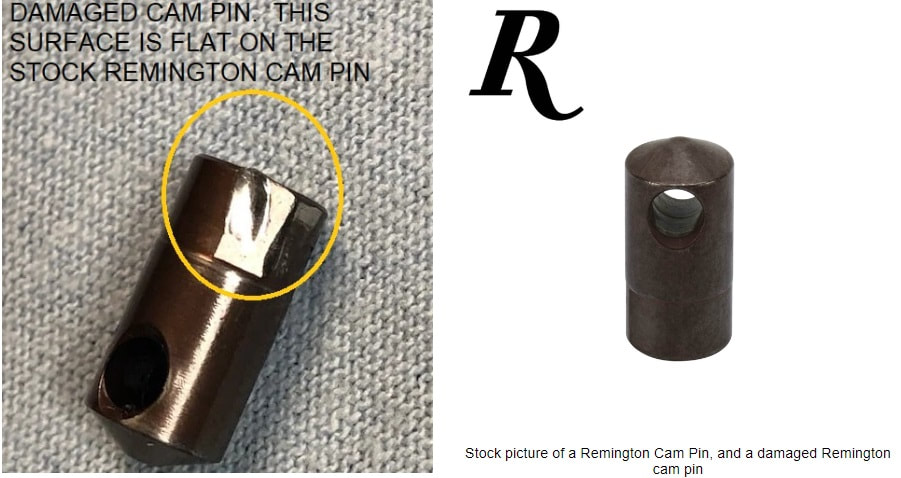
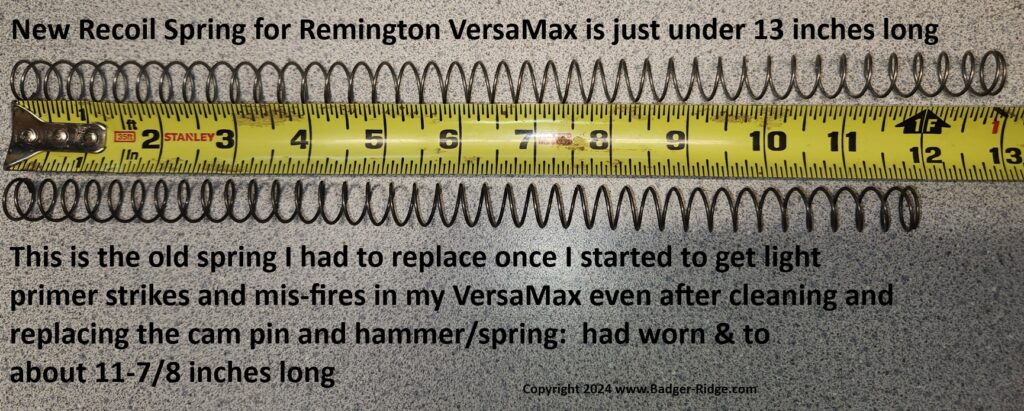
Remington VersaMax (and other Benelli clone shotgun) reliability fixes, and replacement parts
I could drone on about the VersaMax shotgun, how I love it, but it let me down… so I learned how to fix it and love it again. However, I’ve already written a few blog posts about that. So go read them if you want to. Once I started to sell what I found to fix my VersaMax, I was contacted by guys who needed additional help (with both the VersaMax and other Benelli clone shotguns). So now we sell “Remelli” kits, cam pins, new action springs, extractors, extractor springs, magazine plugs, butt stock retaining hardware, and are working on a few more things your Benelli or “Benelli clone” shotgun may need.
What more do you want?
This is an actual serious question. A lot of our items are ideas or contributions from our customers! Got a problem you need a fix or part for? Think we can make something others will want too? Let us know !!! Call us or use a contact form to start the conversation!