The Remington VersaMax is a Benelli-pattern gas-operated shotgun that shares component design and operating characteristics with several Benelli models. These similarities extend into multiple Benelli clones, including Stoeger M3000 M3500 series. Thus many parts are interchangeable between these shotguns.
Many reliability problems can be traced to inadequate maintenance, worn components, or details that the original Remington owner’s manual does not adequately explain. The VersaMax is a reliable gun when properly maintained and worn parts replaced. Many problems are the predictable result of accumulated fouling, worn springs, damaged small components, use of improper/excessive/insufficient application of lubricants, or maintenance that was inadequately explained in the original documentation.
Before working on any firearm, verify that it is unloaded and the safety is on. Follow the owner’s manual for disassembly/reassembly, maintenance, and lubrication requirements. This guide is designed to be used in conjunction with your firearms Owner’s Manual.
The most important areas to inspect/clean/replace worn parts in are:
Removable choke tubes must be lubricated with anti-seize grease!
Regular inspection and appropriate lubrication can identify many problems, and extend part life (before they become failures in the field).
Start With Basic Maintenance
Use the owner’s manual procedures to remove the barrel, bolt carrier group, and trigger group. With those components removed, clean the inside of the receiver and put a drop of appropriate gun oil on each rail where the bolt carrier rides. Only use gun oils that remain suitable in cold temperatures, such as Break Free CLP or RemOil. Avoid products that gel or otherwise become unsuitable in cold weather.
When a VersaMax or similar Benelli-pattern shotgun is unreliable with reputable ammunition, and/or has a high round count, diligently work through the following areas rather than assuming the problem is the ammunition:
Failure to eject, extract, or repeated jams, Light primer strikes (primers dented lightly) / mis-fires: Clean and lubricate the shotgun correctly, inspect and correct/replace missing or damaged parts.
Clean Inspect and lube the extractor & the extractor spring. (On Stoeger M3000/M3500 models the extractor and spring are frequently bad out of the box and should be replaced).
Clean Inspect & lube the ejector and spring (in a recess of the barrel extension that goes inside the receiver)
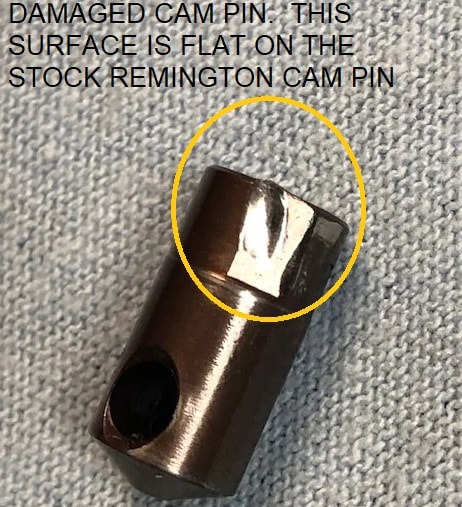
Inspect the bolt cam pin (aka locking pin head) for deformation (replace if deformed)
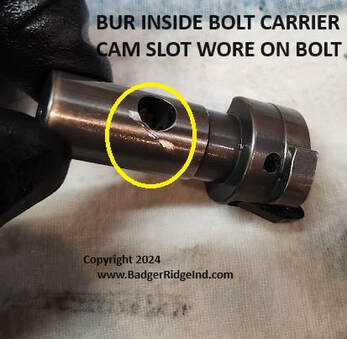
Inspect the bolt carrier and cam-pin slot for burrs.
Inspect the bolt for gouging.
Inspect the hammer for peening
Inspect the firing pin/firing pin spring/firing pin channel for debris or grease that is gelling.
Inspect the hammer spring for wear.
Inspect the hammer-spring plunger/cap for chipped plating.
Clean debris from around the hammer spring/hammer plunger (requires disassembly). Only lube with bonafide gun oil
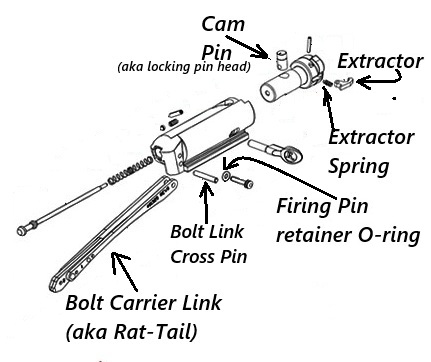
VersaMax Bolt Carrier Group exploded parts diagram (Benelli M4 similar)
The bolt carrier group should be completely disassembled—except for removing the extractor—cleaned, inspected, and lubricated during regular maintenance. Look for wear, deformation, cracks, burrs, gouges, and worn springs.
Cam pin
Inspect the cam pin for deformation. Replace a deformed pin (we sell them individually and they come with our “remelli” kit). When reinstalling a cam pin, it is a best practice to alternate its orientation at each cleaning—flip the orientation line from forward to rearward to forward. Alternating the mar will distribute wear between both faces more evening and give it a longer life. Lubricate the cam pin generously with appropriate gun oil. Grease can be used in warm-weather operation, but oil is preferable where cold temperatures are possible.
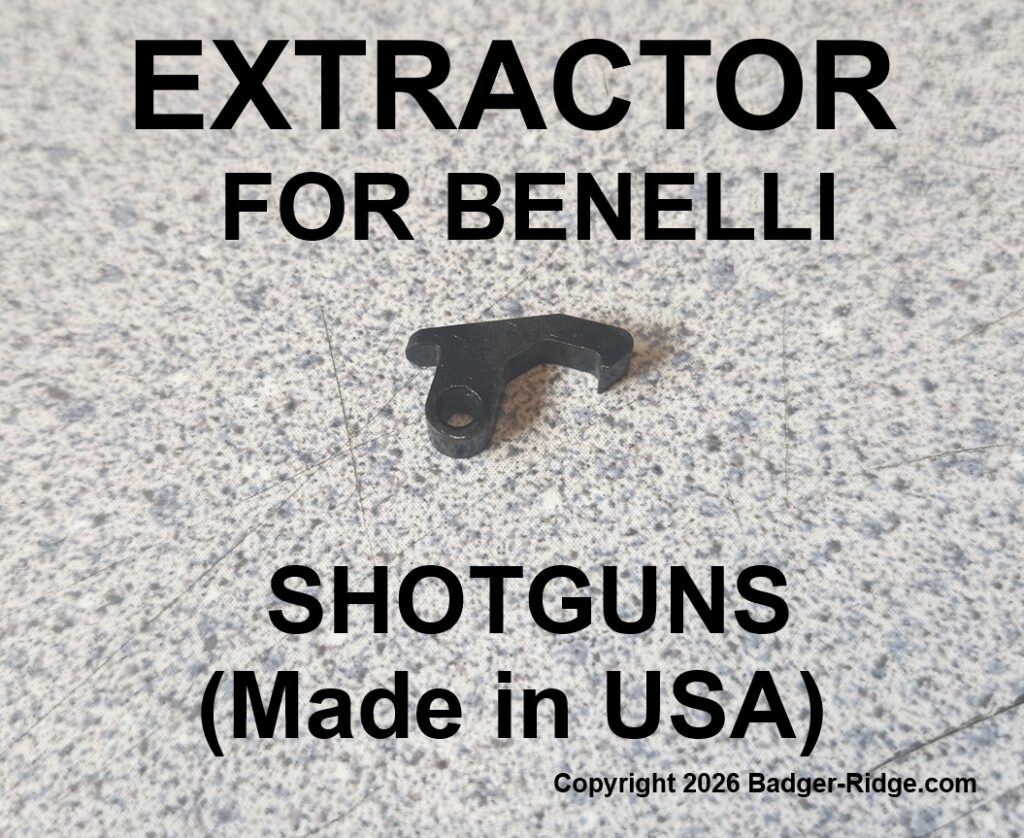
USA made Extractor for Benelli shotguns (Rem VersaMax & more)
Extractor and extractor spring
The VersaMax extractor and spring are generally reliable, but extractors can break and springs wear. Stoeger M3000/M3500 shotguns are more commonly affected by extractor and extractor-spring problems due to poor quality of manufacturing. If a Stoeger continues to jam or fails to eject after proper cleaning and lubrication, the extractor and spring are the most likely causes. A damaged extractor can cause failures to extract or eject. If replacing the extractor, replace the extractor spring at the same time.
Bolt Carrier Burrs and Gouged Bolts
VersaMax Bolt with scar from burr in bolt carrier cam pin slot
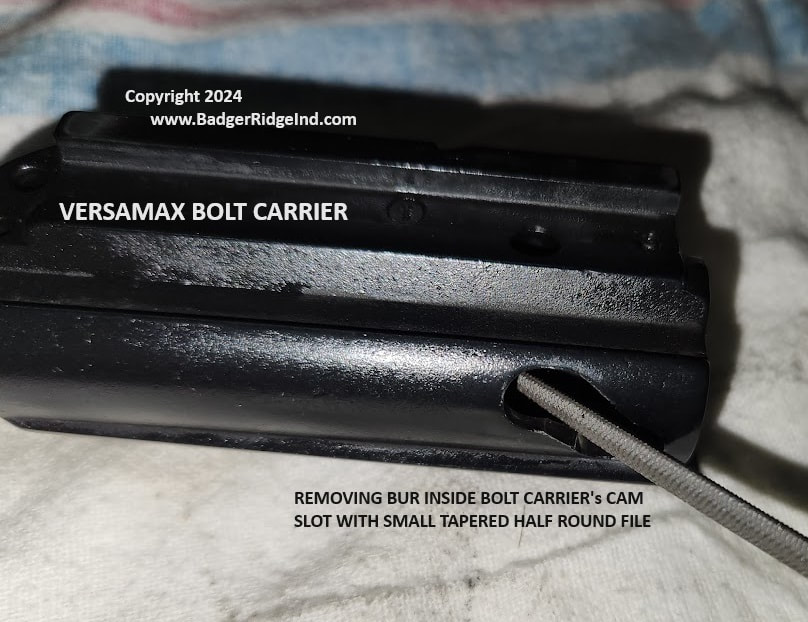
Inspect cam-pin slot in the bolt carrier for manufacturing burrs, remove gouges from bolts and polish. A burr can gouge the bolt as it rotates. If a burr is present in the bolt carrier cam pin slot remove it.
If the bolt was gouged: first carefully remove the high spots. After lightly stoning or filing away the raised portion of the gouge on the bolt, then smooth and polish the affected area so the bolt rotates freely in the bolt carrier.
File knocking burr of edge of cam pin slot in VersaMax bolt carrier
Again: If your bolt was gouged look for and remove the burr left in the bolt carrier during manufacturing that caused it! The picture above shows a burr being removed with a small tapered halfround file. Just remove the burr and nothing more.
Bolt link / “rat tail” Inspect the link for cracks or deformation around the hole in it where the cross pin links it to the bolt carrier.
The bolt link, sometimes called the rat tail or bolt carrier link, is a known failure point, particularly on earlier VersaMax versions. When a bolt link breaks, it can also deform the bolt-link cross pin/pivot pin. Replace cracked or broken links and any damaged cross pins.
Inspect this O-ring and replace it if worn so the bolt carrier assembly remains securely together and the retaining pin is not lost.
Lubrication After inspection and repair: Reassemble the bolt carrier group and set it aside while servicing the recoil system and trigger group.
Lubricate the cam pin heavily with proper gun oil (in warm conditions grease may be utilized).
Put a drop of gun oil on the extractor and extractor spring.
Put a drop of gun oil on the bolt-link pivot pin.
Note: A common cause of bolt-link failure is debris in the action/recoil spring tube and/or a worn action spring..
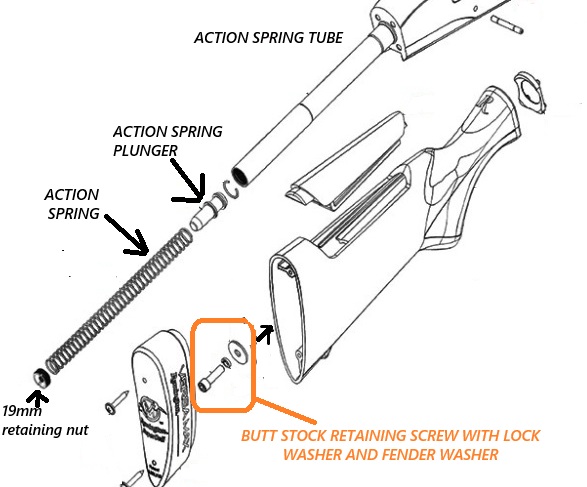
Action / Recoil Spring: The recoil spring is located inside the buttstock.
Buttstock parts schematic for VersaMax shotgun
Cleaning, lubing, and measuring the recoil spring is one of the most important VersaMax maintenance procedures, and the original owner’s manual does not explain it! The should be done every 400 rounds fired if not sooner!
Remove the two recoil-pad screws with a small Phillips screwdriver (A little lubricant or moisture on the screwdriver tip can help it pass through the small recoil-pad holes)
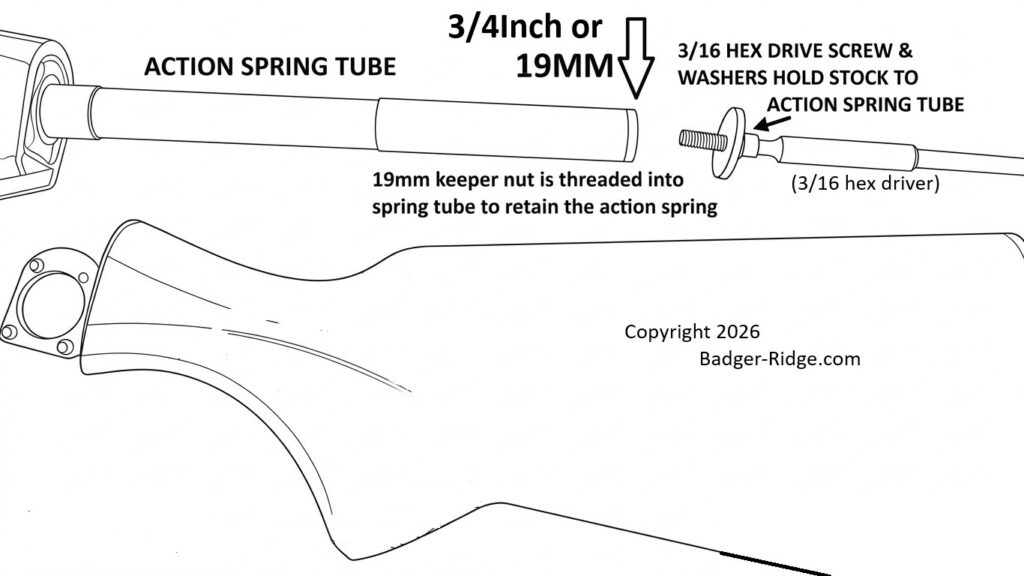
Remove the recoil-spring tube retaining nut/cap using a 3/4-inch (19 mm) open-end wrench. Be aware that the cap is under spring tension.
Remove the recoil/action spring and plunger.
Clean debris from the spring, plunger, and inside of the tube.
Access the action spring by removing the buttstock, then removing the 3/4″ (19mm) keeper nut
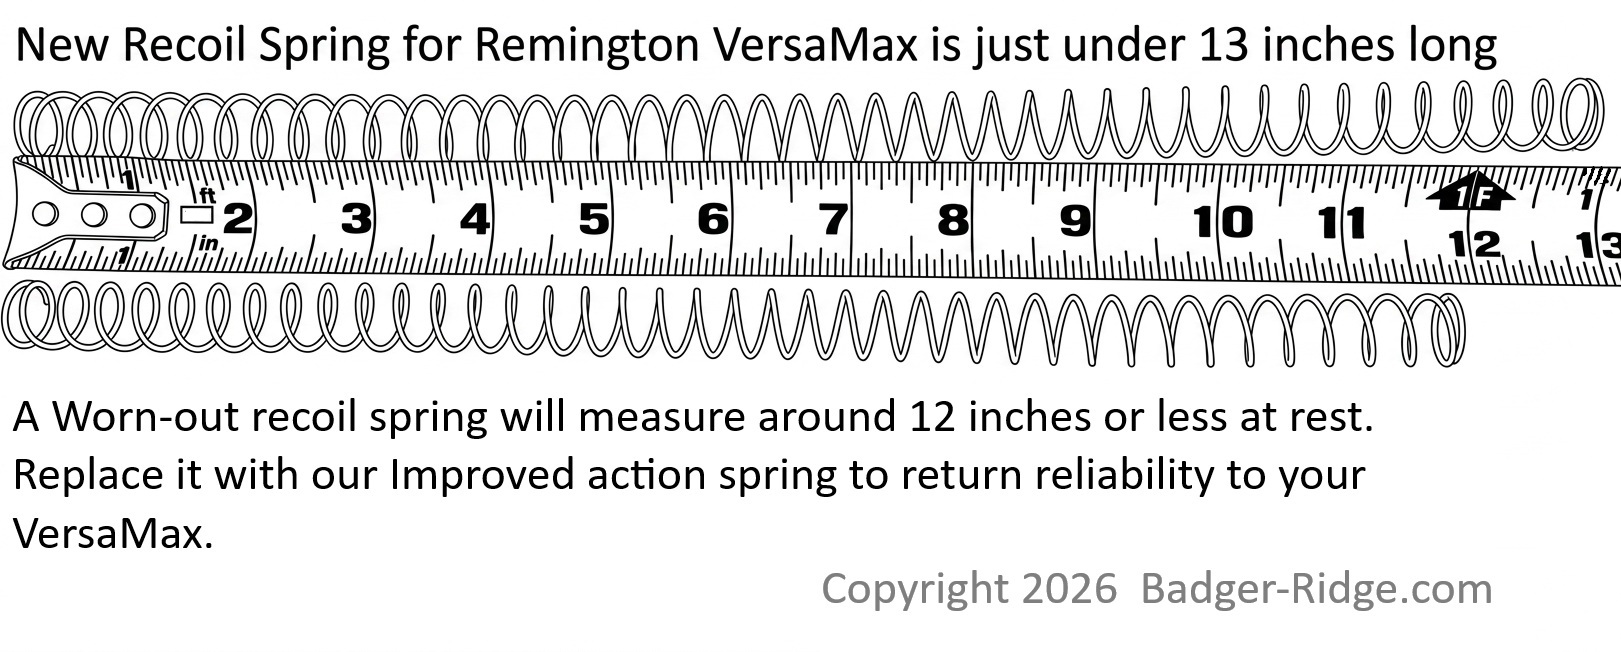
Measure the action spring at rest. If it is approximately 12 inches (30.5cm) or shorter, replace it. A new spring (like our improved spring) is approximately 13 inches (33cm) long.
Comparing a worn out recoil/action spring to a new spring (replace when any spring is near 12″ (30.5cm) or shorter)
Lubricate the spring, plunger, and tube with appropriate gun oil, then reassemble in reverse order.
Trigger Group :The trigger group initially only requires simple cleaning and lubrication.
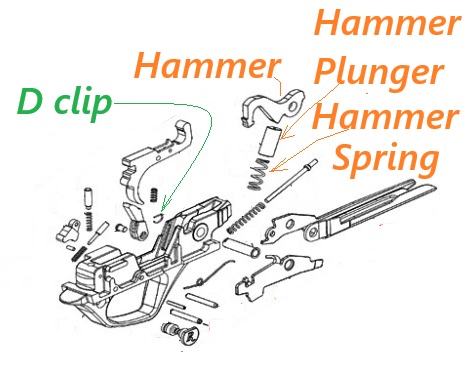
VersaMax Trigger Pack diagram
For routine cleaning, remove the trigger group from the action according to the owner’s manual. Invert it over a container and clean out accumulated debris. An aerosol dry-lube cleaner can help flush contamination from the mechanism. Scrub stubborn deposits with appropriate nylon gun-cleaning brushes and rags. After cleaning, apply drops of gun oil to the pivot pins and hammer spring. However as the shotgun accumulates use, the trigger group should also be disassembled far enough to inspect the hammer, and hammer spring. Clean and inspect hammer-spring plunger/cap (this is not covered by the owner’s manual). We offer the high failure parts explained below in a kit called a “Remelli” kit)
Beware of working on trigger packs: D-clips are easily lost during disassembly and reassembly. Many parts are under spring tension and if not properly handled can shoot across the work space becoming missile hazards.
Problems that develop in the trigger group with use (Three areas deserve particular attention in the trigger pack after it sees a few hundred rounds of use, and cannot be maintained without partially tearing down a trigger pack):
Hammer: Inspect the hammer where it strikes the firing pin. The striking surface can become excessively peened: replace the hammer.
Hammer spring: Hammer Springs eventually weaken and should be replaced when worn.
Hammer-spring plunger/cap: Some VersaMaxs came with chrome-plated hammer-spring caps. The plating can chip and produce abrasive debris that bind the hammer spring. The chipped edges can also catch against the trigger housing and interfere with hammer movement. Any chrome-plated hammer-spring cap showing chipped or missing plating should be replaced.
Again: we offer the hammer, hammer plunger, hammer spring & cam pin in a kit called a “Remelli” kit
The VersaMax trigger group is very similar (nearly identical) to Benelli trigger packs, so Benelli trigger-pack disassembly procedures can be useful references. If you are not comfortable performing this work, you can pay Badger Ridge to perform this service or have the trigger group serviced by a qualified gunsmith.
Gas Pistons (unique to the VersaMax and Benelli M4)
Combustion gases deposit carbon on these components. Oil on the pistons when fired can combine with the carbon and produce sticky, glue-like fouling that solidifies. Any lube on these can promote malfunctions and lock up the system. A simple functional check on an assembled shotgun is to lock the bolt to the rear, tip the muzzle up and down, and listen for the gas pistons moving freely and clinking to a solid stop. If the pistons move freely, they are not likely to be the source of a malfunction, but they should still be kept reasonably clean.
Do not lubricate the gas pistons or gas cylinders with oil or grease.
The owner’s manual provides generally good instructions for maintaining the gas system. Clean the gas system every time the shotgun is disassembled. A bronze pistol-bore brush can be used to scrub carbon from the cylinders. Oils and appropriate solvents are fine for aiding the removal of carbon with scrub brushes, but all liquids must be removed before re-assembly. Wipe the pistons and the inside of the cylinders completely dry. The gas system should not be left wet with lubricant/oil!
Always Use anti-seize grease on removable choke-tube threads (or stuck choke tubes are probable). Do not shoot steel shot through ‘extra full’ or ‘turkey’ chokes.
Badger’s Note: Reposting this information here in a new format: Attempting to be both thorough and brief at the same time. None of this should be new to anyone who has read our blog previously.
This was originally posted to our old website in Jan 2019. It generated a lot of discussion (one public comment posted at the end, and many private messages and phone calls). Some folks just don’t want to hear any reasoning that contradicts their own ideas or desires. I stand by my reasoning and position. That is why I am reposting and editing/updating it below.
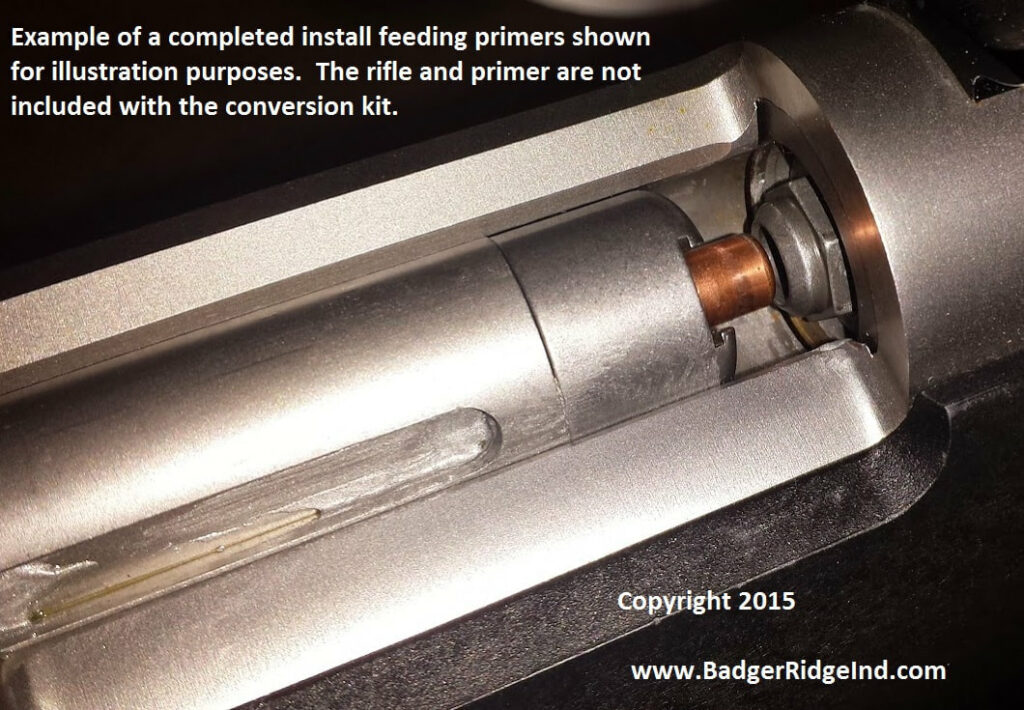
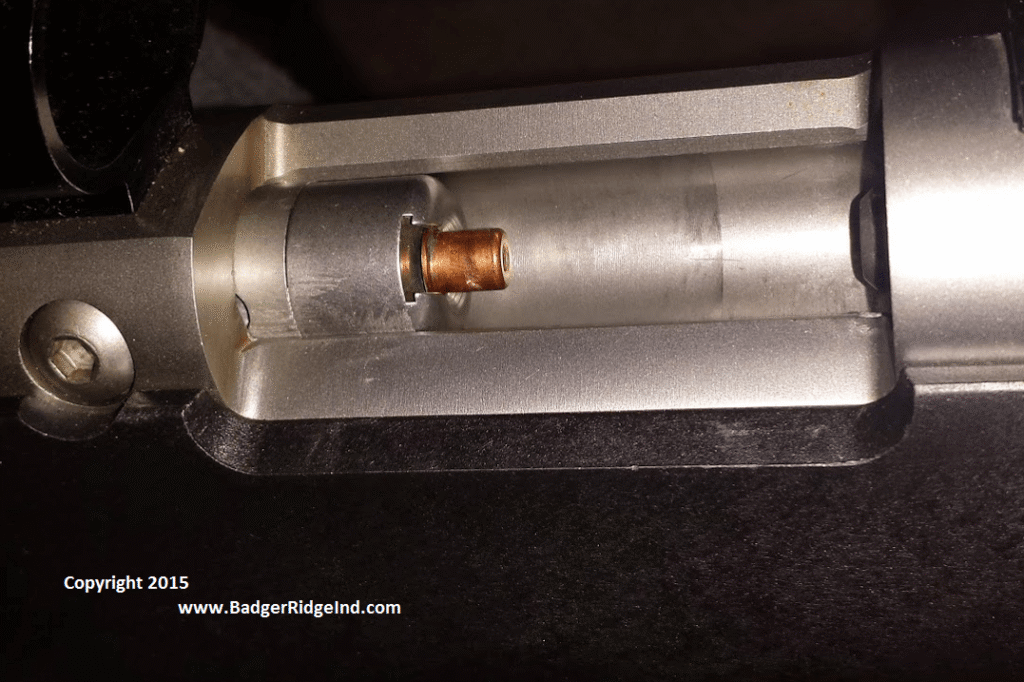
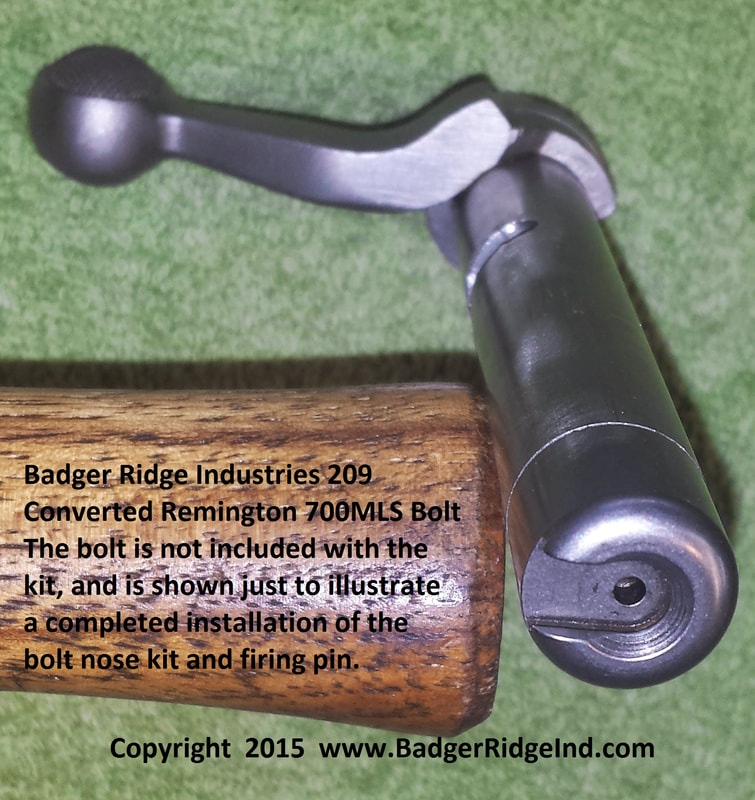
Close up of Remington 700 MLS feeding 209 primer into sealed breech
The Remington 700 ML/MLS & Ruger 77/50 muzzleloaders have been out of production for years now. These rifles can vary drastically in condition. Some have hardly been used. Others used, but well cared for. Some have been neglected. So their condition truly runs the full gambit. This is further complicated due to the original design and other 209 modifications sending fouling corrosive gasses throughout the bolt and the receiver. New owners can be further confused by the various kits that may have been fitted over the years.
Our kits fix blow back issues, don’t rely on most of the parts people tinker with, and base line the rifle to a solid known good state. Many folks find their way to this blog from a simple internet search. Frequently because they are having trouble like misfires, failure-to-fire, are tired of blow back, etc. Some just want to use BlackHorn209 powder (which will misfire or blooper if not sealed up, or paired with proper standard or magnum 209 primers). Other’s have a friend that fixed his woes with our system, or saw a modified rifle at the range using our awesome 209 conversion for Remington 700 ML’s and Ruger 77/50 rifles.
Loading a primer and sealing the breech with it on our Rem 700 ML/MLS 209 system
If you are new to our conversions, you may want to skip this blog post and read some of the others, then come back to this one, as it assumes you already know our conversions are awesome and fix your troubles.
However some folks are determined to do some even “heavier meddling” and make these rifles something different. I’ve looked at this and on a personal level, I’m not interested and won’t be doing anything more on my rifles than using our kits to seal the breech, and shoot Blackhorn209 powder.
We do have products that will aid those who still want to do that barrel swap and burn smokeless, but I myself won’t be going down that path. In this post I want to discuss this ‘heavy meddling’ and explain why I won’t do it myself.
The number one question I get concerning meddling and trying to do ‘more’ is converting to 209’s with our kit and shooting smokeless powder in the factory barrel: DON’T DO IT! It says it right on your rifle’s barrel. No kit will change the fact that the barrel is not safe for smokeless powder. I don’t care what you read on some forum, or what some guy on the range told you. DON’T DO IT! There are not any magical fairy smokeless powders for your rifle, and there isn’t any need to take that risk!
The problem here is that muzzle loader safe propellants (like Black Powder, Pyrodex, Triple Se7en, and BlackHorn209) have different burning properties than the wide spectrum that makes up modern smokeless powder. And that difference is what saves folks from blowing up guns (so long as they follow the manufacture’s rules, don’t double charge, double load, etc). I cannot emphasize enough how using only a muzzle loader safe propellant (and using a witness mark on the ram rod to know the rifle is loaded and avoid a double charge) is the key to enjoying this sport safely.
That said, some rifles, with special barrels are made to use certain types of smokeless powder. However, your Remington nor Ruger is not one of them.
Yes, some folks swap barrels to make a smokeless gun. They of course are 100% on their own, and liable for their own technical problems and safety issues. If it is possible to do a barrel swap, and may be legal in some states to hunt on some hunts with a smokeless muzzle loader… why do it? What really are you going to get and at what cost? Typically those pursuing smokeless want faster, flatter shooting, harder hitting rifles, and think that they need to go smokeless to get better performance. But how much increase in range or velocity will you get versus the $$$$$ spent? How much heavier or more awkward of a rifle will you make? Will it group any better than what you started with?
Doesn’t the original leaky rifle, with black powder, already have what it takes to kill anything in North America?!?! Our kits seals up those breach leaks and makes it reliable. Many modern muzzle loading propellants already out perform black powder. These rifles with their factory barrels have a reputation of being very accurate. Do you really need more than that?
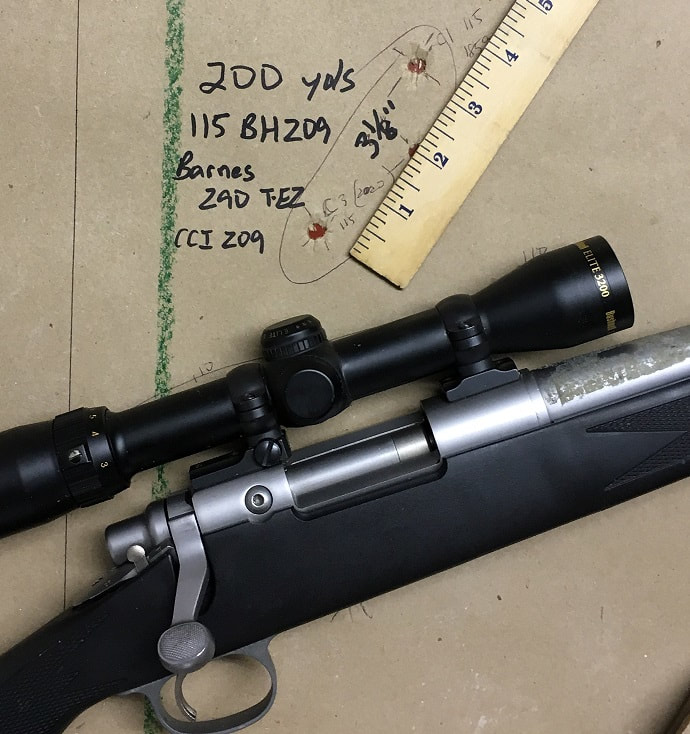
A customer’s rifle 209 converted rifle (original barrel) and his group (click picture above to read more customers’ feedback)
I believe the factory rifle (with our 209 kit) is good enough: my rifles shoot reliably, accurately, and harvest deer (the largest game I can kill around here is Black Bear, but Black Bear isn’t my thing… but I’m sure my rifles could easily handle Black Bear). I’m confident my rifles, with our kit and factory barrels, will kill any North American game to 200 yds. I’m convinced that anyone with a Remington 700 ML/MLS or Ruger 77/50 in good shape and wants to have a top performing muzzle loader, only needs to use our kit, standard 209 primers, Blackhorn209, sabots, and jacketed hand gun bullets or muzzle loader specific bullets.
Steve P, from Lake Orion, Michigan: 130 yard shot, 120gr by volume of Black Horn 209, Parker Ballistic Extreme 300gr and the Badger Ridge bolt upgrade, Timney trigger.
But to continue the comparison: rifles re-barreled for smokeless almost always have much longer, heavier barrels. It must be emphasized that the longer barrel itself gives an increase in velocity… all things being the same: longer barrels increase velocity. Or in other-words, shooting the same powder charge and projectile combination in a longer barrel will generate more velocity. This is because the projectile is in the barrel longer, getting pushed by expanding gasses for longer, so more energy (AKA velocity) is transferred to the projectile.
But with BlackHorn209, and your factory barrel, you don’t have to go smokeless to get more velocity. At heavier bullet weights, (like 275gr and up) I think you will find BlackHorn209 out performs all other muzzle loader safe propellants. And if you were to chronograph a safe smokeless load in a barrel made for smokeless, and of the same length as the factory barrel, against a BlackHorn209 charge (both using the same 300gr projectile), the BlackHorn209 load wouldn’t be too far behind the smokeless. By too far behind, I’m talking a couple/three hundred feet per second. And lets be honest, 200 to 300 FPS is not much of an increase in range or killing power.
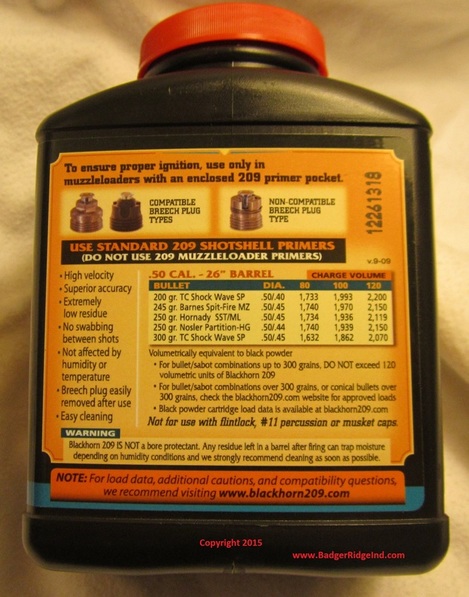
Back of a Blackhorn 209 bottle. Note what it says about primers, compatible sealed systems, and min/max loads
In general barrel swaps cost around $1200.00 [this was back in 2019: the cost certainly has increased]. Frequently more, occasionally less if you do a lot of the work yourself. To consider what our kit does to a standard rifle vs doing a barrel swap, you have to consider the cost against the potential performance increases. And I don’t think that $1200 is worth it. Especially because BlackHorn209 is readily available, and safe! You must realize that if you get something wrong with the smokeless gun, you are more probable to have a KABOOM!
Remember, a longer barrel is essentially what the newer Remington 700 Ultimate Muzzle Loader (UML) has over the older Remington 700 ML/MLS. The Ultimate is a longer, heavier rifle. It is not as handy, and costs so much more than a good used MLS. Plus I understand Remington no longer will warranty the rifle if its been shot with BlackHorn209, so in that case, you are restricted in the powders you can use. I’ve had plenty of customers tell me they sold their Ultimate and got a used 700 MLS rifle and our kit because it does the job, is more handy, easier to carry, and actually saved them $ because its cheaper over all.
I have a Savage 10ML2, new in the box. I’ve never shot it! Why? Because its super long and super heavy: my Remington 700 ML’s and Ruger 77/50’s (with their original barrels) get the job done and are so much lighter and handier. And I don’t go deer hunting from a bench… I’m walking out to the fields and woods, climbing up into tree stands, up ladders, etc. My Remington and Ruger rifles with their factory barrels win hands down overall when it comes to hunting.
So for me, I wouldn’t entertain a barrel swap unless the barrel was not serviceable. And even then its probably cheaper (and definitely easier) to just buy another used 700 MLS rifle with a factory barrel! Or even easier and cheaper to find a ‘take off’ barrel on Ebay from someone’s smokeless build. I get nearly the same performance from my factory barreled rifles, and without all the cost, weight, awkward handling, and added trouble of doing the work to swap a barrel. Dollars & work in vs performance out: I’m tickled pink with our kit and my factory barrels.
If you are tired of the clean up of Black Powder substitutes, and wanting to get away from them for that reason, BlackHorn209 comes out ahead there too. Blackhorn209 cleans up great with standard gun cleaning solvents, just like a smokeless gun. You can read more about that by clicking the posts here in the Badger’s Den (organized by topic).
All that said: any muzzleloader safe propellant works great in the Remington and Ruger original barrels (with our kits installed on the bolt and shooting saboted projectiles). It is so much easier just to convert to our system and get great performance, I don’t think I’ll ever re-barrel a rifle and go smokeless.
But if you are absolutely set on swapping barrels, we offer “half kits.” Smokeless conversions usually use a custom breech plug that sits deeper into the breech (I typically recommend using a Savage 10 ML2 breech plug if you are going to swap barrels). So, folks putting a new barrel on a Remington will probably want a longer nose. Our long nose protrudes farther forward and will not work with our standard breech plug, nor the original barrel. The cost is the same for a half kit with a long nose or a standard nose (just tell us in the “note to seller” portion of check out if you want a long nose).
This bolt has a long nose: it goes about .085″ deeper, but won’t work with a OEM barrel
Standard Nose bolt (note you can see more of the breech plug exposed). Works with OEM barrel and standard Badger Ridge Breech plug
Our Ruger conversions don’t have longer nose options: only the Remington has that option and it’s only for barrel swaps.
ONE LAST COMMENT ON BARREL SWAPS: IF YOU SWAP THE BARREL YOU OWE IT TO WHO EVER USES THE RIFLE AFTER YOU SELL IT (OR PASS IT ON TO) TO INSCRIBE ON IT SPECIFICATIONS:
#1: Its caliber, ie “.45 CAL”
#2: What powder is safe in it: “Use ONLY BLACK POWDER/BLACK POWDER SUBSTITUTES” &/or “USE ONLY APPROVED SMOKELESS POWDERS AT APPROVED QUANTITIES” etc.
So there you have it. I got on my soap box, and told folks that I’ll sell them what they want, but I won’t necessarily agree with them that they ‘need’ it.
That’s my advice, because that is what I use and resolved to myself.
Alas, the customer is always right!
Preserving a public comment/reply below
Comment from Matt 9/24/2021
A new, prefit barrel costs $250-350, a 2 taps costs $40, a grade 9 bolt costs $2, a few small stainless bolts (replaceable vent liner) costs $5, 4 drill bits cost $10-$15, 20 cut down .308 cases are going to run you about $30 (and solve the blowback issue + allow the use of rifle primers)… for a rough total of $440… where is the rest of the $1200 coming from, unless you pay someone else to entirely convert your rifle for you? Basic knowledge of tools, attention to detail, and a basic understanding how firearms work are all that is really required.
Smokeless doesn’t necessarily mean more pressure, nor does it mean more velocity… you have to load it that way for it to be so. Bluedot has a similar burn rate to BH209 (higher ignition temps, however), and RedDot-Unique (on Hodgdon’s supplied burn charts) offer burn rates similar to common BP. You don’t have to use 150gr charges of slow rifle powder and pistol bullets lol.
BP is an explosive, it’s pressure curve is very short and spikey, in order to generate the necessary volume of gas to get the velocity, you have to generate quite high pressures. Smokeless, especially the slow shot powders and fast rifle powders, allow you to achieve the same velocities at lower breech pressures. You also use considerably less smokeless to accomplish the same velocities than you will BH209 or BP, which saves a lot of money.
Reply from Badger Ridge (Tom) 9/24/2021
I think you are mixing a bunch of half truths and and oversimplifying to justify your meddling. If you want to meddle, go ahead, but I’d suggest you slow down and quit trying to push and rail against those of us urging caution, not seeing the value in such meddling, and asking simple questions like: “What are the real risks vs the rewards? What are you trading away? Are you over simplifying & ignoring? What is the cost of getting it wrong? Who pays it?”
Please, don’t try to use this site to paint a false picture: that building a smokeless setup as something it isn’t. It isn’t simple and easy nor is it super safe. But again, if you want to meddle, its your life. Just don’t push it on others.
Your argument on cost is flawed: first, I specifically say that the costs can vary due to how much you can do yourself). How much did the tooling to make custom parts cost? How much would you have to pay a skilled technician for their knowledge, time, and tools? If you don’t like my $1200 round figure you must assume most folks are able to DIY, and that you don’t have to account for labor costs (and I said as much in my post)
Further, you also assume that you are correct in all your broadly expressed assumptions & over simplifications on various smokeless powder burn properties (you are not). You ignore the probability of, and the effects of, overcharging with smokeless in a muzzle loader. You ignore the pertinent differences in black powder’s ‘burn rate/spikey curve’ that make it much less dangerous to over charge with.
Who analyzed those pressure curves, with what tools, and then engineered a system to contain them? What safety factor did they build into the system? (BUT OVER CHARGING IS BAD IN ANY SITUATION). People make mistakes. Which one do you want going KABOOM with your hand on the fore-end, and face just behind the action?
Another issue with your post seems that you are assuming we are discussing using a centerfire action (made to feed 308 cases and take smokeless pressures). The rifles I’m discussing lack recoil lugs and also don’t have the ability to utilize 308 cases as primer carriers… I’ve discussed primer carrier ignition systems like used on the Ultimate elsewhere (in the Badger’s Den and our FAQ)… and why we abandoned the plan to convert muzzle loaders to use them. 209 systems are simpler and more effective.
When you look at the whole of those shooting muzzle loaders, very few relatively, have the ability to prime and de-prime cases. They are better served by using 209s in a system to puts most of the wear on a 209 that is readily obtained and then discarded after use. Of course if you are set up to reload that’s an easy fix, but a very bad point to over look from the majority perspective.
So with these old muzzle loaders, that aren’t designed for smokeless, aren’t safe for smokeless, can’t handle 308 sized cartridge cases, but yet have a great propellant (with tons of engineering behind it) like BH209 available… its still the smarter move just to put our kit on the old leaky breech rifle, use BH209, and avoid the heavy meddling.
A little knowledge on a subject is dangerous… knowing enough to believe you understand and are competent, but not knowing enough to know that you don’t understand everything is a bad place. To get through that state, one typically requires something called wisdom.
If you can come up with all the complicated stuff to convert/re-barrel a rifle, but don’t value what I’m trying to show you here… please move on.
But alas you are free to meddle. Just don’t expect me to support it as a ‘good’ or ‘best move’. Nor will I urge others to put so much resources into trying to get such little performance increase when its so safe and easy and to get just about the same thing with our kit and BH209.
Originally posted to our old website in November of 2018. Reposting and updating it here. I’ve done a lot of these totally frozen messed up bolts over the years. Unfortunately bolts corroding solid are a fairly common outcome from many folks ignoring basic maintenance on the old leaky breech systems. If you have one, the short answer is to remove the bolt from the rifle, purchase our system with installation service, and then send me the bolt. If you want the long answer keep reading:
Loading a primer and sealing the breech with it on our Rem 700 ML/MLS 209 system
Welcome to the blog of the company that has the best fix for your Ruger 77/50 and Remington 700 ML/MLS. Our sealed breech 209 modifications are the fix for blow-back, miss fires, etc. Our kits are Blackhorn209 compatible and seal up the breech with 209 primers. If an internet search brought you here, your search is over. This blog has lots of articles about those two rifles and our products for them. You can click on the links in them or in the banner at the top of the screen to find the items you may be interested in.
The Remington 700 ML and Ruger 77/50 muzzleloaders are our specialty. They both came from the factory with the same fatal flaw: blow-back coursing backwards through the bolt from each firing. The Remington and Canadian 209 mods didn’t improve this. If anything they only made blow-back worse.
If not quickly and properly cleaned after firing, the bolt will corrode and freeze up. Our kits correct this fatal flaw by sealing up the breech. But not everyone has our kit yet, and seeing these rifles are all 20 plus years old, it’s all to common for some one to have shot and then put it away without a proper cleaning. Be thankful if the bolt was at least removed! Getting a frozen bolt out of a rifle is a nightmare!
So beyond installing our 209 system on bolts that have been well to decently cared for, we frequently get challenged when folks send us neglected froze up bolts. Sometimes we get them before they get beat on, other times we get to see if we can pick up the pieces and make it work. You can read more about some of the crazier ones we get here in the “Badger’s Den” and get more specific help troubleshooting a Remgington 700 ML by clicking the “Maintenance and Troubleshooting guide” of the Remington 700 ML Resources section. We also have a Ruger 77-50 Resource section too.
If you have a tough Remington or Ruger bolt, or any questions, remember you can call us at 989 795 2526 or reach out to us via our contact form. We’ll get back to you with a cell phone number and email address so we can start the process!
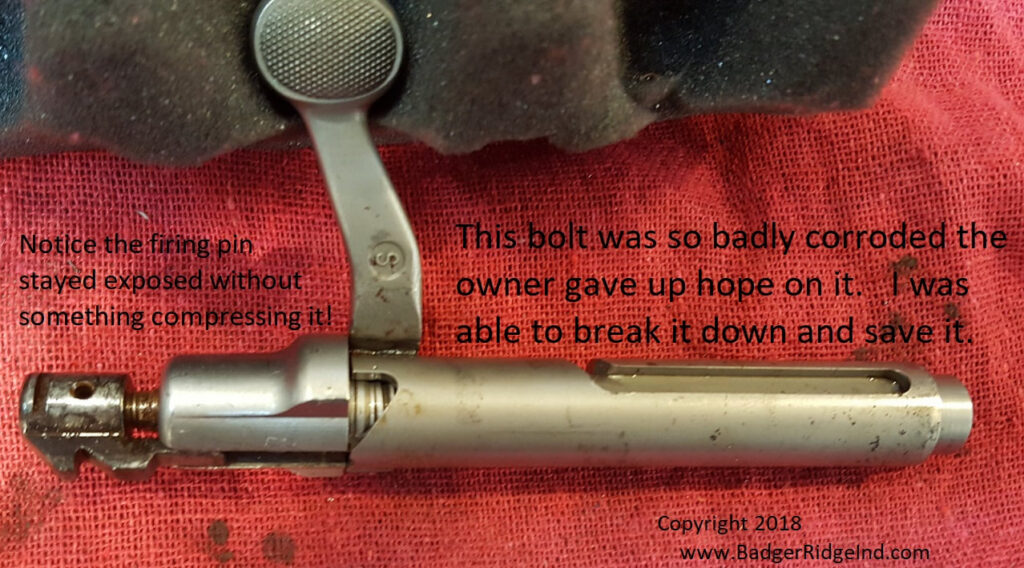
When the owner of the bolt seen here contacted me asking if I could help, once I replied to him, he was thoughtful enough to text me pics. After looking at his pictures, I was pretty sure I could fix it: But I wasn’t certain what parts of his I could salvage and what parts I would need to replace. The bolt plug looked good, which was surprising… usually when folks try to take these apart and break them they mangle something, and typically that is the bolt plug.
So I counseled him that I was confident I could fix it, but couldn’t be sure of the price until I had it in my hands, tore it down, and scrubbed it all clean. I commonly have to sell new components in cases like this, or have to ask for some more money beyond the basic install fee for my time and tools/materials I put into fixing these.
I told him to start by buying our standard Remington 700 ML-MLS kit with installation, then send me the all the pieces he had from the bolt, and we’d take it from there. If I needed more money I’d let him know.
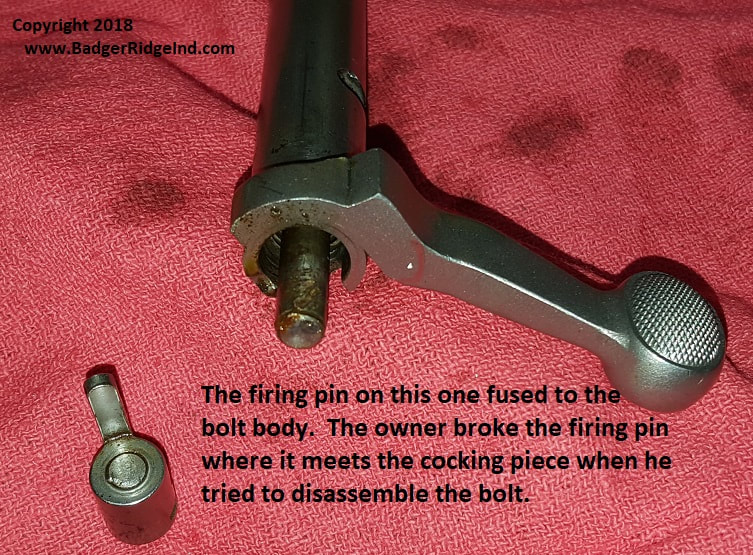
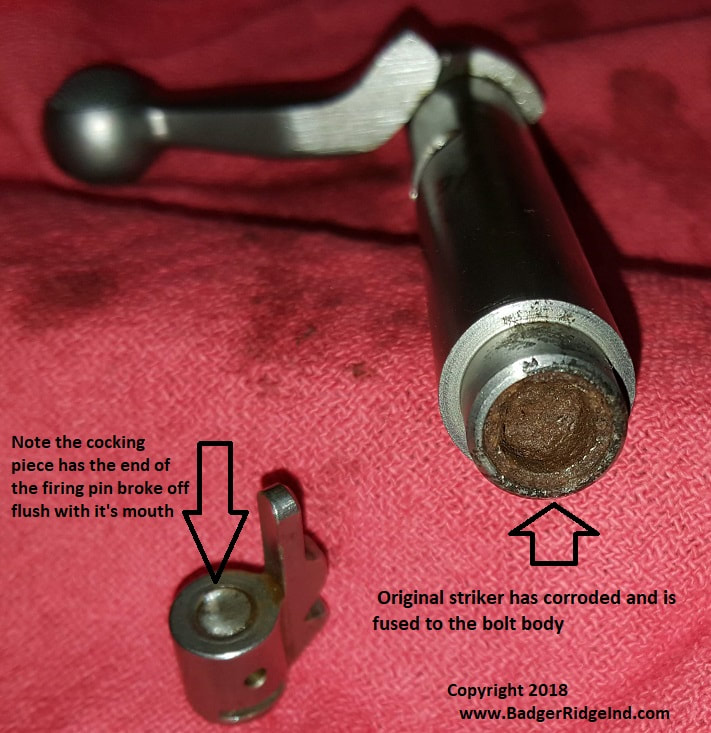
When the parts came, it was very clear that the striker/firing pin was fused to the body pretty solid. I tried my normal tricks to get it loose, and even tried to press it out with my jig and 12 ton press. It wouldn’t budge. So I began flushing the gunk I could out of it from the back end of the bolt, and tried the jig and the press again. No luck. It actually kept breaking the sacrificial pin I built into the jig to keep from over stressing stuff: This bolt wouldn’t break free. Frustrated: I filled the back end of it up with Kroil penetrating oil to sit over night. Worst case, I’d have to chuck this in the lathe and drill the firing pin/striker out from the opening in the bolt nose.
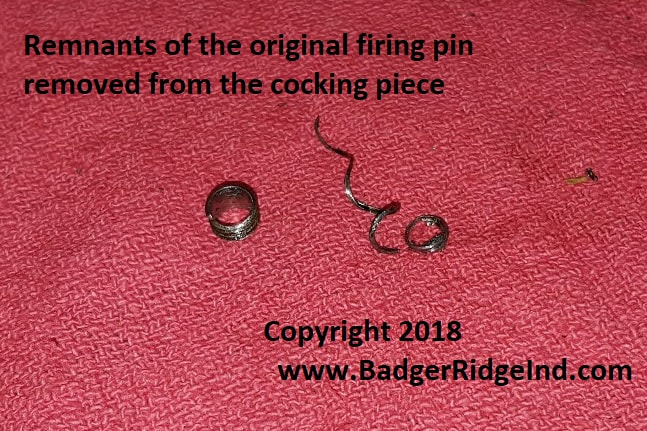
I then turned my attention to the cocking piece. The cross pin was out. So I chucked it up in my lathe and tried drilling it out left handed, that normally does the trick but it didn’t budge. So I tried small holes with screw removers wedged in, and every other trick I knew, but it wouldn’t budge. So I ended up just drilling it out and leaving the little spiral of the V from the thread in it and then picking that out. It was a bit tougher than removing a screw from a blind hole as it all kept fracturing where the cross pin was drilled through, and it’s a deep hole proportionally to its diameter. But eventually I got the portion deep towards the bottom out with a bottoming tap and a small dental pick.
I’m glad I could save the customer from having to buy a new cocking piece (we stock the unthreaded version of these cocking pieces for customers in this situation and have special firing pins for our kits that work with unthreaded cocking pieces).
The leftovers from drilling out the end of the firing pin lodged inside the cocking piece
I left the bolt body to sit for the evening so that the penetrating oil could do its work. When I came back the next morning none of the Kroil had seeped through to the nose. That wasn’t a good sign, as it meant that pin was wedged in there and sealed. I tried the jig and the press again. I sheared the breakaway pin again (I was really getting frustrated having to fab more break away pins!).
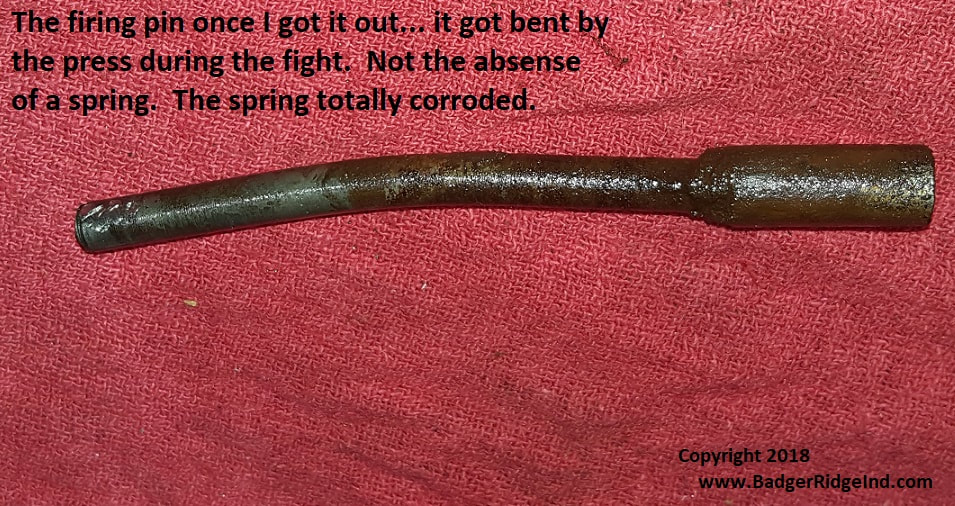
So I made a new jig that didn’t have a shear pin. Either I was going to break the pin free of the bolt body, or I’d break the bolt in the press. I probably should have just chucked the bolt in my lathe and drilled it but I was pissed and moving forward: At this point I falsely felt I had nothing to lose. Luckily for the customer the 12 ton press and the new jig (and probably the Kroil) did the trick, the firing pin/striker busted free of the bolt body, but bent the old firing pin the the process, which made it super tricky to get out, but I managed to get creative and work that one out too.
Bend the firing pin breaking it loose! Note the absence of a main spring: it corroded totally away!
I was amazed. Typically when I break these apart there are sections of mainspring that come out. In this case the mainspring had completely corroded. It must have been all that corroded mess that I had flushed out the first evening!
Anyways from here it was just cleaning up all the crud, and removing any pitting that would interfere with the new firing pin. Now that I had the parts all apart and cleaned up: it was just a normal installation.
I did ask the client for a little more money for my time, broken shear pins, and use of my lathe and sent his bolt back to him: Crisis corrected.
If you have a tough Remington or Ruger bolt, and want a convesation please feel free to reach out to us via phone (989 795 2526) our contact form. We’ll get back to you with a cell phone number and email address so we can start the process!
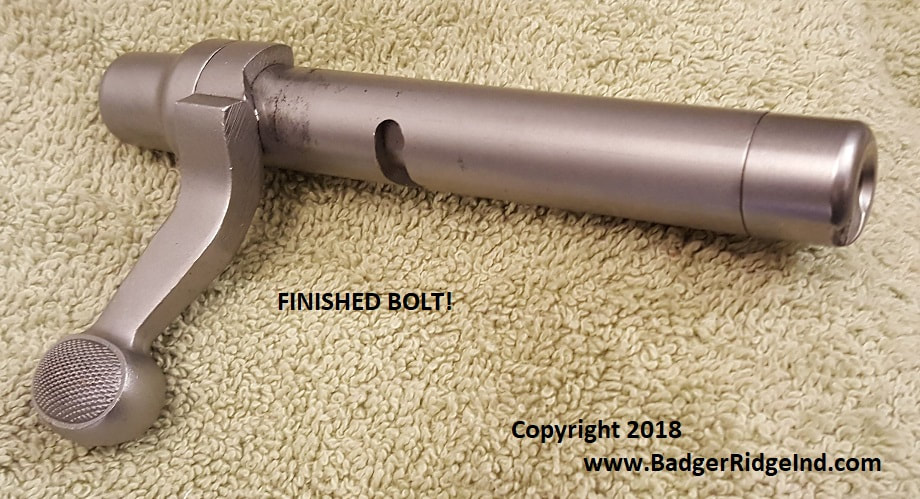
This is the completed bolt ready to go back to the customer.
Preserving a comment from the original website below:
Comment from Eli bowman 10/13/2019
Was sick of my 700ml to many misfires then I come across a like a new gun. I had Badger Ridge 209 install the conversion into my bolt. I love the way it pushes the 209 into the breech plug; highly highly recommend if you have a 700 ML. It’s worth every penny for this conversion and really like the hand written thank you for your purchase that came with my kit.
Badger ridge, thank you for quality kit. Keep up the great work! Got 3 buddies that have 700ml s so I’m sure you will get there business when they see mine!
Reply from Badger Ridge (Tom) 10/13/2019
Thanks for the kinds words. We look forward to helping your friends as well!
This was originally posted to our old website in April of 2018. Moving it here and editing/updating it to preserve the content. Now-a-days I fix bolts like this more often that I’d like to admit, but a few years back I sometime I felt inclined to share. Hope it helps you.
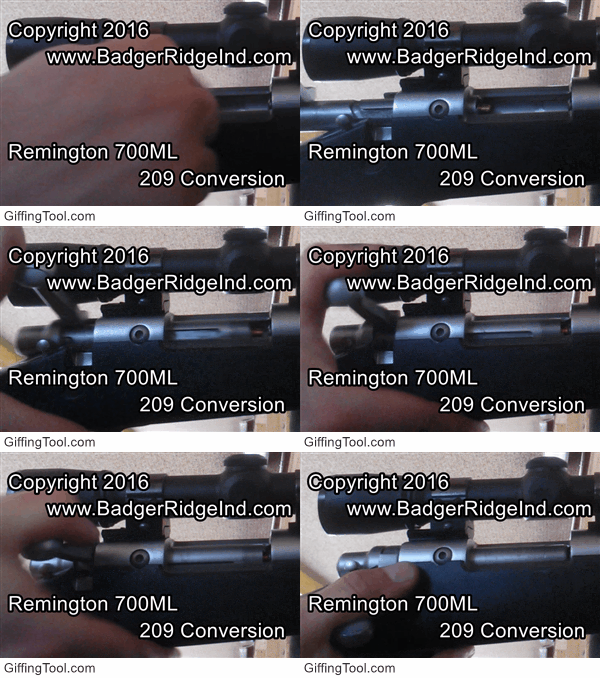
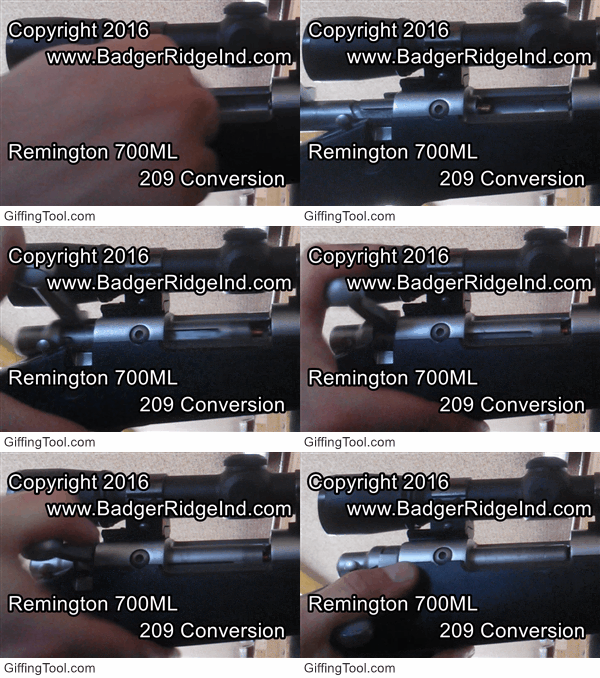
Animated Gif Loading primer in Remington 700 209 sealed breech
Welcome to the website with the only conversion kit you’ll ever want on your Remington 700 ML or Ruger 77/50. I’ve been writing and updating this blog for years. If an internet search brought you here, you will find what you are looking for by reading through these articles or finding the topic you are interested in along the right hand side.
The Remington 700 ML and Ruger 77/50 are our specialty. They both came from the factory with the same fatal flaw: blow-back coursing backwards through the bolt from each firing. The Remington and Canadian 209 mods didn’t improve this. If anything they only made blow-back worse.
If not quickly and properly cleaned after firing the bolt will corrode and freeze up. Our kits correct this fatal flaw by sealing up the breech. But not everyone has our kit yet, and seeing these rifles are all 10 to 20 years old, it’s all to common for some one to have shot and then put it away without a proper cleaning. Be thankful if the bolt was at least removed! Getting a frozen bolt out of a rifle is a nightmare!
Badger Ridge sealed breech 209 system feeding a primer
I was contacted by a Remington 700 owner who admitted he shot his rifle a few years ago, removed the bolt but never cleaned. He had soaked the bolt in penetrating oil for a couple of days, but he couldn’t get it to budge. I recommended he buy our 209 conversion with installation, send me the bolt, and if it wasn’t too much additional work I wouldn’t bother him. He was on a tight budget and couldn’t afford our 209 conversion. So, I told him to purchase our legacy mainspring replacement service and ship me the bolt. We’d go up from there as my time and replacement parts required. We sometimes have new bolt bodies, and essentially always have new mainsprings, and more!
Once I got the bolt in my hands, it looked like any other Remington 700 bolt with the Canadian 209 mod, but indeed I couldn’t compress the mainspring nor get it to move when I put it in a rifle. First move: soak it a couple of days in penetrating oil. After the penetrating oil bath it still wouldn’t budge, so I put it in the jig I made for these bolts and pushed on the firing pin with my 12 ton press. That worked without any marring or damage!
What it looked like after I used my jig and press to compress the mainspring.
The firing pin “protested” a little as it protruded. Once the threaded portion of the firing pin was exposed, I cut the firing pin off (at point where it threads into the cocking piece). I removed the remnant threaded end from the cocking piece. Then I reversed the bolt in the jig and pressed out the pin from the back:
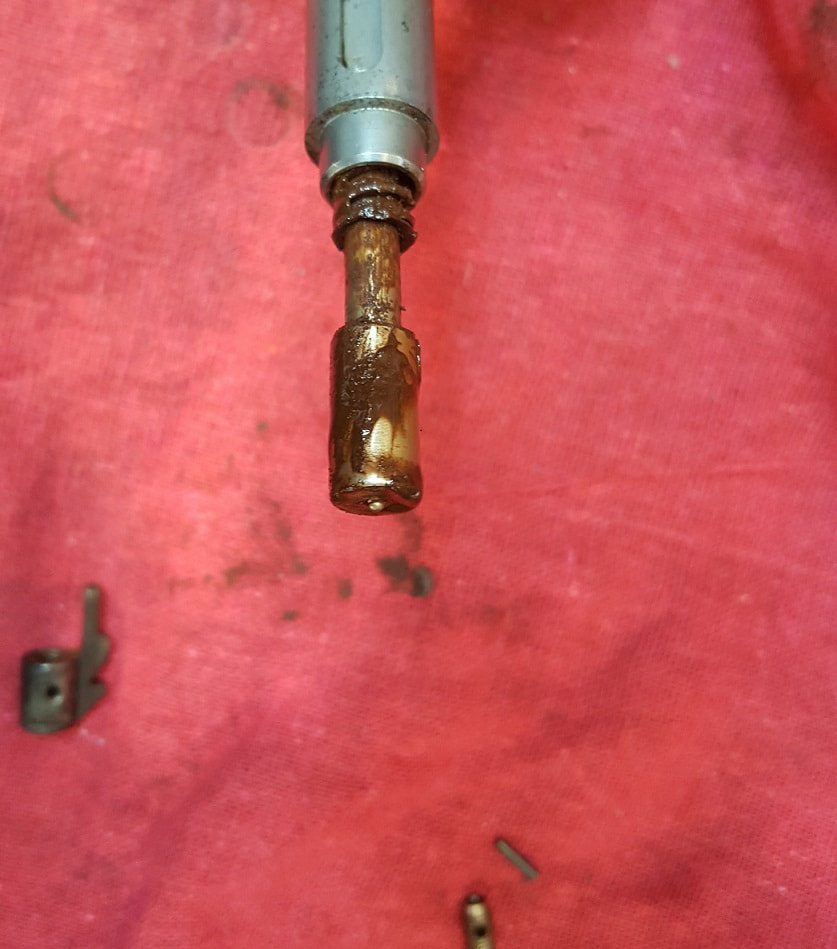
Fring pin pressed out from the rear after cutting it near the cocking piece. The brown crud isn’t grease: its penetrating oil soaked rust and crud
Because it was corroded through in multiple places: most of the mainspring came out (in 3 pieces) with the firing pin, but not all of it. The bolt plug wouldn’t unscrew, even after I cleaned it up. I realized the back end of the mainspring had fused itself to the bolt plug, so back into penetrating oil for another night.
The next day I managed to get the bolt plug to break free of the body. Removed the chunk of mainspring that had fused itself to the bolt plug, and cleaned up all the pitting. After a lot of cleaning, scrubbing, and gingerly re-freshening of threads: the cocking piece, bolt body, and bolt plug ended up being serviceable. As I had to sacrifice the original firing pin to get it apart, I pulled an old used Canadian firing pin out of my junk bin. All I needed was a new mainspring to put it all back together. The client made my additional trouble ‘right’ with a few more dollars and it all went back in the mail.
While the customer is always right, and he is very happy… I have to admit it didn’t sit right with me to do so much work just to leave the bolt with a leaky setup that will likely fail even if properly cared for… and if neglected it will totally lock up again. I really felt this rifle needed our sealed breech 209 conversion. But the customer is always right.
Hope this has helped you. If we can help you in anyway (perhaps with a Ruger 77/50 or Remington 700 ML) please call us at 989-795-2526 or use the Contact page to reach out. We usually reply within 24 hrs. Be sure to mention what type of muzzle loader you have!
Preserving some of the more useful comments and replies from the original post:
Comment from Jeff Harn 12/4/2024
I have a 700ML (20 years old) and keep having a lot of miss fires.
I’m just looking into to what the problem could be since reading the above article think it’s just going to need a good internal cleaning of the bolt and go with the upgrade.
One thing I will say is that when everything is working correctly with this gun You can touch the bullet holes! Please any other feed back is much appreciated
Reply from Badger Ridge
Yes these rifles tend to shoot well. That’s why I love them and strive to service and improve all that I can. The original system and the older modifications all suck. However the system we sell will fix the unreliable ignition and make the Remington 700 ML/MLS one of the finest muzzle loaders you can own.
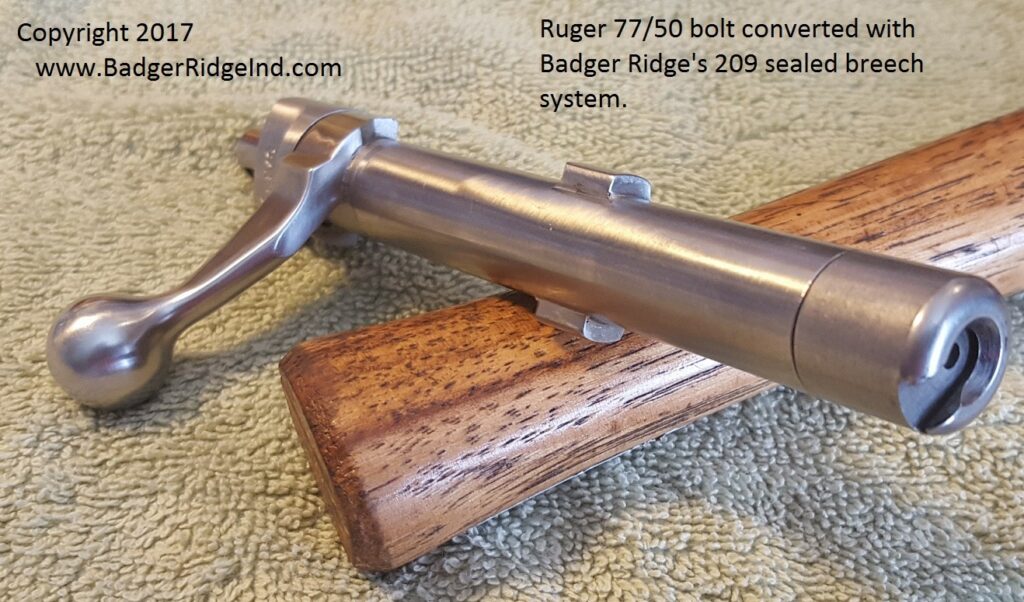
We originally offered a 209 conversion for the Remington 700 ML. Then in February of 2017 we released a similar sealed breech 209 system for the Ruger 77/50! Reposting this anouncement from our old website here to preserve and update it.
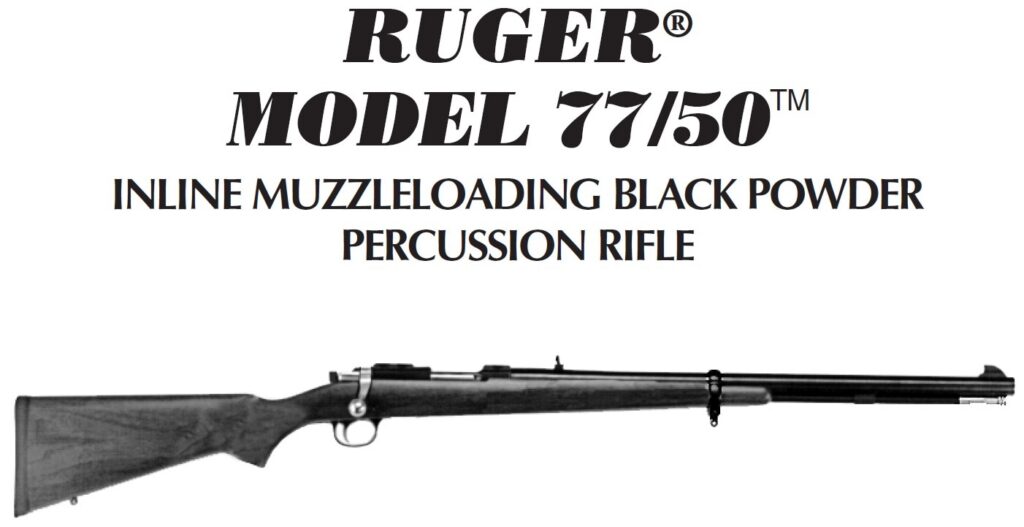
Much like the Remington 700 ML and 700ADL, Ruger sold a muzzle loader that looks a lot like the Ruger 77/44 (and the 77/22): the Ruger 77/50. According to the Ruger website, it was in production from 1997-2004. Judging by serial number data no where near as many were made as the 700ML. The Ruger functioned very similar to the Remington, and even had a breech thread that allowed use of 700ML breech plugs. (Not that we nor the manufacturer are endorsing that. It’s just so similar it’s possible). Thus these rifles had many of the same problems as the Remington 700 ML: Blow-back, frequent misfires, and factory setups that didn’t have 209 options.
In order to develop and prove out our sealed breech 77/50 209 conversion a few 77/50’s were purchased and converted by Fred and myself. Having a couple of centerfire Ruger 77 MKII’s that I’ve hunted with for years, in many ways the 77/50 didn’t feel like a totally new rifle to me, even though it was a ‘totally new’ rifle to me. And while on the surface it works similar to the Remington, and the breech plug threads of both are essentially identical, the 77/50 is a very different rifle to convert.
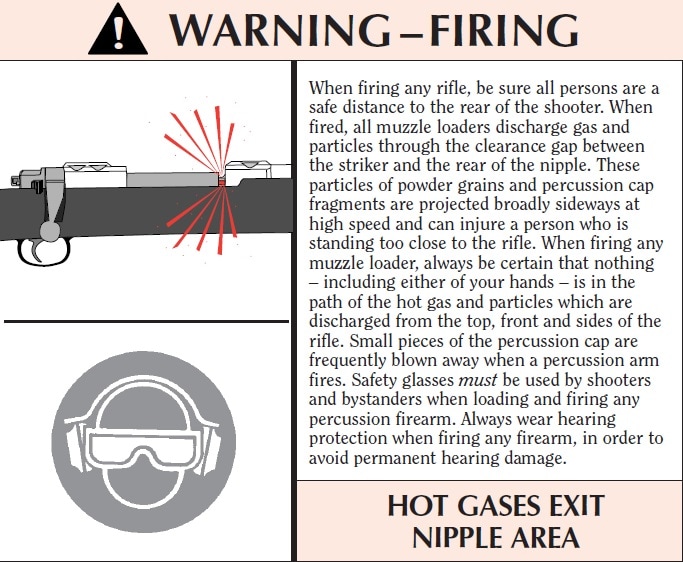
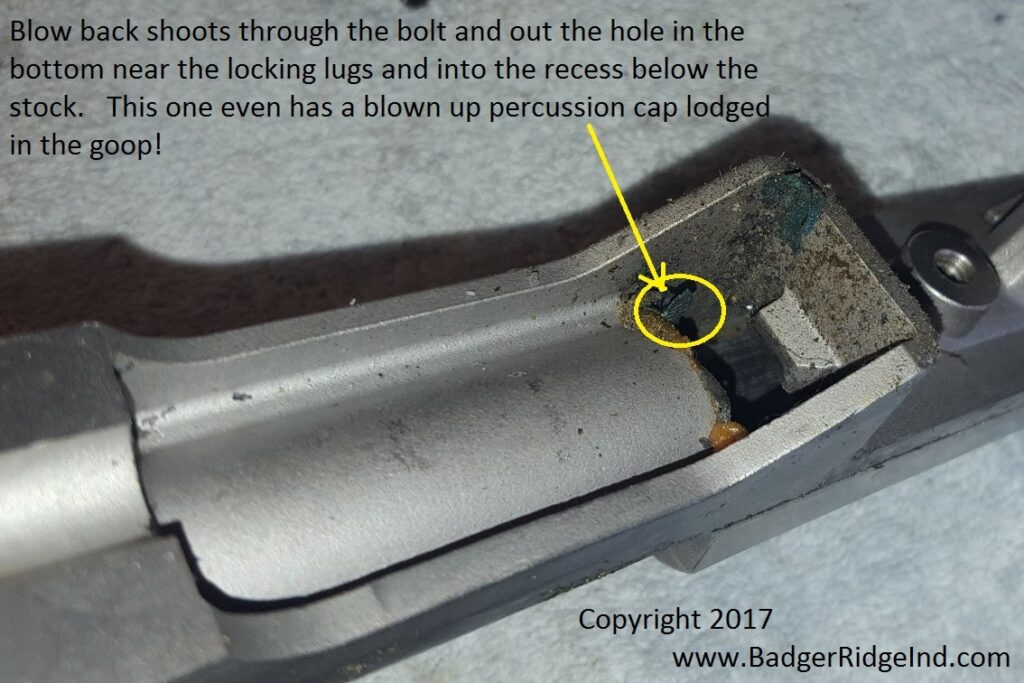
As the rifle came from the factory, or even when modified with a Canadian 209 system, the warning about “Hot Gases Exit Nipple Area” excerpted from the 77/50 manual rings true and must be heeded. Hot gasses and pieces of primers/caps being blown back and around the nipple and the associated fouling are some time referred to as “blow by”. However I find it seems more accurate to call it “Blow Back”. The later version of the 77/50 used a protrusion on the bolt itself to try and direct the blow back to the side of the rifle. And while it does accomplish this, it also directs blow-back into the bolt. The bolt has a vent in the bolt body that directs the blow back that enters it down and into the stock! So as delivered from Ruger, blow back gets in the bolt, and is even directed down and into the inner recesses of the rifle!
This complicates cleaning and over the long term reduces the reliability of the system. So compared to the Remington we had to modify the Ruger’s bolt much more to get a 209 system that seals the breech and is more reliable.
The main reason to switch to our system is not only to use 209 primers, but to seal up the breech area and essentially eliminate all of the blow-back issues. 209 primers are hotter and more reliable source of ignition. Using them to seal blow back into the breech plug vastly simplifies cleaning and makes the rifle safer and more reliable. Our conversion seals out the elements and allows one to shoot Blackhorn 209 powder. Which in my opinion is the best black powder substitute available. The Canadian 209 system and the original cap system are not Blackhorn 209 compatible, and they allow blow-back into all those nooks and crannies.
Remember the warning above: blow-back not only can injure a shooter or by stander, but it can burn the optics mounted above the breech, project corrosive fouling throughout the bolt and action, and wear out a mainspring prematurely. Even worse, the Ruger 77/50 is known to have an additional deficiency: Blow back launches the firing pin rearward and occasionally shears the trigger’s sear!
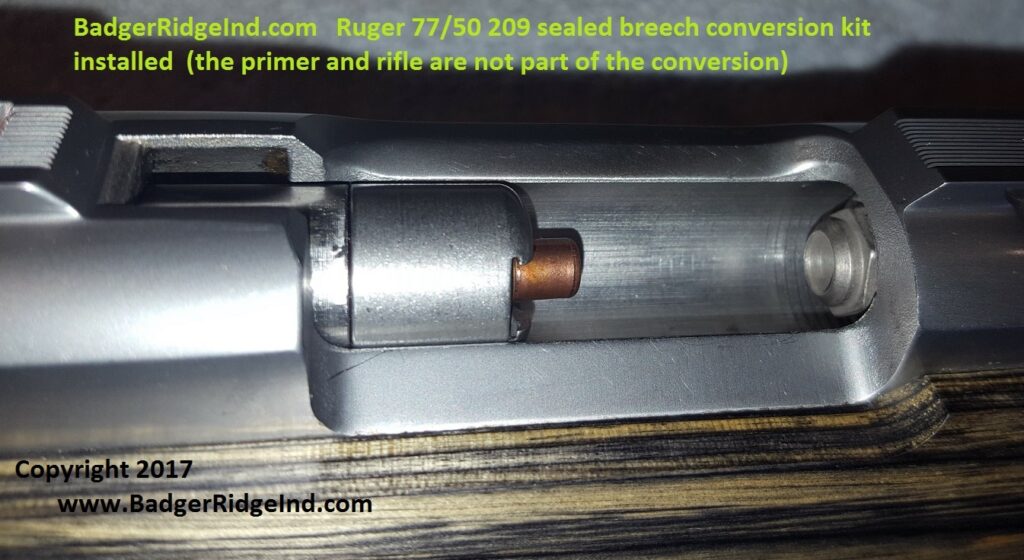
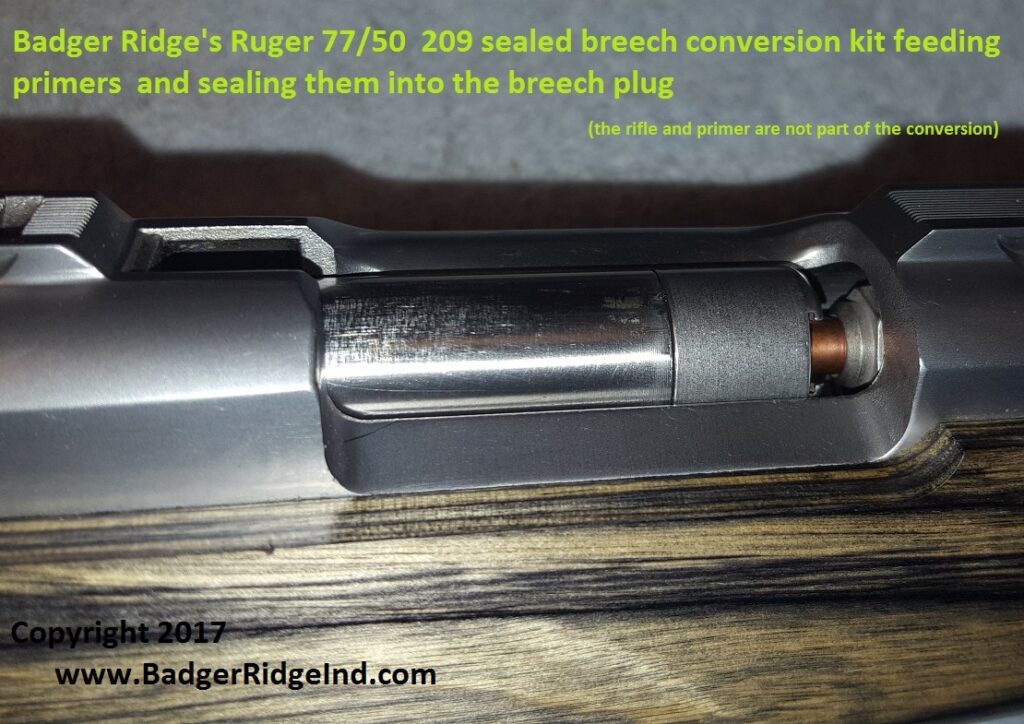
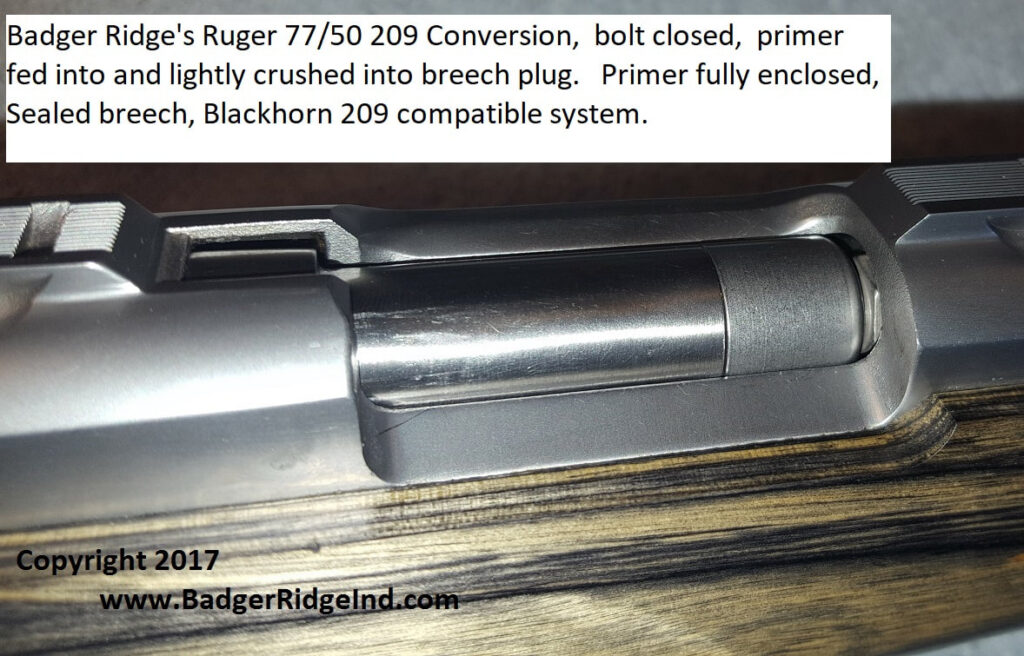
Badger Ridge Converted bolt feeding primers and sealing them into the breech plug
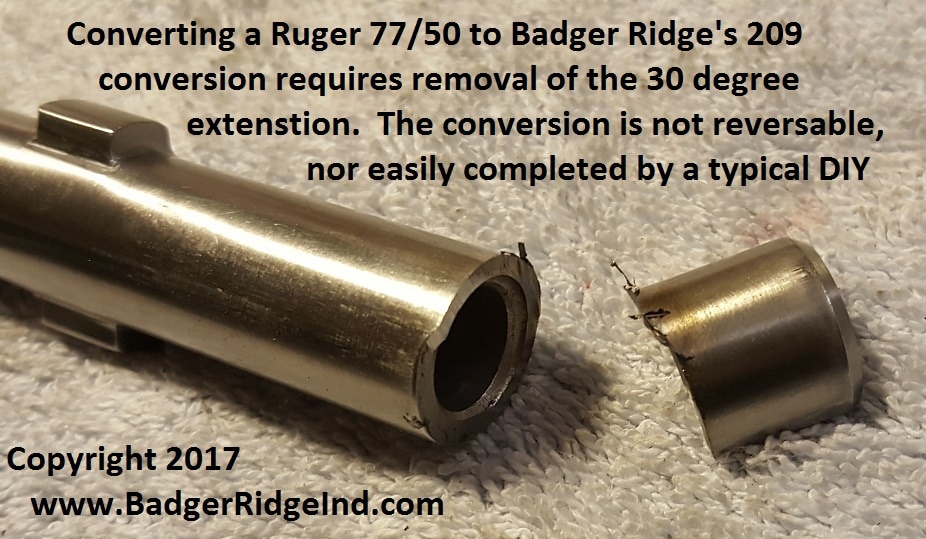
The conversion process requires the bolt to be completely stripped, our new firing pin to be installed, the extended shroud to be cut off, and the nose of the bolt dressed. Then the 209 nose is timed to align it for loading and unloading, pressed on, and firing pin protrusion set. So once complete there really isn’t any going back. But once the converted rifle is shot, I’m sure no one will ever want to go back to the leaky original set up!
Our Ruger 77/50 conversion is through its first rounds of testing but is still in what the DoD would call LRIP (low rate initial production). I’m not comfortable sending this one out for just anyone to install, and for now, will only offer it as a full conversion service. Or in other words, I’m not willing to sell this one as a kit; you will have to pay me to install it.
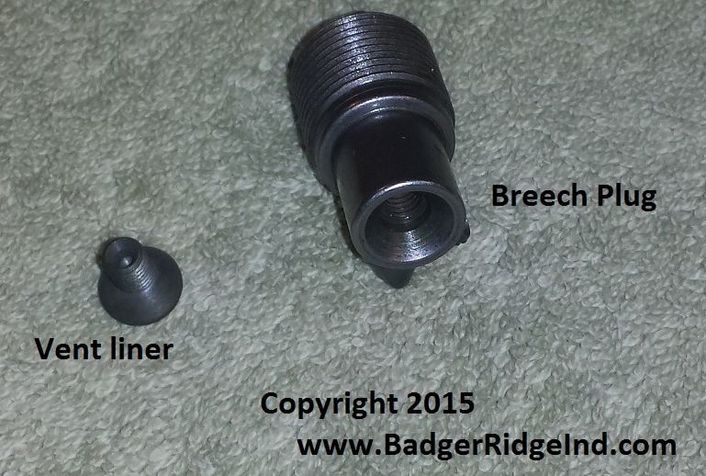
The Ruger conversion uses a very similar breech plug to the one used in our Remington system:
If you are interested in making your rifle work the way you always wanted it to, and Blackhorn 209 compatible, you can purchase Ruger 77/50 conversion as a service (very similar to our Remington 700ML conversion service). Mail us your bolt, we’ll convert, and send it back with the breech plug, vent liner, and other accessories. The details are all in the listing for this service!
We also can ship an entire new 209 converted bolt to you if you want to keep the original leaky system, or are missing a bolt etc. That is more expensive than converting an existing bolt. We do not recommend this unless you hunt out west where leaky non 209 systems are required for special hunts, but on others you can use our sealed breech 209 system.
And as always feel free to use the Contact form to send me your info or call us at 989 795 2526. If you use the contact for we will do our best to email back promptly.
Preserving some of the questions/comments from the original post below:
Comment from Jim Brown 11/14/2017
How easy is it to remove spent primers? Are there issues with primer misalignment with the 209 recess in the breech plug? I am considering this conversion for my Ruger.
Reply from Badger Ridge 11/14/2017
Typically you pull the spent primer from the bolt nose with your fingers or just turn the rifle on it’s side and the primer falls out. No misalignment issues. The nose feeds the primer into the breech plug. It seals by getting a .003 to .005″ crush. So when extracting the primer it comes right out of the breech plug via the bolt action, and by turnging the rifle on it’s side the primer will fall out.
If there is any issue, its only with a discharged primer ‘ballooning’ and sticking in the nose, but every time that has happened to me a dry fire was all that was required to loosent the spent primer in the nose. Then opened the bolt and the primer dropped out when I turned the rifle on its side.
The real issue you need to understand is that every brand of primer has slightly different dimensions. With this system the most critical dimension is length. We will set the bolt to lightly crush Federal primers in our test rifle. 9 times out of 10 this will give the same results for the end-user.
In the 1 in 10 that doesn’t, they either have no crush, or too much crush (excessive headspace or insufficent head space). In the case of no crush, the instructions recommend that you try Winchester primers (as they are longer than the other 3 USA made primers). If you get a seal/light crush with them, then use them. Also you could buy primer pocket shims from us, and shim the primer pocket to use shorter primers.
In the very few cases the head space is insufficeint to cloase the bolt on CCI/Federal/Remington 209’s, the customer sends the bolt back to us. We increase headspace by about .005″ and typically they get a good crush then.
Comment from Jim Brown 12/7/2017
Tom, I am curious. What does the vent liner screw do?
Reply from Badge Ridge (Tom) 12/7/2017
Short answer: The vent liner is a removable flash hole… so that when the flash hole (small hole down the middle of it) is shot out and enlarges, you just replace the vent liner.
Long answer: The vent liner focuses the fire from the primer, and acts as a constriction of back pressure from the burning powder charge… by having its constriction and the large expansion area between it and the primer, back pressure seen at the primer is reduced and keeps from deforming or blowing up the primer. This action tends to produce consistent pressures, which tends to increase accuracy as well.
Flash hole errosion is a problem on all sealed breech 209 muzzleloaders (and that is rarely understood). The vent liner allows one to correct for an erroded flash hole, just by swapping in a new vent liner. Other breech plug designs ignore the problem, or expect you to purchase new breech plugs instead of inexpensive vent liners.
So over all the Vent liner is a key component to keeping blow-back in check, making a reliable ignition system, and aides in getting consistent pressures as well. It performs best when it’s orifice is between .030 and .036… it should be replaced when it hits .036 or accuracy will degrade and pressures seen at the primer will build.
I’m very interested to convert the two Ruger 77-50s that I have (and some Remington ML700s as well). I understand that you do the work on the Ruger bolt(s) but will send the complete works to fix the Remingtons.
Here’s my question: if you aim for a crush on the primers as indicated between the bolt face and the breech plug face, and I install the breech plug, how can you ensure that, or put differently, how will I know I’ve achieved the correct ‘crush’, neither too much nor too little?
I suppose the breech plug could be marked and backed out a quarter or one-third turn or so if too much gap, but how about too little? Re the latter, will that be apparent with too forced a closing of the bolt, but what would that be like or feel like? Would there be any telltale marks on the primer in either instance (after firing), either too much gap or too little?
And finally, you imply (or indeed state) that the breech plug will, over time and use, open up, such that more than .036 it’s time for a fresh one; in other forums, Chuck Hawks’ for instance, he talks of carbonization in the breech plug hole for black powder rifles generally and drilling out the carbon occasionally, without any numbers for reference, but nonetheless. These two views seem inconsistent, can you enlighten?
Thanks, looking forward to hearing from you.
Reply from Badger Ridge (Tom) 1/7/2018
Mr. Quin,
Some good questions. They are essentially answered in the instructions that come with the kit.
First and foremost, never ever back out a breech plug from its fully seated position. Always fully seat the breech plug into clean breech threads. An unseated breech plug is not safe!
The crush is mostly a feel, ie you feel how the bolt closes without any primer in the nose, then you try a primer and can feel the difference. If its so hard to close the bolt that you’d have to strike the handle with your hand or some sort of hammer: DON’T. Or in other words a light crush is all that is needed, and it can be done with gentle but firm hand pressure. Again, nothing more than light hand pressure is needed to get a light crush: pounding and hammers are bad!
If you have ever just neck sized your brass, its the same feel you get after a few reloads. There isn’t any gaps to be measured, either the primer will feed without any crush, will feed with some crush, or it will be very difficult to close the bolt because the primer is too long.
Primers from different manufacturers will have slightly different dimensions. And they will even vary slightly between each other when they come out of the box. If you have precision measuring tools like calipers or a micrometer you can see what the primers dimensions are before you try and feed it, and then measure it after its been crushed to see the variation. This is not exact either, because the primer will spring back some. If you can do this, then you’d be looking for about .003 to .005” of crush.
But remember the goal here isn’t to crush primers; it is to seal them so that blow-back stays in the breech plug. So in effect if you are not crushing primers so much that you detonate them, you don’t have to strike or use extreme force get the bolt handle down, and you are sealing the blow back in when you shoot: you have been successful.
I’ve got a couple rifles, and Fred has had a few too. In developing the kit we tried a few different lengths to set the bolts length to and tried these bolts in multiple rifles… that gave us a good range to set them too (and there is only a few thousandths of an inch window here). So when I convert a bolt, I set it to that tolerance and try it in my rifles. Just from the length its set to, I’ll have a good idea what primer will work in my rifles, I try it in my rifles. We set these so that they work well with Federal 209’s.
So far that has worked well for clients, but I can’t tell 100% you what primer will work best in your rifle. That is because of the rifle’s we’ve bought and tried this on, we have a decent range of headspace figured out.
The issues is I can’t know exactly what your rifle’s headspace will be. But I really don’t need to know it exactly. When you get your bolt back, start by trying Federal, CCI or Remington (they are close enough in length to figure this out). If they crush, good. If not, you can try another brand. Seeing the primers length will vary depending on the brand, and Winchester are pretty much the longest, CCI’s are next (Federal and Remington are close to CCI)… it will either be Winchester that crush well, or CCI/Federal/Remington… probably one of the two groups.
So there is some trial that still must be done by the client.
Bottom line: Read and follow the directions, clean those breech threads, fully seat the breech plug, do not work on a loaded rifle, and don’t beat on things.
Occaionally a customer’s rifle will have excessive headspace. They will need to buy some small washers (aka primer pocket shims) and shim the bottom of the primer pocket to get a satisfactory crush/seal.
If a client is not getting a crush, say with CCI, they could add washers to get a crush, or they could try Winchesters. In my opinion it is better to just switch up to Winchester and if it seals use Winchester primers, and not use the shims…. Keep it simple and less complicated and it will work better in the field.
So essentially we’ve got it down to where the bolt we send will have a good crush with CCI/Federal/Remington primers 9 times out of 10… and our suggestion is to use the primers that crush with just some gentle downward pressure on the bolt handle. If you are the one in 10 that cant seal with CCI/Federal/Remington 209’s, then try Winchesters… or buy some primer pocket shims.
In some very rare cases the bolt won’t close on any primer. If that is the case well work it out and may end up machining off some more metal from the bolt to increase head space.
And with our breech plugs, the breech plug doesn’t open up or wear as it is heat treated stainless steel and prmers are made of much softer stuff. To clean the breech plug is gently reamed with drill bits that are undersized so that the carbon/fouling can be removed but cleaning should not remove metal from the breech plug!
The hole through the center of the vent liner will open up due to the fire from the primer passing through it from each shot. Remember the vent liner is like a screw with a hole down the center and is screwed into the end of the breech plug. When its orifice (inside hole) opens to .036, replace it with a new vent liner. The vent liner are only a few $ each, and the gage pin to know if its .036 or larger are in expensive too (if you add them you kit order). So using vent liners makes the breech plug last much, much, longer.
Comment from B Qunn 1/8/2018
Hello again, thanks for the answers, some more questions.
First, the “209 nose” piece which, once the overhang deflecting piece on the original bolt is cut off, is pressed on
1) is this piece stainless steel?
2) how deep into the bolt is it pressed?
3) how do you set the firing pin protrusion? Do you start out with an overlong pin and install it into the various bolts you get and then cut any excess off?
Also, I see from your setup that if there is backward movement from the primer firing, it bucks against the new bolt face (inside the 209 nose) much more than against the protruding firing pin, which is more like a usual firing pin in size unlike the original which is basically a big flat cylinder end-on, and thus would greatly reduce the reported ‘sear shearing’ over time (unlike the Canadian kit which, although it replaces the original firing pin cylinder with another with a bump on it, to make the primer fire, it’s still a relatively big cylinder end-on, an only held in place by the mainspring, so any rearward thrust could push the firing pin back and may over time deform the sear (maybe)); I like yours.
FWIW the hole in the Ruger bolt is as I see it a gas escape hole, just like the same in the bolt action Mauser/Springfield/Winchester 70, etc. It may have the unintended effect if there is blowback of fouling the works under the bolt or on the trigger mechanism, but its main purpose is safe gas management I would assume; having said that, not having any blowback at all is best, still leaving the hole for unfortunate extraordinary rearward escapes of gas like from punctured primers. I do find it odd that, once the bolt is locked, the gas hole points horizontally to the left into a channel which would allow the gas to go down; I would have preferred it pointed straight down from the bolt , but perhaps that would have exposed the hole even more to day-to-day dirt, etc., directly into the bolt where the firing pin and spring reside, so not good. But I’m glad it’s there, the Remington 700ML doesn’t have one.
I also see that there is a chamfered recess in the 209 nose piece and a corresponding chamfer on the breech plug surrounding where the primer will sit; are these designed to mate up? And finally, elsewhere above or on your site you mention routinely replacing the bolt/striker mainspring with a fresh OEM one on the Remingtons, but on the Rugers you use the original spring having cleaned it – can you explain? Thanks again.
Reply from Badger Ridge (Tom) 1/8/2018
Mr. Qunn,
Some good questions. Most of them are a bit of ‘trade secrets’ and design decisions…. but here we go:
Our Ruger 77/50 kit (just like the Remington 700 ML kit) is manufactured in the US on CNC machines from 416 stainless steel. The nose and the breech plug are heat treated. The vent liner is 17-4 stainless and also made in the USA.
The problem with the 77/50 that I haven’t been able to find a ‘fix’ for is the main spring. I just can’t find them. So we are forced to reuse the original springs. Luckily the new bolts we sell have brand new springs with them, but I cannot find the spring alone. If you know a source please share.
For the Remington I used to buy main-springs direct from Remington, but now have them made in the USA for us in bulk. (we have two versions: one for the original 700ML/Model 7, and a second for our 209 system or the Short Action Rem 700). If someone was to send in a Ruger bolt with a spring that was totally shot, I’d probably end up cutting another spring, or seeing if a 700ML spring would work (the two springs are very close in many ways).
On the Ruger, after cutting the bolt protrusion off, and machining it square and to the proper length, the bolt nose is pressed approximately ½” into the original bolt with designed interference fit. Trust me, the nose is not going anywhere.
The firing pin is purposely manufactured too long: I have to file it to set the protrusion on it similar to the way our Remington Kit works. (see the Remington 700 instructions for the details there).
As for fit between the nose and the breech plug, both the Ruger Kit and Remington have the same profiles. The nose and breech plug have the same very carefully designed tapers that allow them to come very close together to enclose the primer almost fully, but not allow them to touch and still allow pressure a path for gas to escape if there was some sort of rupture.
Like you said, no blowback is best, and we have a design that should seal it into the breech plug. But the path to vent any ruptures in the Ruger bolt body is not modified by our kit: the original a route for gas to escape if a primer was to ruptured remains. So in the Ruger, gas from a ruptured primer could still travel through the hole in the bolt nose, along the firing pin, then down through the bolt body, and into the lower recesses of the receiver: The gas safety route as designed by Ruger is preserved. And like you said, the Remington doesn’t have this vent hole in the bolt body, so if it has a rupture our system relies on the carefully designed gap between the breech plug and bolt nose to give a relief path (which is the same in both our Ruger and Remington systems).
Unlike the Remington, the Ruger Kit crushes the primer, and the Ruger has locking lugs on the bolt that hold the crush. So before firing there is already bolt thrust from the primer crush: when the primer is discharged it cannot move forward or rearward due to this crush.
On the Remington kit the swaging of the primer into the breech plug seals well. But swaging into a tapered hole also allows for some movement forward, deeper into the breech plug, when the firing pin protrudes and ignites the primer. The movement is more notable with lose primers or brands with more taper to them, such as Winchesters. This movement of the primer forward allows the primer cup to bulge in the the bolt face, which is one reason the Remington kit can suffer stuck primers (but not the only reason). The Ruger Kit seems to fare better here. I haven’t had a stuck primer yet, even with Winchester primers (which are notorious in our Remington kit).
I’m 100% sure that the sears in the Ruger 77/50 were stressed and broken by the original design driving the firing pin rearward into them. The Canadian 209 mod worsened this, and the Bager Ridge Conversion completely eliminates blow back driving the firing pin rear-ward. Thus our system should be considered an essential safety and life prolonging modification to every Ruger 77-50.
Yours,
Tom
Comment from B Qunn 1/8/2018
Further to my point on handling rearward escaping gas, obviously the main outlet would be the substantial hole (if that’s the right word, it’s basically the right side length of the action between the ‘chamber’ (if you will) and the rear bridge of the action) to the right of the bolt where the action dips down to facilitate primer loading (in a cartridge rifle, to load the cartridges); the escape hole in the Ruger bolt is just to handle whatever gas enters the bolt, if any, since most will blow up and out to the right which, as far as I can see, cannot be stopped or managed on inline muzzleloaders (on cartridge rifles, the bolt locks up about 1″ deep inside a big hole in the end of the action or barrel and so if gas escapes rearwards there into that chamber from a ruptured case or punctured primer, to manage it, they usually have an escape hole drilled into the right side of this overhang, sometimes both sides; they also have escape holes in the bolt for whatever gas gets inside the bolt).
One additional question: could you comment on whether the likelihood of escaping gas with an inline muzzleloader with a breechplug is significantly more or less than with a cartridge rifle; I assume much less, as with a cartridge rifle you can get either a punctured primer (here too) but you can also get a ruptured case side or bottom, whereas here you have the breech plug between you or the action and the powder burn, and surely a threaded breechplug is many times stronger than brass cartridge cases, so you only really have to worry about a punctured primer, and your system limits that, as well as reducing the likelihood of over-time sear shear. Agree?
Reply from Badger Ridge (Tom) 1/8/2018
There is a lot to this question.
I think simply: center fire rifles are designed to operate at higher pressures, and achieve those pressures faster (ie they have a faster pressure curve and higher peak pressures). As most of them are bottlenecks: They typically have smaller bores that don’t have the same volume as your standard 50cal muzzle loader. This tends preserve more pressure as the projectile moves down the bore, and tends to drive the compubustion of their powders to higher pressures. This is a feature of bottle necks, that muzzle-loaders and straight wall cartridges lack.
Your muzzle loader contains its lower pressures, and builds them more slowly by having a larger bore, using different propellants, and containing the combustion gases to the rear with a stainless steel breech plug. The breech plug is much stronger than brass center fire rifle cases, but does have holes machined into it. Those holes always allow some pressure to seap through rearwards.
All that said these are two different systems with differing ways to handle the pressure.
What I know is
1. The original leaky system blew that pressure all over you and through the action 2. The Savage 10ML2 did a great job of keeping the muzzle loader back pressure encased. 3. Our kits work a lot like the Savage 10 ML2 (but our stuff is not for smokeless powders!!!!)
If you follow the rules (ie no smokeless powder, use witness marks, only load with known good components, etc) you will be as safe as you can. Its when folks start trying to ‘get more’ out of their rifles by breaking the rules, that they only “get more… danger.”
Comment from B QUINN 2/1/2019
Thanks for all these comprehensive answers to my comprehensive questions (yes, I show up once a year bidden or not). Re your last paragraph, what are “witness marks”? Are these the markings you make on your ramrod to show when you’ve seated a bullet, etc.? Or something else? Thanks, and I still have the Rugers and the Rems, and hope soon to proceed with the upgrade kits. Life has a way of getting in the way, as you know.
Reply from Badger Ridge (Tom) 2/1/2019
Witness marks are marks on ram rods. When the ram rod is placed all the way into the barrel and abuts the breech plug: if the witness mark aligns with the end of the muzzle it will indicate if the rifle is charged or not (depending on where you put the witness mark). I personally make marks that indicate where the barrel aligns when empty. Any other alignment means the rifle is loaded.