The Remington VersaMax is a Benelli-pattern gas-operated shotgun that shares component design and operating characteristics with several Benelli models. These similarities extend into multiple Benelli clones, including Stoeger M3000 M3500 series. Thus many parts are interchangeable between these shotguns.
Many reliability problems can be traced to inadequate maintenance, worn components, or details that the original Remington owner’s manual does not adequately explain. The VersaMax is a reliable gun when properly maintained and worn parts replaced. Many problems are the predictable result of accumulated fouling, worn springs, damaged small components, use of improper/excessive/insufficient application of lubricants, or maintenance that was inadequately explained in the original documentation.
Before working on any firearm, verify that it is unloaded and the safety is on. Follow the owner’s manual for disassembly/reassembly, maintenance, and lubrication requirements. This guide is designed to be used in conjunction with your firearms Owner’s Manual.
The most important areas to inspect/clean/replace worn parts in are:
- Bolt carrier group (cam pin, bolt carrier cam pin slot, bolt-link/rat-tail assembly, extractor and extractor spring, firing pin/spring and channel in bolt carrier, firing-pin retaining-pin o-ring)
- Recoil/action spring and its associated tube and plunger (trapped inside buttstock)
- Trigger-group: hammer, spring, and plunger/cap
- Gas pistons and gas plug retaining cylinder o-rings
- Removable choke tubes must be lubricated with anti-seize grease!
Regular inspection and appropriate lubrication can identify many problems, and extend part life (before they become failures in the field).
Start With Basic Maintenance
Use the owner’s manual procedures to remove the barrel, bolt carrier group, and trigger group. With those components removed, clean the inside of the receiver and put a drop of appropriate gun oil on each rail where the bolt carrier rides. Only use gun oils that remain suitable in cold temperatures, such as Break Free CLP or RemOil. Avoid products that gel or otherwise become unsuitable in cold weather.
When a VersaMax or similar Benelli-pattern shotgun is unreliable with reputable ammunition, and/or has a high round count, diligently work through the following areas rather than assuming the problem is the ammunition:
Failure to eject, extract, or repeated jams, Light primer strikes (primers dented lightly) / mis-fires: Clean and lubricate the shotgun correctly, inspect and correct/replace missing or damaged parts.
- Clean Inspect and lube the extractor & the extractor spring. (On Stoeger M3000/M3500 models the extractor and spring are frequently bad out of the box and should be replaced).
- Clean Inspect & lube the ejector and spring (in a recess of the barrel extension that goes inside the receiver)
- Inspect the bolt cam pin (aka locking pin head) for deformation (replace if deformed)
- Inspect the bolt carrier and cam-pin slot for burrs.
- Inspect the bolt for gouging.
- Inspect the hammer for peening
- Inspect the firing pin/firing pin spring/firing pin channel for debris or grease that is gelling.
- Inspect the hammer spring for wear.
- Inspect the hammer-spring plunger/cap for chipped plating.
- Clean debris from around the hammer spring/hammer plunger (requires disassembly). Only lube with bonafide gun oil
- Inspect the firing-pin retaining-pin O-ring and ensure its holding the retaining pin fully into the bolt.
- Inspect the bolt link/rat tail for cracks & Inspect the bolt-link cross pin for deformation.
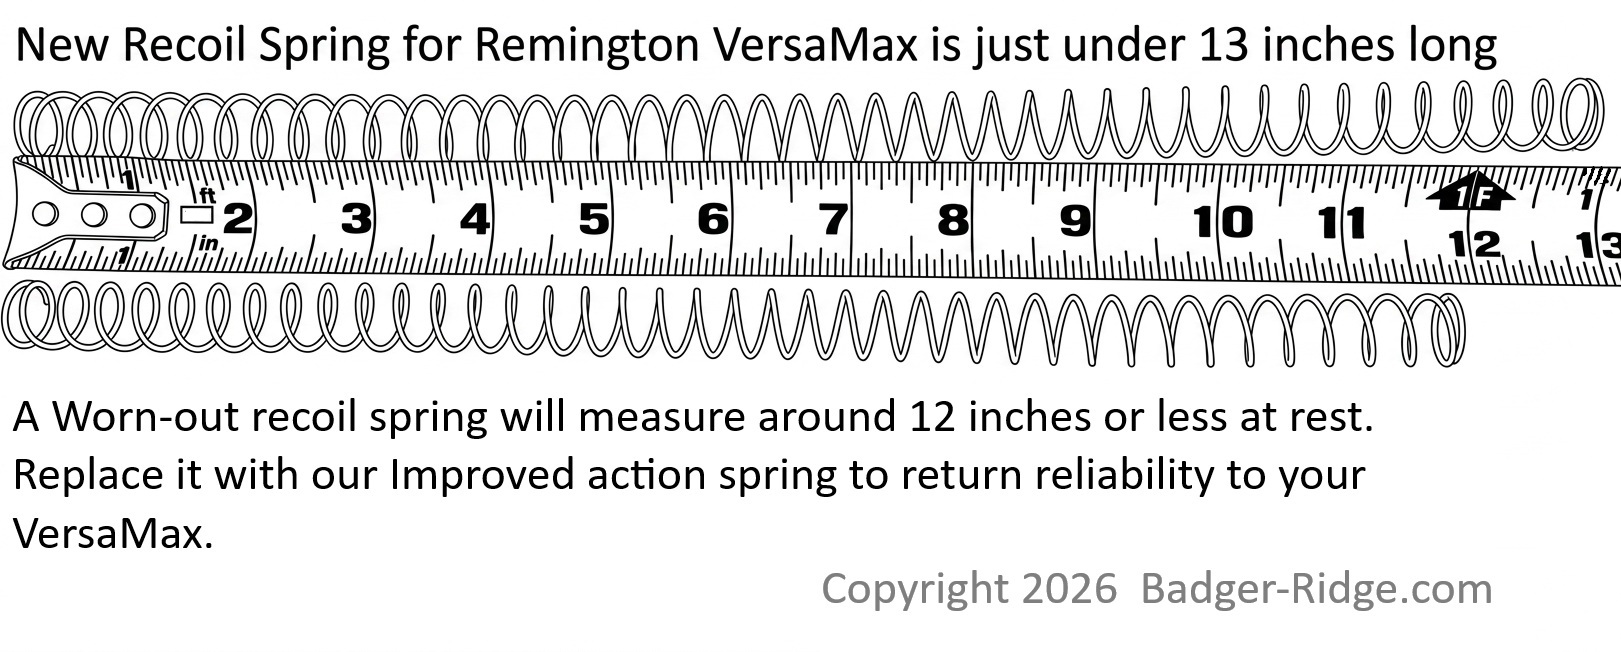
- Inspect, clean & lube the recoil/action spring (in buttstock). Replace the action spring if its resting length is approximately 12 inches or less.
Gas-system concerns (unique to the VersaMax and M4)
- Make sure the pistons move freely.
- Remove carbon deposits.
- Do not leave oil or grease on the pistons or inside the cylinders.
- Inspect the gas-system-plug O-rings.
Detailed procedures: Bolt Carrier Group
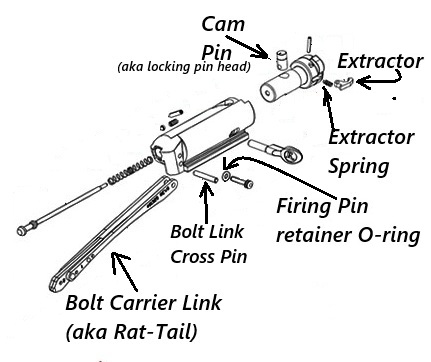
The bolt carrier group should be completely disassembled—except for removing the extractor—cleaned, inspected, and lubricated during regular maintenance. Look for wear, deformation, cracks, burrs, gouges, and worn springs.
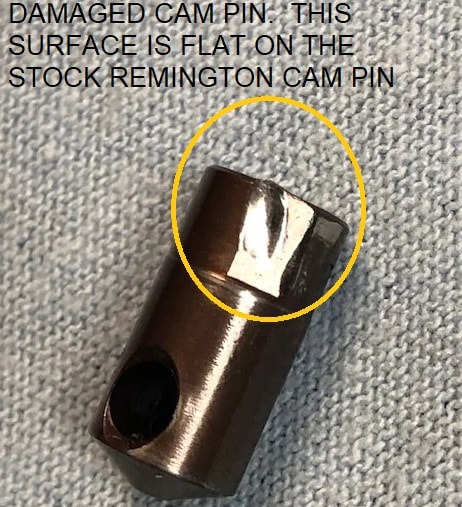
Cam pin
Inspect the cam pin for deformation. Replace a deformed pin (we sell them individually and they come with our “remelli” kit). When reinstalling a cam pin, it is a best practice to alternate its orientation at each cleaning—flip the orientation line from forward to rearward to forward. Alternating the mar will distribute wear between both faces more evening and give it a longer life. Lubricate the cam pin generously with appropriate gun oil. Grease can be used in warm-weather operation, but oil is preferable where cold temperatures are possible.

Extractor and extractor spring
The VersaMax extractor and spring are generally reliable, but extractors can break and springs wear. Stoeger M3000/M3500 shotguns are more commonly affected by extractor and extractor-spring problems due to poor quality of manufacturing. If a Stoeger continues to jam or fails to eject after proper cleaning and lubrication, the extractor and spring are the most likely causes. A damaged extractor can cause failures to extract or eject. If replacing the extractor, replace the extractor spring at the same time.
Bolt Carrier Burrs and Gouged Bolts
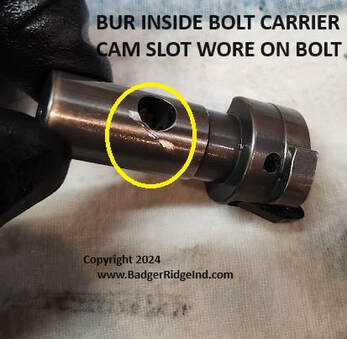
Inspect cam-pin slot in the bolt carrier for manufacturing burrs, remove gouges from bolts and polish. A burr can gouge the bolt as it rotates. If a burr is present in the bolt carrier cam pin slot remove it.
If the bolt was gouged: first carefully remove the high spots. After lightly stoning or filing away the raised portion of the gouge on the bolt, then smooth and polish the affected area so the bolt rotates freely in the bolt carrier.
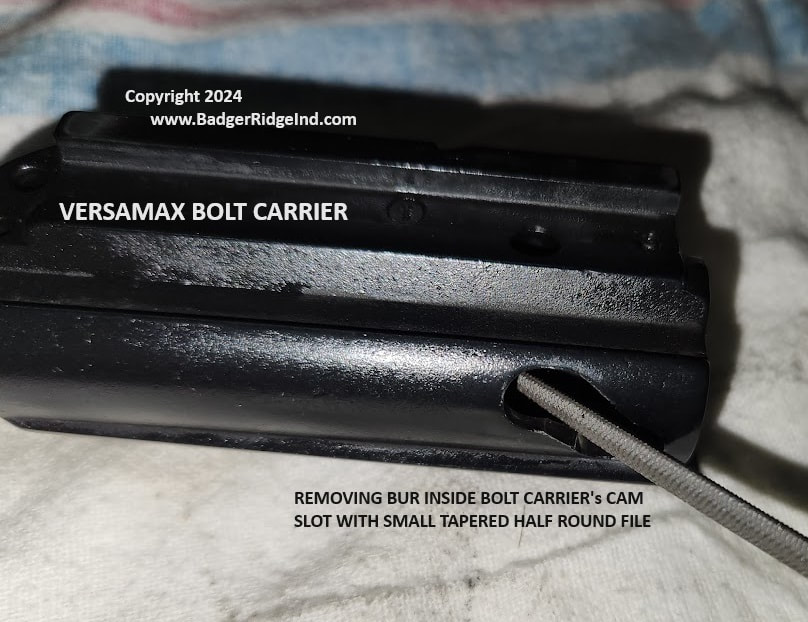
Again: If your bolt was gouged look for and remove the burr left in the bolt carrier during manufacturing that caused it! The picture above shows a burr being removed with a small tapered halfround file. Just remove the burr and nothing more.
Bolt link / “rat tail” Inspect the link for cracks or deformation around the hole in it where the cross pin links it to the bolt carrier.
The bolt link, sometimes called the rat tail or bolt carrier link, is a known failure point, particularly on earlier VersaMax versions. When a bolt link breaks, it can also deform the bolt-link cross pin/pivot pin. Replace cracked or broken links and any damaged cross pins.
Firing-pin retaining pin O-ring The O-ring on the firing-pin retaining pin can wear and allow the retaining pin to work out of the bolt carrier.
Inspect this O-ring and replace it if worn so the bolt carrier assembly remains securely together and the retaining pin is not lost.
Lubrication After inspection and repair: Reassemble the bolt carrier group and set it aside while servicing the recoil system and trigger group.
- Lubricate the cam pin heavily with proper gun oil (in warm conditions grease may be utilized).
- Put a drop of gun oil on the extractor and extractor spring.
- Put a drop of gun oil on the bolt-link pivot pin.
Note: A common cause of bolt-link failure is debris in the action/recoil spring tube and/or a worn action spring..
Action / Recoil Spring: The recoil spring is located inside the buttstock.
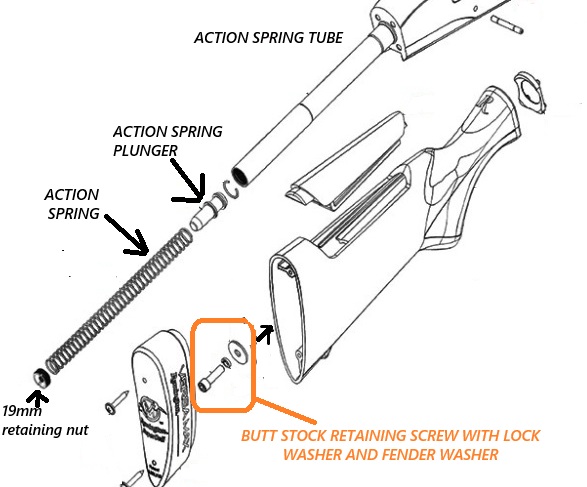
Cleaning, lubing, and measuring the recoil spring is one of the most important VersaMax maintenance procedures, and the original owner’s manual does not explain it! The should be done every 400 rounds fired if not sooner!
- Remove the two recoil-pad screws with a small Phillips screwdriver (A little lubricant or moisture on the screwdriver tip can help it pass through the small recoil-pad holes)
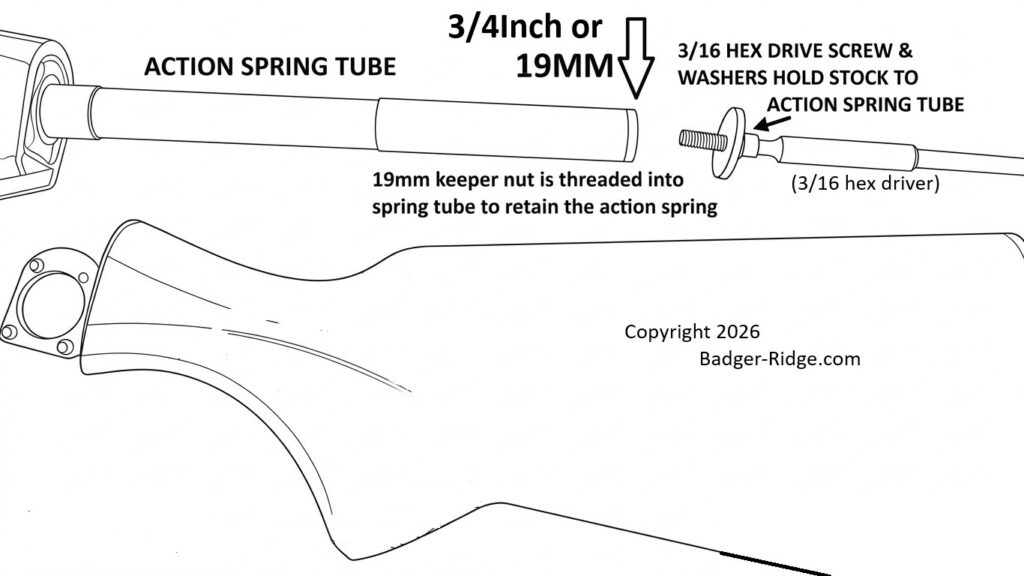
- Remove the buttstock retaining screw using a 3/16-inch Allen/hex driver.
- Remove the recoil-spring tube retaining nut/cap using a 3/4-inch (19 mm) open-end wrench. Be aware that the cap is under spring tension.
- Remove the recoil/action spring and plunger.
- Clean debris from the spring, plunger, and inside of the tube.
Measure the action spring at rest. If it is approximately 12 inches (30.5cm) or shorter, replace it. A new spring (like our improved spring) is approximately 13 inches (33cm) long.
Lubricate the spring, plunger, and tube with appropriate gun oil, then reassemble in reverse order.
Trigger Group :The trigger group initially only requires simple cleaning and lubrication.
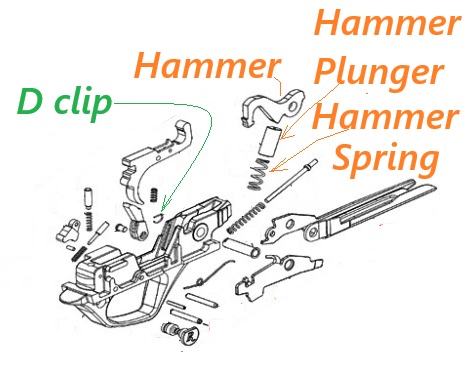
For routine cleaning, remove the trigger group from the action according to the owner’s manual. Invert it over a container and clean out accumulated debris. An aerosol dry-lube cleaner can help flush contamination from the mechanism. Scrub stubborn deposits with appropriate nylon gun-cleaning brushes and rags. After cleaning, apply drops of gun oil to the pivot pins and hammer spring. However as the shotgun accumulates use, the trigger group should also be disassembled far enough to inspect the hammer, and hammer spring. Clean and inspect hammer-spring plunger/cap (this is not covered by the owner’s manual). We offer the high failure parts explained below in a kit called a “Remelli” kit)
Beware of working on trigger packs: D-clips are easily lost during disassembly and reassembly. Many parts are under spring tension and if not properly handled can shoot across the work space becoming missile hazards.
Problems that develop in the trigger group with use (Three areas deserve particular attention in the trigger pack after it sees a few hundred rounds of use, and cannot be maintained without partially tearing down a trigger pack):
Hammer: Inspect the hammer where it strikes the firing pin. The striking surface can become excessively peened: replace the hammer.
Hammer spring: Hammer Springs eventually weaken and should be replaced when worn.
Hammer-spring plunger/cap: Some VersaMaxs came with chrome-plated hammer-spring caps. The plating can chip and produce abrasive debris that bind the hammer spring. The chipped edges can also catch against the trigger housing and interfere with hammer movement. Any chrome-plated hammer-spring cap showing chipped or missing plating should be replaced.
Again: we offer the hammer, hammer plunger, hammer spring & cam pin in a kit called a “Remelli” kit
The VersaMax trigger group is very similar (nearly identical) to Benelli trigger packs, so Benelli trigger-pack disassembly procedures can be useful references. If you are not comfortable performing this work, you can pay Badger Ridge to perform this service or have the trigger group serviced by a qualified gunsmith.
Gas Pistons (unique to the VersaMax and Benelli M4)
Combustion gases deposit carbon on these components. Oil on the pistons when fired can combine with the carbon and produce sticky, glue-like fouling that solidifies. Any lube on these can promote malfunctions and lock up the system. A simple functional check on an assembled shotgun is to lock the bolt to the rear, tip the muzzle up and down, and listen for the gas pistons moving freely and clinking to a solid stop. If the pistons move freely, they are not likely to be the source of a malfunction, but they should still be kept reasonably clean.
Do not lubricate the gas pistons or gas cylinders with oil or grease.
The owner’s manual provides generally good instructions for maintaining the gas system. Clean the gas system every time the shotgun is disassembled. A bronze pistol-bore brush can be used to scrub carbon from the cylinders. Oils and appropriate solvents are fine for aiding the removal of carbon with scrub brushes, but all liquids must be removed before re-assembly. Wipe the pistons and the inside of the cylinders completely dry. The gas system should not be left wet with lubricant/oil!
The O-rings on the gas-system plugs should also be inspected and replaced if missing, worn, or damaged.
Choke Tubes :
Always Use anti-seize grease on removable choke-tube threads (or stuck choke tubes are probable). Do not shoot steel shot through ‘extra full’ or ‘turkey’ chokes.
Badger’s Note: Reposting this information here in a new format: Attempting to be both thorough and brief at the same time. None of this should be new to anyone who has read our blog previously.