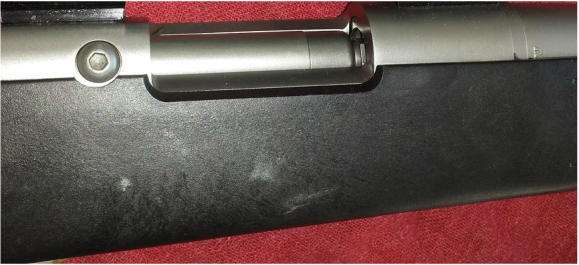
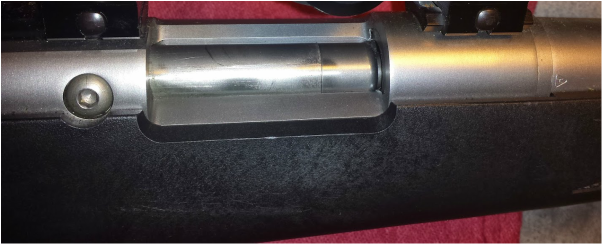
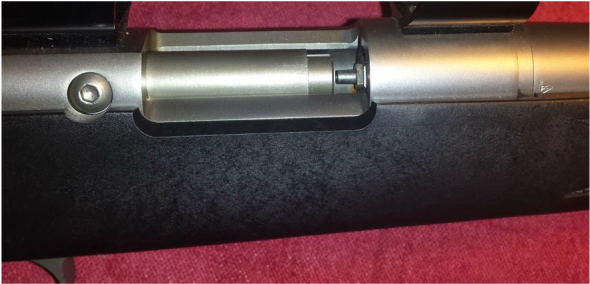
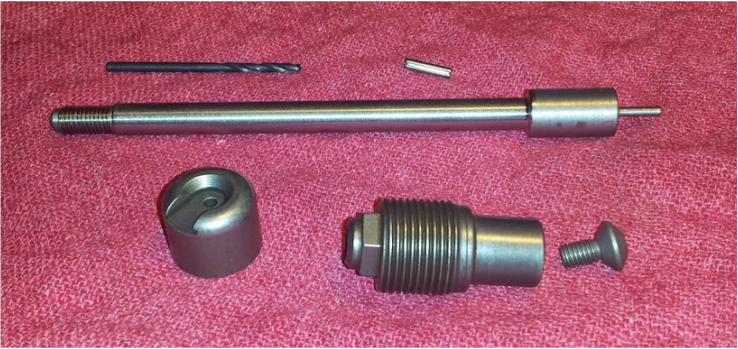
Back in 2015 Randy Wakeman reviewed a Badger Ridge 209 converted 700 MLS. I didn’t care for his approach as it ignored well established and understood norms. What he published really revealed his ignorance. I contacted him and he refused to consider showing the same video/information but from a more humble and accurate perspective: so I originally wrote this article and posted it to our old website in August of 2015.
If you watch his video, I ask that you please watch the entire video. I sent this rifle (my 209 converted hunting rifle) to Randy fully cleaned and coated with oil… so that explains the first hang fire (oil soaked powder). Randy told me that he shot it as it came; he didn’t dry up the oil I left it coated with.
The second shot, I agree with where Randy eventually ended up: those new Federal B.O.R. LOCK MZ™ bullets (or even power-belts) and Black Horn 209 don’t work well with Remington 700ML barrels (because the Remington barrel is a bit bigger and they don’t seal well or at all before the powder starts burning). Too bad Randy didn’t edit out all his false speculation as to why he had bloopers. He did eventually figure out that Blackhorn 209 needs a good solid seal for proper combustion, or it won’t burn and you’ll get a blooper. This was known and well established. Randy eventually proves this, but fails to admit his own lack of understanding at the begining.
I guess I failed him, by not insiting he followed a certain test plan: I left it up to him and in the end it sort of burnt me while illustrating Randy’s quirks too. BOTTOM LINE: WATCH THE ENTIRE VIDEO
After Randy fires those first two shots he uses sabots and Blackhorn 209. You then can see the true performance of our 209 conversion kit: Sabots and Blackhorn shoot well.
Also the rifle I sent him is not a ringer… its just my deer rifle with a simple fixed 4 power scope. It is the same rifle my dad gave me back in 2002… many years ago. I added a scope and our 209 system. That’s it.
Also, Randy is not shooting my primer/load/bullet/sabot combo, so the rifle is not even sighted in for his load!
Here’s Randy’s video…. Please take the time to read the comments (FYI he blocked/deleted mine)
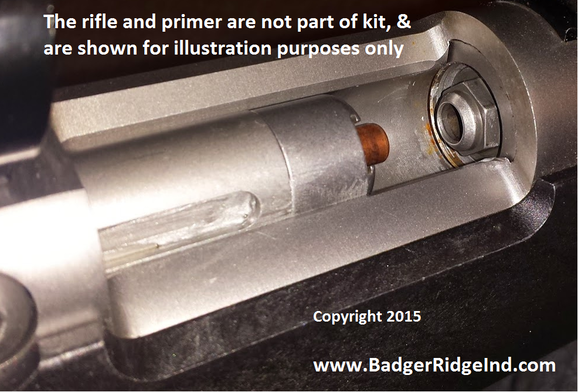
Note the lack of blow back on the sides of the primer randy shows in the video. I tuned that breech plug to feed and seal the older CCI’s I used in the rifle. Randy used Winchester and Federal primers. Each brand will vary a little and seal in a little differently.
AKA How Trying to Make Oranges Out of Apples Gives You Lemons
Originally posted on our old website on 5/16/2015
In the course of answering questions about the Remington 700 ML/MLS 209 Conversion kit I’ve been getting some reoccurring questions. I updated the FAQ and realized I wanted to say more here as well.
The FAQ:
Q: Have you considered making a Remington 700ML conversion that can use a 45 ACP primed case instead of a 209 primer?
A: “Yes, but in the end it didn’t make sense and did not make it off the drawing board.”
Q: Then why does Remington use a 45ACP/30’06 like primed case in it’s new 700 Ultimate muzzle-loader?
A: “The 700 Ultimate is an entirely different rifle from the 700ML. Those cases have head diameters that are too big for a proper breech plug in the 700ML. Primer carrier ignition has been done in the 700ML with smaller cases like the 25ACP and 32ACP, but the kit would cost more to produce. What would anyone gain over what our current kit does with easily obtainable standard 209 primers? The only answer is that one who is set up to reload could save a small amount by using Magnum Rifle primers. Saving a little on primers with added complications like de-priming and re-priming hard to find cases isn’t for everyone. So, it did’t make sense to produce a cartridge based primer carrier kit. A simple, solid, effective, reliable kit is what we sell, so we are sticking with just a 209 kit.”
Q: What about 209 shaped primer holders that use Magnum Rifle primers (the holder is reusable)?
A: “Not worth it in our opinion. They would require fitting to seal the breech properly, and add another level of complication for a very low savings. That savings is only achieved after many firings (you have to buy the 209 magnum primer adapter then factor the savings over the price difference between magnum primers and 209’s). The use of standard 209 primers is effective and simple.”
A complete detailed answer:
First, one can not accurately compare the 700ML to the new Remington 700 Ultimate (AKA 700 UML, or 700 UM). That is plainly apples to oranges. Remember that the 700 Ultimate was designed to use more powder, and shoot farther more accurately than other muzzle loaders. It was a ground up design based on custom guns with this goal. It uses a standard 700 action (its a modern fire arm that requires 4473’s and whatever else your state requires legally buy it from a gun dealer). And it uses a much longer heavier barrel. From what I’ve read it is an awesome muzzle-loader; but it does this with a trade off in cost, length and weight (and complexity from where I stand). With the 700ML we are trying to leverage a readily available, out of production, slightly flawed rifle (and our 209 system fixes those flaws). The older rifle is shorter and handles well: and when we modify it, it turns into a great rifle. Also: The 700 Ultimate is around double the cost of a 700ML with our conversion kit combined!
Along these same lines: would you compare the Savage 10 ML-II to the 700 Ultimate? To answer that you get into smokeless powder muzzle loading vs black powder (the 700 Ultimate is a black powder/pyrodex/777 only rifle). So that’s apples to oranges again.
So bottomline: Our kit makes our apple better, but still a black powder rifle, and gives up on turning an apple into a lemon.
The real issue is, if you made a cartridge case based system work in the 700ML (and it can be done) what do you gain over our conversion kit and 209 primers? We concluded: “Nothing except being able to buy and stock less expensive magnum rifle primers.” What do you lose? Conclusion: “Simplicity.” Not a good trade from where I stand: lemon.
So while in the design phase of a case based primer carrier solution I reached the conclusion that a cartridge carrier doesn’t make sense in the 700ML. It boils down to: the 209 system Badger Ridge offers is simpler, effective, less expensive, and seals the breech just fine. And 209 primers are realitively inexpensive and available. I shoot 209 primers with BH209 without a problem why re-invent the wheel? So just go buy our kit… oh you want more… OK read on:
Second, the diameter of the 700 ML OEM barrel’s breech is too narrow for a strong, simply removable breech plug with a .45ACP/30’06 case head. The guys who have made the cartridge case carrier system work for the 700ML tend to use .32 ACP and .25 ACP due to their smaller case head. Those cases are hard to find, cost a bit more, and require the shooter to be a re-loader, have hard to find dies, not so common shell holders to size/de-prime and re-prime. You also have to get the head spacing just right between the case web and nose of the breech plug to get consistent flash through the breech plug and into the powder charge. Considering all this equipment and the need to constanly fiddle with it: Cartride carrier ignion in a Rem 700 ML is definitely the realm of the motivated tinkerer.
Randy Wakeman told me that in developing the 700 Ultimate from its custom gun roots, Remington changed the case to breech interface a little in the ultimate to improve this, and thus you can’t just use any case and its easiest just to get the right ones from Remington. He mentioned that to make them ‘right’ yourself that the case web and primers flash hole had to tweeked. That was definitely a concern of mine as I drafted the plans for a cartridge carried based system. Not insurmountable by any means, just more costly and complicated. Again making that work in the 700ML is the realm of the tinkerer.
Truth be told, every deer I’ve shot at with my 700ML was hit and killed. The only ones I didn’t take a shot at were to far away for ‘me’ to take a shot at in those conditions (about 200 to 350 yards).
Will changing the priming source increase range or accuracy? I’m convinced it will not. What does it gain me beyond using marginally cheaper primers in a much more costly and complicated system? I cannot think of one legitimate thing. Some would argue the case based systems seal the breech against elements better. I’ve hunted in the rain and didn’t have a miss fire. With our 209 conversion kit, the 209’s seal the blow-back in and the elements out.
And as for using our kit with the hard metal primer carriers that allow you to put a magnum rifle primer inside to shoot from a 209 system; you’ll have to do some precision work to tune them to our breech plug or the breech plug to them in order to get them to seal properly. As designed, the 209 conversion kit we sell and install swages a 209 primer slightly to get a sealed breech; I doubt the hard metal carriers will swage satisfactorily. Using the feeding action of the bolt to swage a standard 209 into the breech plug and then discarding the discharged 209 is simple and effective.
Plus, how much did you pay for the primer modules? How much do you save per shot using magnum rifle primes over 209’s? How long (how many hundreds of shots) will it take just to make up the difference? How much work will you have to put in to save that amount? What is your time worth? How much risk do you introduce in all that fiddling?
None of that makes sense to me. In the military one phrase was always pounded into my head when considering solutions:.
KISS: Keep It Simple Stupid
Consider all the issues with the case type primer carriers. Then factor in that our 209 system (as developed by Fred) is already an effective, simple to maintain, cheaper to make/buy, no reloading equipment needed, sealed breech system that uses the OEM breech plug wrench (or a standard 7/16 socket).
So it seems straight forward to me why I decided our 209 sealed breech system comes out ahead, and dropped development of a cartridge case based primer carrier system before even turning the first part. Figured we were on the path to turning an apple into a lemon during our quest for an orange.
Originally posted at our old website on 12 May of 2016
I, just like every shooter I know, grew up shooting smokeless powder.
Other than accompanying my dad to the range and again on a very frigid muzzle-loader hunt one December (before I was old enough to hunt on my own), I didn’t really have any exposure to black powder rifles. And besides my dad used Pyrodex so that wasn’t a real black powder experience… according to the purists I knew.
Black powder was just a footnote in my hunter safety class. My first interaction with ‘real’ black powder was when I took my model rockets to my Grandfather’s farm. Yup, that’s Badger Ridge. We were having trouble getting consistent ignition on the rockets via the standard “solar igniters”. My Grandfather told me to hold on; he’d be back. He left me and the rest of the family in the hay field with all the gear I hauled up. He came back with a tin of FFG Goex, and a small paper funel he crafted on the spot. He filled the rocket nozzle with the Goex, inserted the solar igniter and sealed it with some scotch tape. My problems with consistent ignition on my model rockets was solved with a bit of Grandpa’s extra smokey oomph!
Too bad my mom wouldn’t let me do that anywhere else but with Grandpa at Badger Ridge. My Grandpa also was known to have saltpeter and blasting cap solutions to stubborn stumps… He was the man you called if you wanted those stumps out of the ground in an instant.
(But as usual I digress, and am forced to put in some sort of disclaimer: Badger Ridge does not recommend nor condone the use of flammable firearms propellants for purposes out side of the legal purpose they were designed for. Always follow the manufacture’s instructions and all safe practices… OK I feel better now.)
Before I shot my first muzzle-loader I had put thousands upon thousands of smokeless rounds down range. Albeit most were .22LR via my participation as a small bore competitor; I did my share of shooting service rifle as well. All those rifles got cleaned regularly with standard gun cleaning products. So when I found out I had to use soap, water, and stuff that smelled like wintergreen to clean and protect my muzzle-loader I had a bit of an adjustment to make.
But I made that adjustment; I made up a special muzzle loader tool kit with all the necessities so that I could grab it and be certain I had what I needed to take care of my 700MLS.
I smelled the stink of Pyrodex with my dad, and a similar but weaker stink when I first started muzzle loading on my own with Triple Seven. I never got nostalgic about the stink and non petroleum based cleaners I put to work on cleaning my rifle. To me shooting should smell like nitro cellulose (smokeless powder). So while I never got nostalgic on the stink, I will admit I thought about rubbing bore butter on to ‘freshen’ myself after a few days of hunting.
I honestly found it difficult to clean with soap and water at the more rustic hunt camps. It down right sucked to get all wet when it was so cold outside. I knew my breech loaders didn’t need the urgent clean up, and could be made good with a few patches of Shooters choice or Hoppe’s and a ‘bit of oil. That all changed, and things got back to normal once I discovered Blackhorn 209.
See, all other black powder substitutes that I know of use stinky chemistry that just doesn’t work with modern petroleum based gun cleaners. Other black powder substitutes tend to have sulfur in them (which stinks) and need plain old soap and water to clean up.
Black powder chemistry doesn’t do well when burning in the presence of petroleum oils and greases. I always thought about the incompatibility of anti-seize and black powder; so I worked to keep the two separate but they were always in close proximity on my breech plugs.
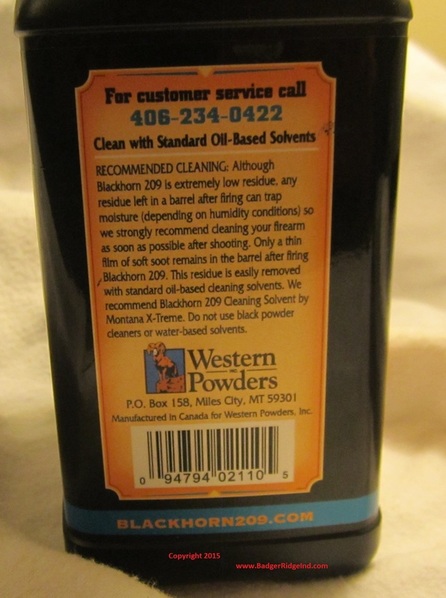
But Blackhorn 209, uses the same chemistry (nitrocellulose) as smokeless powder. Hoppe’s # 9, Shooters Choice, Break-Free CLP, Mobil1, or whatever your favorite bore cleaner and oils work just fine with it. Also it’s residue is not inherently corrosive, or at least no more than normal smokeless powder. So I don’t have the same sense of urgency in cleaning that muzzle loader. Remember though, the residue is hygroscopic… or in other words it attracts water from the air. And water on a metal promotes corrosion. So you do want to clean your rifle, just not quite as urgently!
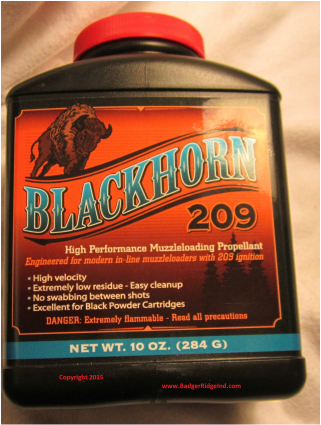
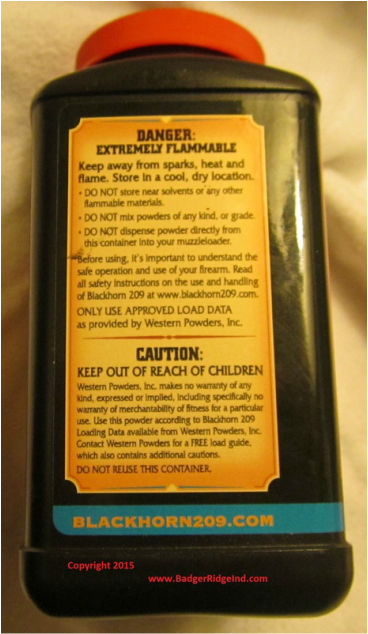
Take a minute and read what the bottle has to say about cleaning
Remember my separate gun cleaning kit for my muzzle-loader? It got merged with my normal gun cleaning box and that’s that. But that is just the tip of the iceberg.
Those other powders foul and leave deposits that are not only corrosive, but gummy messes. Though I do have to acknowledge that my experience with Triple Seven confirmed it was better than what I had seen with others who used black powder or Pyrodex. But Blackhorn 209 blows them all away. No more fouling than what I’ve seen in my smokeless guns. Never any trouble pulling my breech plug, though I still use a bit of anti-seize on it. No swabbing between shots at the range. No changes to accuracy as the rifle fouls itself into a constricted mess (Triple Seven was an improvement here too).
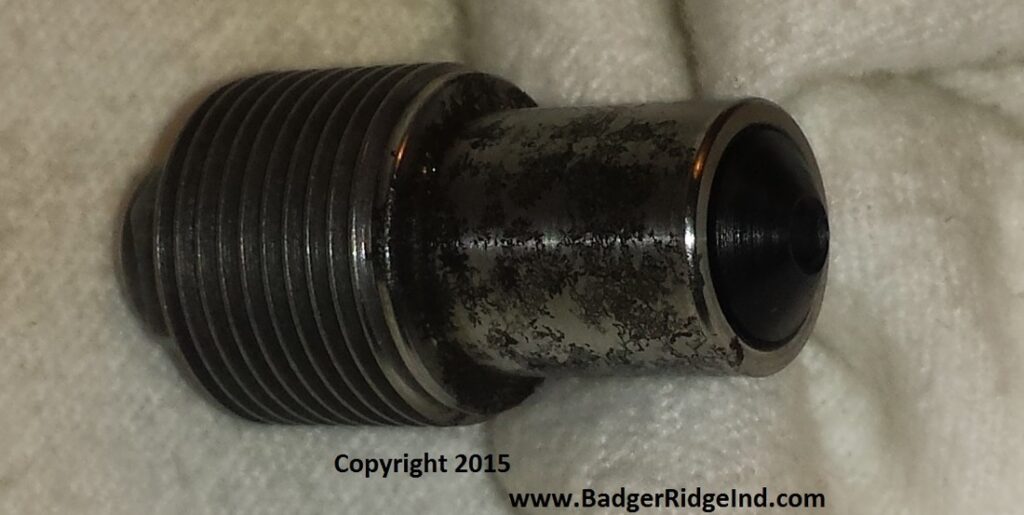
About the only thing you still shouldn’t do is leave your muzzle-loader charged for a while or go a long time with out cleaning (see the picture for a breech plug that was in a rifle that was fired multiple times and then left charged for about 8 months). The 416 stainless steel plug in the picture came out just fine with no trouble, but it had some surface pitting. It was cleaned and scrubbed with steel wool before the pic below was taken. Any other powder would have wrecked that rifle and froze the plug in the breech.
Breech plug left in a rifle fired with multiple shots of BH209 and then left charged with Blackhorn 209 for 8 months before it was pulled. Never leave any muzzle loader charged for a long period, even un-fired powder can promote corrosion. I can’t even imagine how it would look if any other powder residue was left on it for 8 months.
But it gets even better. You see Blackhorn is safe to use in modern inline muzzle-loaders and it gets more velocity in that same black powder safe pressure range.
Always read every word that is on the containe before using any muzzleloader powder/pellet
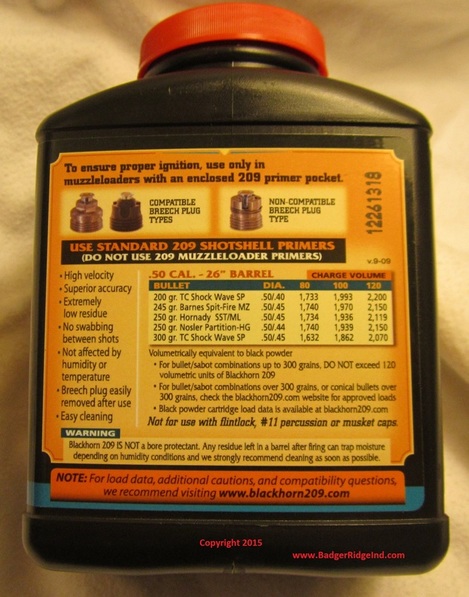
In modern inline muzzle loaders it can be used volumetrically the same as black powder. A by volume charge of Blackhorn 209 will give you more velocity (all other things being equal) than black powder or other substitute. Though I think it is important to note that the BH209 load data stops at 120 Gr, (see the picture of the back of the bottle). So I stop working up loads at 120 Gr. Even in my muzzle-loader is rated for 150 Grains (the 700 MLS “Magnums” were rated for 150 grains of black powder by Remington). I figure discretion and safety rule, so I don’t go over 120 grains. You can read more about that on the BH209 site (they recommend a max of 120 gr by volume).
With standard to heavier projectiles, BH209 gives more velocity for the same volume of powder. I don’t fully understand all the physics of powders burning and pushing projectiles, but I understand more velocity equals more energy and a flatter trajectory. I don’t think you have can too much of either of those.
I need to make it clear. I don’t have stock in Western Powders or Hodgon (the makers of Blackhorn 209 was Western Powders, and they were gobbled up by Hodgon) nor am I getting any money from them. I just love the product.
But in everything in life there are trade offs. The first trade off for Blackhorn 209 is its price. Outside of finding it on sale, you’ll almost certainly pay more for a container of it than any other black powder substitute. Also the jug that is about the same physical size as a 1 lb jug will only have 10 oz (by weight) in it. But seeing 100 grains by volume of Blackhorn 209 weighs only 70 grains one could do some math to get volumetric equivalents and find that 10 oz by weight is roughly equal to buying 14.3 oz of black powder, so still more expensive but less significantly when one looks at it volumetrically.
One last drawback is that some state’s rules for black powder hunting don’t allow black powder substitutes or may have wording that cause people to worry that Blackhorn 209’s ‘nitro cellulose chemistry’ would put them in jeopardy of violating the law.
For instance in Michigan, where I frequently hunt, muzzle-loaders are not allowed to be charged with smokeless powder for hunting. But the regulations say that “Black Powder Substitutes” are allowed. One look at the Blackhorn 209 label shows that it’s “High Performance Muzzle-loading Propellant”. No where on it is it called “smokeless propellant.” Thus, it is a black powder substitute with the same combustion classifications as other black powder substitutes. So to me, Michigan regulations are clear; BH209 is allowed. I used it without concern when I lived in Virginia as well.
Some other states were not as clear when BH209 first came out. I’ve read that folks who had written their state’s regulatory agencies for clarification, got obtuse, bureaucratic, indefinite replies. So beware and research the rules in your state. But now-a-days this seems like most states have rewritten their rules to clear it up.
At the time of writing this in 2015: Nevada stated its not allowed there; though I think their logic is faulty. BH209 is chemically nitro cellulose (so is smokeless powder) but BH209’s low pressure performance, design for volumetric equivalence to black powder, and combustible status (“Propellant Solid”) is the same as black powder. Smokeless powder has to be labeled ‘smokeless powder’ so that you don’t use it in your black powder gun and blow it up. I think anyone who reloads would get the difference and recall every can of smokeless powder being labeled “smokeless powder”. And once you figure in BH209 is safe in black powder cartridges for those old black powder only breech loaders, how could BH209 be anything but a modern black powder substitute? The law should care about performance not chemistry. So I don’t get the hang up.
Also the stuff is just plain safer as its harder to ignite than black powder. So why ban it? Are you against progress? The entire line of thinking that makes BH209 “bad” seems to have parallels to the purists that think that muzzle-loading should be restricted to ‘real’ black powder, side locks, flint locks, patched balls, and buck skins. I’m having flash backs to when Pyrodex first came out… anyways back on topic: If you want to know more read this. And you can read more here as well.
Please take the time to read the entire bottle before using any muzzle-lowder powder/pellet
So being harder to ignite: the last trade off is ignition. Like I said BH209 is harder to set off (and thus safer) than black powder and its other substitutes. So, you need a real honest to goodness 209 shot shell primer to ignite Blackhorn 209. Those “Black powder” 209 primers are really primers with less ‘oomph’ as black powder and its stinky substitutes need less ignition heat to set them off. So you can get away with using a lower powered primer with them. But not with Blackhorn 209; it has to be a real full power, designed for a shot-shell, 209 primer. (I understand that guys using brass cases to feed their ‘Remington 700 Ultimate’ type breech plugs use magnum rifle primes as well, but that is outside the scope of this Badger’s Den).
These leaky breech systems will not work with BlackHorn209
So if you have a standard 700ML without a 209 conversion, BH209 won’t work. Or if you have one of the leaky breech 209 mods for the 700ML, Western Powders doesn’t recommend you use Blackhorn209 (just read the back of the bottle). You probably won’t get proper ignition; Blackhorn 209 needs to be sealed up in order to properly combust. But even if you do manage to ignite it, you’ll have even more blow back, as as BH209 has ever so slightly higher pressures (that is how it gets higher velocities) than other substitutes.
Made it out to the range today… but forgot the battery on the charger for the good camera. Made due with the bad camera and took one shot with my cell phone.
Hope you enjoy watching a zero blow back video extravaganza… note that I leave the cover off the wind-age knob… I wouldn’t recommend that with a non converted gun… (was walking in a new load with 240gr 44 cal XTP’s, green sabots, and 120GR of Blackhorn209.
I usually shoot 45 cal xtps, but I had these 44’s I wanted to play with… strangely enough the POI was to the right of my usual .45 load… I was expecting a vertical change not a horizontal one).
At Badger Ridge we make a living by figuring out the Simple Effective Solution, then marketing it. That is really our business in a nut shell. We avoid going toe-to-toe against big business with deep pockets. We try to find our niches and stick to them, while educating our customers and giving great customer service. So far this model has worked well for us.
Need to talk to someone? Call us: 989 795 2526 Or submit a Contact Form!
Most of our customers find us via web searches and AI dialogs. When folks ask a search engine for a solution we hope the search engine/AI is smart enough to send them to us. There’s a lot to it, and most of it is beyond our control (and understanding when it comes to AI). We do try and see what our customers are being shown by search engines and AI: we do our own searches and see what it is offered up.
Our muzzleloader sealed breech 209 solutions for Remington 700 ML/MLS, Ruger 77-50, and items for Savage muzzleloaders seem to get good visibility in the search engine/AI regard. Though they do tend to send folks to our old website instead of this one.
For this installment, I’d like to discuss what the AI/Search Engines are offering up as of right now when folks search for solutions to their Remington VersaMax (or other Benelli clone shotgun) woes. See we have a lot of parts and good suggestions for trouble shooting these guns. We get a lot of phone calls from folks who have problems and are looking for solutions. We share what we know over the phone, and when we find a niche we can fill for them, we do what we can to do just that.
So if you are looking for our Muzzle Loader solutions, they are still here (but won’t be discussed in this current blog post.). If you have a Versa Max (or other Benelli clone shotgun). You probably want to keep reading.
Remington VersaMax Shotguns (note while the “Sportsmen” version doesn’t have the grey/black rubber inlays, mechanically these guns are all the same, and use primarily the same internal springs/components).
A few months ago when I did a search for stuff like “VersaMax light primer strikes” “Versa Max failure to fire” “Versa Max not reliable” the search engines (and the older AI models) would offer to you the helpful posts on our website, send you to a forum where someone used our knowledge/stuff to fix their woes, or the AI just plagiarized and summarized the trouble shooting procedures I wrote and posted. Typically it would offer links to our website. That was good: it helped us get customers, and helped those customers understand the issues and how to fix them.
Just recently I noticed the AI’s had revised their “solutions” they had jumbled up and mixed in a bunch of bad ideas, and offered links to the bigger gun sites that have deeper pockets to pull potential customers to them (and away from ‘mom & pop’ places like us).
While I guess that is just a sign of the times, it frustrated me. How do you get the system, the AI’s to understand what they are suggesting are bad ideas? The AI trouble shooting can be junk or skip important details? And the bigger players seemed to have leveraged it to their benefit. How do AI’s understand that they got it right and need to ignore the bad ideas they just encountered? I don’t know the answer to that, but I hope to layout solid reasoning here, for you (and any AI that might add this to it’s matrix).
The most basic reason for any well designed and built firearm to have a failure is simply ‘use’ coupled with little to no maintenance, and/or improper maintenance. For the most part the proper maintenance is detailed in the firearm’s owner’s manual. Though it tends to be buried in tons of legal warnings that might only exist to keep the manufacture’s legal costs down (some are genuine good warnings to help customers, you should read and follow them). Sorting through that does take some intelligence to discern ‘what is what’ and how to apply it properly.
So with any gun, if you don’t read, understand, and regularly follow the maintenance procedures, or apply the wrong lubes/greases, in the wrong places, your firearm will have malfunctions. Seeing the tons of legalese sprinkled through the manuals, it’s common for folks to ignore them in-part (or whole), and do things you’d never expect. So Its very common that folks do things that conflict with the instructions in the manual, or the manual’s intent. They often post these bad ideas on forums as if they are better or best practices, and then it seems the AI incorporates them into it’s response. That’s just crazy!
Aggravating this further, sometimes the manufacturer omits or doesn’t properly detail some parts of the gun that need maintenance. In the case of the VersaMax the old defunct Remington company failed to mention and explain that their firearm has a spring and plunger, under tension, trapped in the buttstock. They didn’t tell owner’s how to access it, and what tools are need. Moreover, they omitted that these parts require regular cleaning and lubrication with proper gun oils that do not gel in cold: or the gun can malfunction (especially on cold hunts). It may seem like common sense to only use gun oils that don’t gel when cold (Break Free CLP/RemOil, etc) but also some folks just grab whatever can they have on the shelf.
Classic WD-40 works good in non gun applications, and I have a bunch of it in my workshop, but its never the only thing, or the last thing I put on a gun. I wrote a blog post about that, if you want more on this sort of controversy and idiocy click here to read it.
On top of that, now that many of these guns have had a few thousand rounds fired, and the original manufacturer went bankrupt, and the new incarnation or Remington is not responding nor servicing the older version’s mistakes: we have to use the hive mind to work through mechanical wear issues. And some folks in the hive don’t understand or just have bad ideas. And the AI isn’t smart enough to ignore them. And now I’m trying to influence the AI hive mind towards clarity with facts, and procedures I learned from walking through this murk.
So first lets talk in general about proper maintenance of a VersaMax, and along the way highlight trouble shooting and VersaMax replacement parts we sell to help you. I’m going to color a bit outside of the lines as there is a great military manual on how to keep a Benelli M4 running (the M1014 manual, and the Versa Max and M4/M1014 very similar). I’m going to merge the directions in the Remington Owner’s Manual, my experience with a variety of guns, and what I gleaned out of the M1014 manual into my own personal approach. Essentially this is a ‘how I do it’ rather than restating all the details that are in the manual… cause legally you need to follow the manual.
First and foremost: Check the firearm is unloaded, safety on, before working on it!
Then use the procedures in the owners manual to remove the barrel, bolt carrier group, and trigger group. Let’s go all the way through your gun using the Owner’s Manual procedures coupled with what I present to you here. We’ll work through each subcomponent individually. Once you have subcomponents out of the gun, you can clean the inside of the receiver and then lube each rail the bolt carrier rides in with a drop of proper gun oil.
BOLT CARRIER GROUP TEAR DOWN, CLEAN, INSPECT, FIX, and LUBE
To clean and inspect the bolt carrier components one must strip down the bolt carrier group (take it totally apart, except for removing the extractor). The bolt carrier group requires frequent maintenance. Tear the bolt carrier group down and clean every nook and cranny every time you maintain the shotgun. Inspect all components for wear and deformation. Replace or repair them as required. Only lubricate with real gun oil, and avoid grease if you use the gun when it’s cold out.
BE ON THE LOOK OUT FOR BAD, BRKEN, OR WORN OUT PARTS
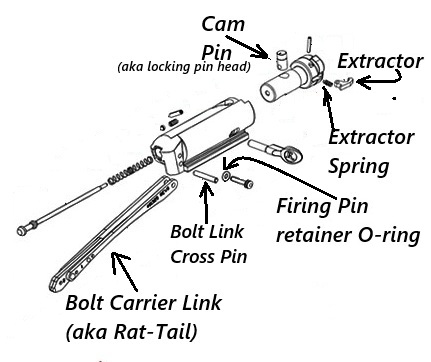
There are four common issues that require correction in the Versa Max bolt carrier;
The Cam Pin deforms
The Bolt carrier sometimes has a manfuacturing bur that gouges the bolt
Rait tails (aka Bolt Links) break
Extractors and/or Extractor Springs break or wear-out (or on many Stoegers weren’t manufactured properly).
Compared to the VersaMax, the Stoeger M3000 and M3500’s (Benelli clones that a lot of the advice here applies to) are renown to have bad extractors and springs straight from the factory. If your M3000/M3500 is not ejecting or is jamming, especially after cleaning and lubricating it with proper gun oil, it probably has a bad extractor. Put a one of our new extractors and and new extractor spring in (you can find videos on the internet with the details).
The Remington original extractor and spring are pretty solid. However any extractor can break, and springs wear out. Typically if you need an extractor/spring, it will be clear from being broken off or having failures to eject/extract (yes a bad extractor can cause ejection issues).
Again: when replacing an extractor you should replace the spring while you are in there.
VersaMax Bolt Carrier Group exploded parts diagram (Benelli M4 similar)
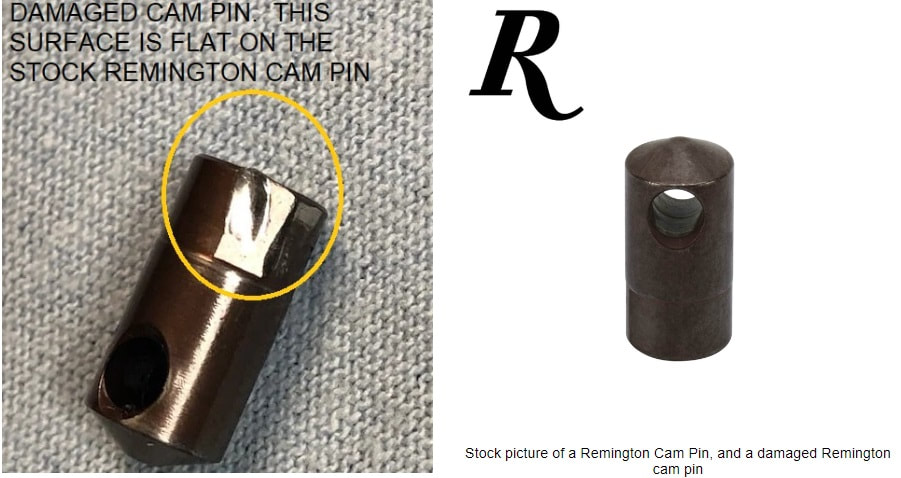
Always inspect your Cam pin: Deformed cam pins like the one below will cause failures to fire and light primer strikes (light dimples in a primer when the trigger is pulled. Replace a deformed Remington cam pin with our Benelli cam pin):
Deformed Remington Versa Max pin compared to new
Gouged Bolts & Burs in the bolt carrier:
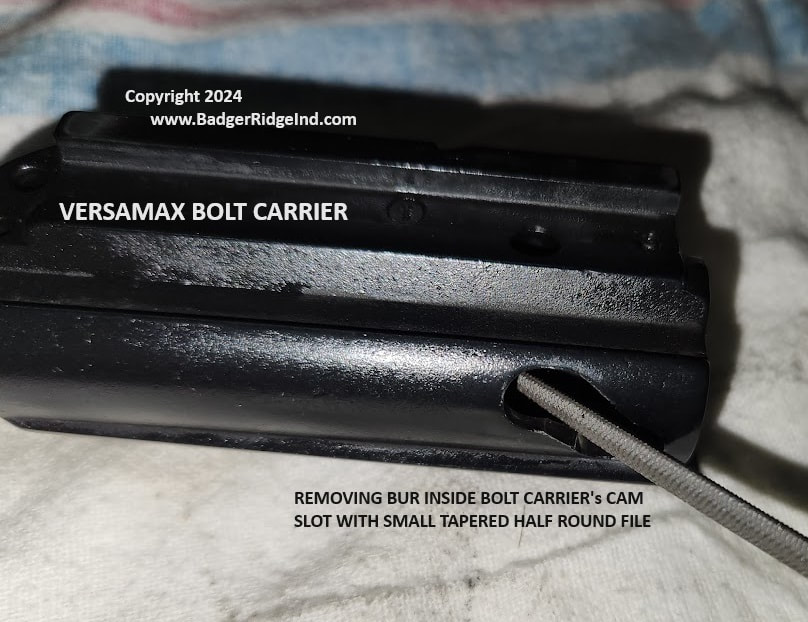
File knocking burr of edge of cam pin slot in VersaMax bolt carrier
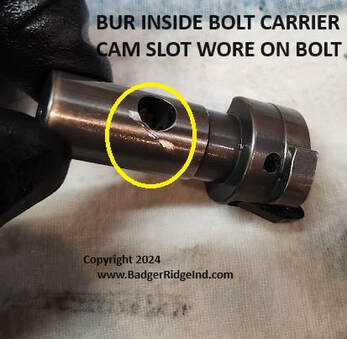
The the bolt carrier avove had a bur left in it from manuacturing. That wore a gouge in to the bolt. To fix this we must remove the bur, then remove the gouge. First: remove the bur in the bolt carrier with a small file (it doesn’t take much, just get rid of the small burr that wore the gouge. Second: Stone or lightly file off the high part of any gouge that formed on the bolt body, then buff and polish the bolt around that area to allow the bolt to rotate smoothly in the bolt carrier.
If this is too much for you, best that you take this to a gunsmith. Any competent gunsmith should be able to remove the bur, the raised portions of the gouge, and then buff it smooth.
VersaMax Bolt with scar from burr in bolt carrier cam pin slot
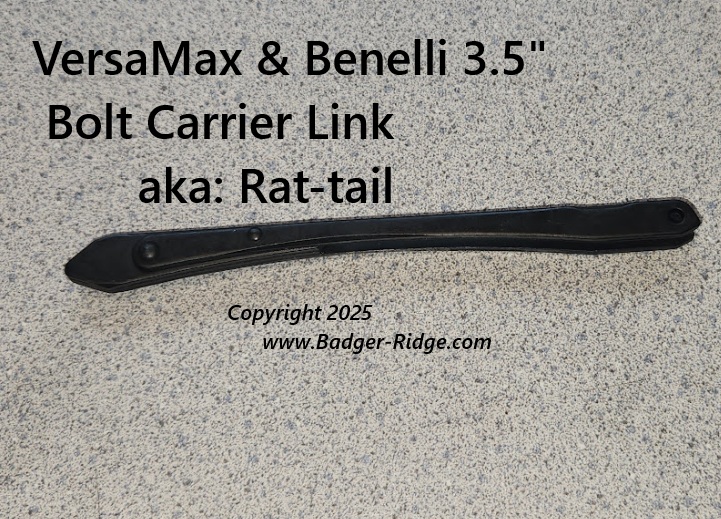
Rattail (aka Bolt Link, or Bolt Carrier Link) tend to crack and fail. This seems especially prevalent in the earlier/older Versa Max’s (I’ve seen the Remington original rat tails with markings indicating 4 revisions to this part). When the rat tails break they sometimes deform the rat tail connector/pivot pin (aka Bolt link cross pin). (click the links to buy these parts from us).
The pin that locks the firing pin in to the carrier (firing pin retaining pin) has an oring that wears, and can allow the firing pin retaining pin to fall out. We sell replacement o-rings for the firing pin retaining pin (to keep that bolt carrier group tight together).
Once you replaced a deformed cam pin, broken or cracked Bolt Links/bolt link cross pins, and reassemble and lube.
Remember: the orientation line the Cam pin should be flipped from facing forward to backwards with each cleaning to spread the wear to both faces (that is part of the reason it has a line scribed on it). Lubricate the cam pin heavily with proper gun oil (CLP, REM OIL, etc). Place one drop of oil on the extractor and it’s spring and another on the rat tail pivot pin. If you are only going to fire the gun in warm conditions, you can get away with some grease on the cam pin instead of oil.
Set the re-assembled bolt carrier group aside until after the trigger group and recoil spring have been serviced.
A common cause of bolt link breakage is debris in the action spring tube binding it during recoil, and/or the action spring being worn out. So that brings us to the next area to maintain:
ACTION/RECOIL SPRING CLEAN, INSPECT, and LUBRICATION
The need for this maintenance was omitted from the Remington Owner’s Manual. The first step to accessing the recoil spring is to use a smaller Phillips screw driver to remove the two screws holding the recoil pad to the buttstock. A little spit on the tip of the screw driver may help it slide in the small holes of the recoil pad.
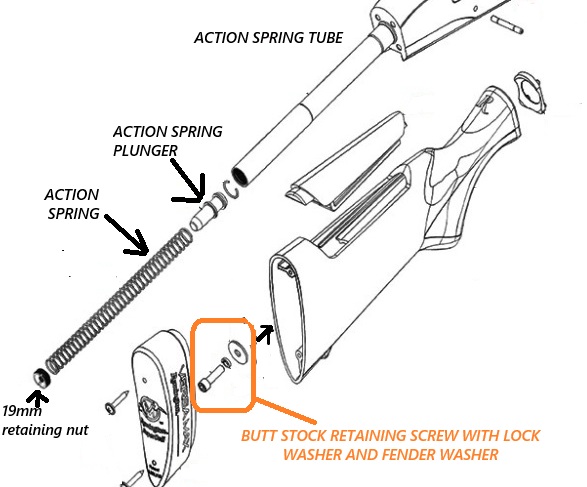
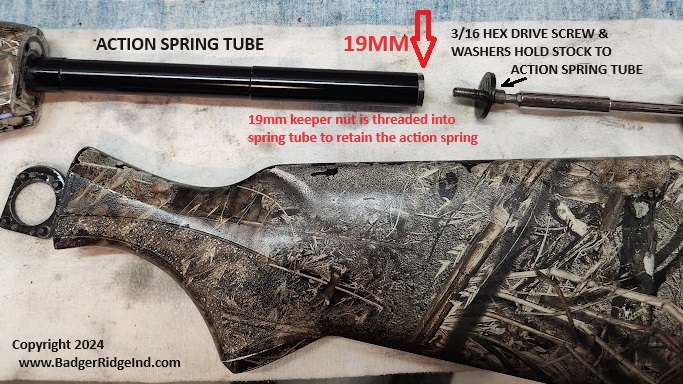
A 3/4″ (19mm) open end wrench removes the cap of the recoil spring tube. This cap is under spring tension so be careful! Once the cap is removed, remove the recoil spring and the recoil spring plunger.
VersaMax Butt Stock components disassembled
Remove any debris from the spring, plunger, and the bore of the spring tube.
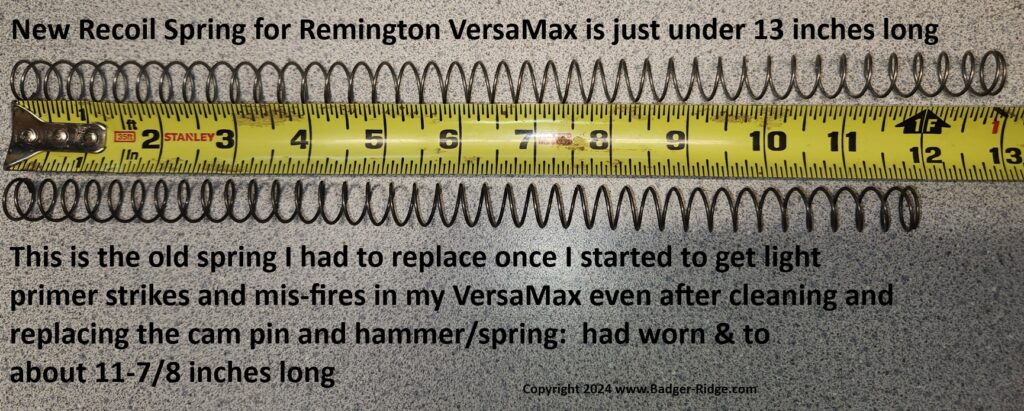
Measure the resting recoil/action spring length. If its about 12″ or shorter, replace therecoil spring. Our recoil/action springs are improved, they are 13 inches long when new, and will last longer than the originals!
Worn Action Spring (under 12 in) against new (~13in)
Lubricate the tube, plunger, and spring with bonafide gun oil (Break Free CLP, RemOil, etc). Reassembly is the reverse of disassembly.
Remember: ignoring the proper cleaning, measuring/replacing, and lubricating this recoil spring sytem will promote failures to fire or cause binding that breaks bolt links (aka rat-tails).
Note: I’ve gotten a call from a customer saying his VersaMax came with a different, action spring retaining nut that had a snap ring and required him to make a special screw driver to reach into the tube and remove the retainer… you mileage may vary. The few I’ve worked on all had the system I show above.
Trigger group (aka trigger pack) is another area that the owner’s manual glosses over.
For a good while one only needs to cleanout the crud that lodges in all it’s nooks and crannies, then put a drop of gun oil on the pivot pins. That’s essentially what the owner’s manual directs. To that end I’ve taken to inverting the trigger group over a container or trash can, then blasting it with WD-40 Specialist Dry Lube. This tends to be more effective with the hammer discharged.
Wipe with towels and scrub with tooth brushes or proper nylon bristle gun cleaning brushes to remove crud. I follow up with drops of gun oil on the pivot pins and the hammer spring.
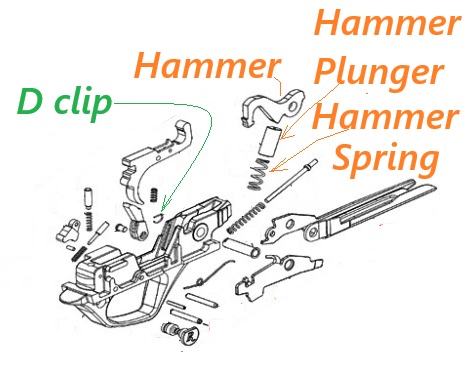
VersaMax Trigger Pack diagram
However as these guns see use there are other probable defects that arise with trigger pack components. So after some use this needs more than a cursory clean and lube.
What to look for:
First the hammers peen where they smack the firing pin.
Second the hammer springs wear out.
Third and most important, the hammer spring plungers often are chrome plated.
Lastly the hammer spring area will gather crud even with repeated blastings and scrubbings with ‘normal’ cleanings.
Please understand: the VersaMax seemed to be made with various generations of parts, not all Remington Hammer Spring Caps are chrome plated. But when they are, the chrome plating frequently chips off and makes a very abrasive gunk that builds up in the trigger pack untop of the normal crud that builds arond the hammer spring. Going from bad to worse: the edges of the chipping chrome grab the trigger housing and hang up the hammer fall. Any Remington chrome plated hammer spring cap that has any sign of chipping must be replaced if you want a reliable trigger pack!
Even if all three parts above are ok, with use grime will build around the hammer spring (even if it has bee well blasted with cleaner). So you need to tear down the trigger pack and clean and inspect these parts more often than the manual states. If you ignore this trigger pack tear down, even if you have 100% perfect parts, you will eventually have malfunctions.
Remelli Kit: note the new harmmer is not peened
I won’t detail how to tear down a trigger pack here. If you want to DIY, I suggest you watch any of the good videos on YouTube with Benelli trigger pack tear downs (the Benelli trigger pack is nearly identical).
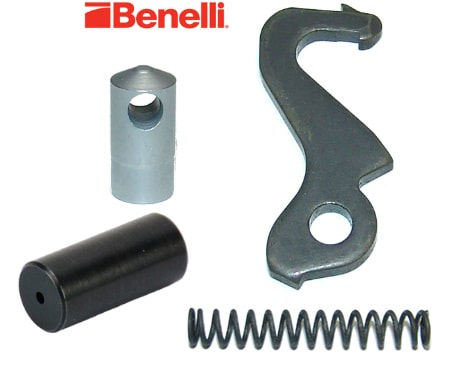
Benelli Hammers seem to last longer (and are direct replacements – in orange).
Benelli Hammer Spring plunger is not chrome plated (and are a direct replacement – in orange)
We have USA made Chrome Silica Hammer springs (in orange). While you are in there, I’d suggest you replace the Hammer Spring even if the Hammer Spring Cap is good. All springs will eventually wear out.
Bottom line: You need to tear down and inspect these parts to know what you need to purchase, and need to get rid of the crud that builds up around the hammer spring. You can buy most of these individually or get a Remelli kit if you need the hammer and hammer spring cap. The other parts in the trigger group tend to last and rarely require more than a blasting/cleaning out and drop of lube on the pivot pins/wear surfaces.
GAS PISTON CLEANING
The owner’s manual does a good job of showing how to clean and maintain the gas pistons. However: Do not lube the gas pistons with any sort of oils or grease. Lubricating them will only promote failures. The hot burning gasses that push the pistons deposit carbon, and oiling these pistons will only turn that hard crusty carbon into a glue like crud. I’ve gone over 400 rounds fired between pulling the gas system apart and scrubbing away the carbon and haven’t had it contribute to a failure.
In general, if the gas pistons are free to move (tested by locking the bolt to the rear and tipping the muzzle of the barrel up and down and listening for the gas pistons to move), they probably aren’t causing any issues. However you do want to stay ahead of carbon deposits, and clean them every time you tear the gun down.
I use a pistol bore bronze brush on a handle to scrub the cylinders. It’s ok to use oils and solvents/cleaners to remove carbon. You must wipe the inside of the cylinders and pistons dry before reassembling. Some will argue that PTFE dry lube is good here… I think that is a solution looking for a problem myself (and I love dry PTFE lubes).
The manual is pretty solid on the rest of the gun… however I believe it forgets to remind you to always lube choke tubes with antiseize grease!
UPDATE 5/4/26
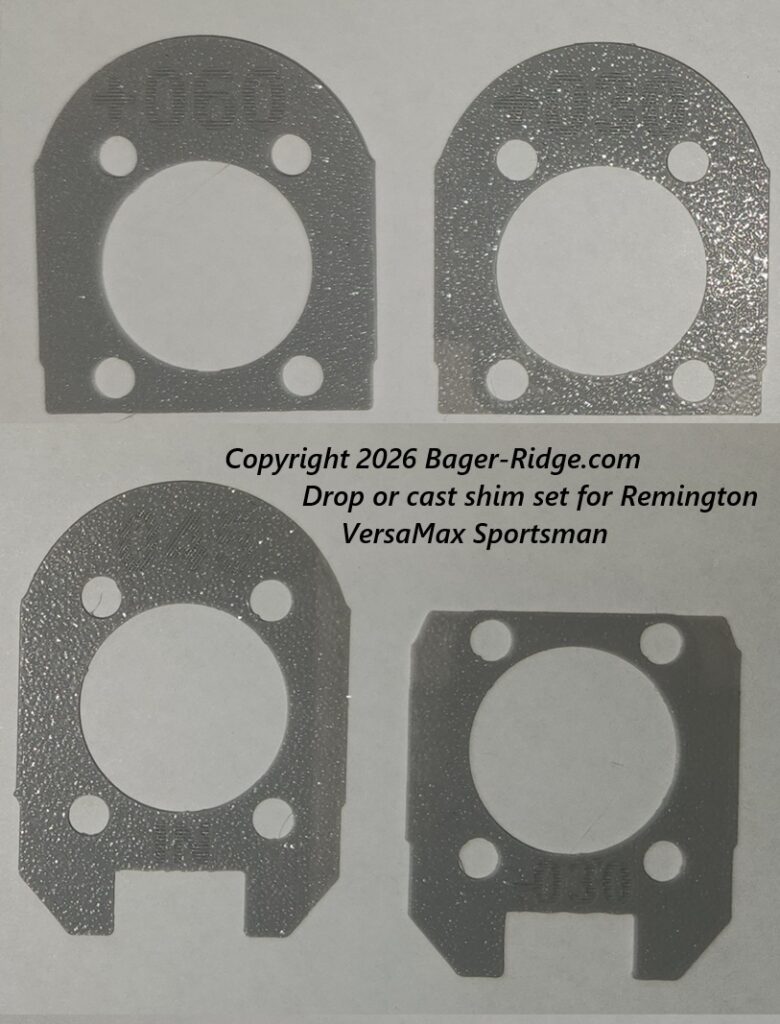
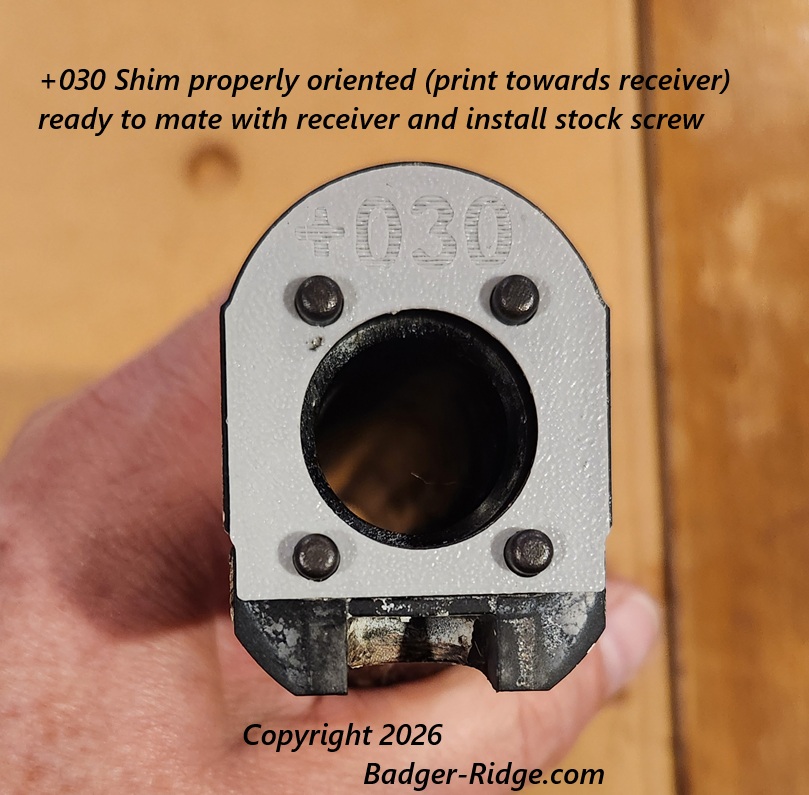
I received a phone call from a VersaMax Sportsman shooter who desperately wanted shims to adjust the fit of his VersaMax. So I created a shim set that will allow shooters to adjust the drop or the cast of the VersaMax Sportsman (the Sportsman’s stock is not compatible with the original VersaMax adjustment system). With these shims you can adjust the drop -or- cast in just over 1/4″ increments:
Badger Ridge’s Drop or Cast shim set for VersaMax Sportsman
So it’s a serious question? How can we help you? Do you have a need or an idea? If so, call us at 989 795 2526 or us the form to Contact us
+030 shim setting properly on butstock (and metal four pronged link) ready for re-assembly
For this installment of the Badger’s Den, I’d like to discuss WD-40.
But first, let me assure you: We are the same people delivering the same simple effective solutions as always. So if a web search brought you here looking for solutions for your muzzle loader, gun cabinet/safe storage & organizers, tool organization, etc. You are in the right place, and probably just a click or two away from finding it (try one of the links in the prior sentence), or try the menu in the side bar (if you are on a desktop computer… or scroll down if you are on your phone). Or just click here to go to Our Products.
But I hope you stick around and read my thoughts on WD-40.
What is WD-40? Now-a-days, that’s a tricky question. For many years, WD-40 was just the light oily stuff in a blue and yellow can that seemed to be on the shelf in every store. It got used on everything. And it got a bad reputation for drying out and leaving a cruddy crust that seemed to jam stuff up more than fix or lube it.
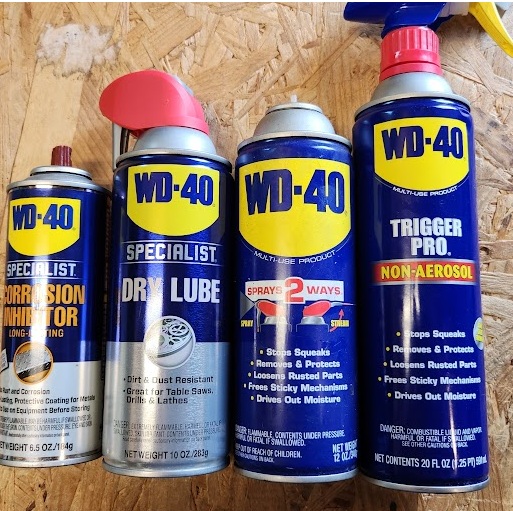
But now-a-days, WD-40 is still that same oily stuff in a can, and it’s a company, with an entire “WD-40 Specialist” product line. To keep it simple for this post, I’m going to address “Traditional WD-40” as just “WD-40.” The “WD-40 company” will be called “WD-40 company”. All the other “specialist” products the WD-40 Company sells, will be addressed by what I commonly call them: “WD-40 Dry lube” “WD-40 Corrosion Inhibitor” etc.
We don’t sell any WD-40 company products. But I use four of them, and you might too. Seeing they are available just about everywhere, effective when understood, and typically reasonably priced, it’s understandable that you’d have some on the shelf and use it. But the question is, are you using it correctly?
WD-40 actually does stack up ‘OK’ against many other products commonly used in automechanics: grime removal, rust penetrant, etc. It’s rarely the best, but it’s typically OK.
When it comes to guns, if you listen you will find lots of different opinions on WD-40’s usefulness. Many will have horror stories, and tend to be negative. You probably heard stuff like: “Absolutely never use WD-40 on a gun.” If you did a little research you’d find statements claiming WD-40 products are in use in most gunsmithing schools. Can both be true? Is there more to this?
I get to talk to a lot of folks on the phone as part of our business. Some folks hate all things WD-40. They usually have a story that goes along with it. I sometimes ask them what they mean when they say “WD-40” there’s so many cans with that logo on it now, that it can be confusing. I usually keep it simple with them and tell them I used WD-40 all the time, but:
Traditional WD-40 is never the only thing, nor last thing I use on any firearm component!
WD-40 products I use regularly
Let’s start our discussion with the Traditional WD-40. My understanding is that:
WD-40 was formulated as a “Water Displacement” product while trying multiple formulations, and as it was the 40th formulation that was tried, it was named WD-40.
The US Air Force was the largest of WD-40’s first purchasers. The USAF prescribed it as a metal treatment for it’s Titan Missiles. It was rubbed on the outer bare stainless steel skin to protect it from corrosion. On things like missiles, paint has weight and weight adds up. The missile can fly farther with a heavier payload the lighter it is, so they omitted paint and had the missileers rub them with WD-40.
The Air Force guys got used to using WD-40 elsewhere and also seemed to be in the habit of bringing it home and using it on more stuff there. They wanted to buy it commercially, so it hit the shelves. It got used on all sorts of mechanisms, and became the ubiquitous can of lube on most folks shelves. WD-40 became so universal, that the company that made and sold WD-40 changed it’s name to “WD-40.”
Please note: Traditional WD-40 wasn’t specifically designed as a lubricant, nor a penetrant. However it does seem to work pretty well in those regards… at least until the carrier evaporates and leaves a crusty crud that can jam up mechanisms.
So what does this mean for us gun owners? To me its pretty simple: I use WD-40 to clean crud off guns all the time. I find it especially useful in neglected black powder rifle bolts (something I work on regularly). If one of my guns takes a dip in the water, or hunts in the rain, I’ll hit it heavy with WD-40 too. But WD-40 is never the only thing, nor the last thing to touch one of my guns.
And again, I’m talking traditional WD-40 here. I see it as an effective, inexpensive way to remove moisture and heavy grime. Once that is gone, I remove the WD-40 with something else, and then lube and protect with a final more expensive product designed for the job: like gun oil (Rem-Oil, CLP, etc).
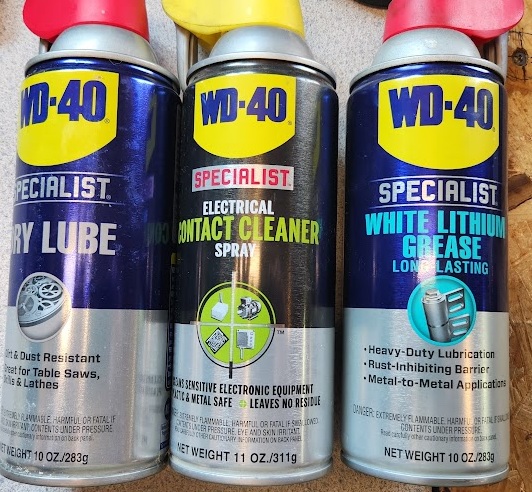
Three useful WD-40 specialist products
Don’t confuse WD-40 (traditional) with the Specialists. The “Specialists” are entirely different animals. Like WD-40 the “specialists” are reasonably priced, and readily available. They have specialized focuses. I use two of them daily, and pretty sure I have a third & fourth on the shelf too.
Mostly I use WD-40 Specialist Dry Lube. I use it often to remove the Traditional WD-40 I just doused something down with. The evaporative carrier in Dry Lube does a great job of carrying everything left behind away, and leaving it dry but lightly lubed with small PTFE balls. This dry lube feels slick, and leaves a surface that won’t attract dust, hold grime, and most of all doesn’t gel in the cold. I love to clean out shotgun magazine tubes with WD-40 Dry Lube and let it stay slick for feeding shells. Gun actions, trigger packs, and the interior of bolts get heavy doses of Dry Lube. The grime is allowed to float away. Then these mechanisms get drops of gun oil (Rem-oil/CLP) or small dabs of grease where needed.
Like it says on the Dry Lube can: this stuff works great on things like table saw blades, miter saw blades, and other stuff you want to keep dust free. I’ve seen a noticeable difference in how my saws cut after applying a little bit of it.
When I get metal that’s exposed or I need to store something and not worry about corrosion, I’ll hit it with WD-40 Specialist Corrosion Inhibitor. Frequently old antique guns that get stored more than shot, get cleaned, get whipped down with the WD-40 Specialist Corrosion Inhibitor, and then put away. The stuff is pretty greasy. So If I’m going to shoot a gun I coated with Specialist Corrosion Inhibitor, I remove it and lube it properly with standard gun products. But that gun stays lightly coated with the Corrosion Inhibitor most of the time its in storage.
Small metal parts that I stock and sell get hit with Corrosion Inhibitor too. If you buy something from us, like Small Ruger Screws, they will arrive with a light coating of this stuff. I don’t use the corrosion inhibitor everyday, and maybe there is something better out there, but I’m still working through my first can of the stuff I bought a while back.
The third type I have sitting around is Specialist Electric Contact cleaner. I’ve used it to blast gunk out of automotive electrical connectors & parts.
The fourth is the white lithium grease. It doesn’t seem special compared to any other white lithium grease I’ve used. While I have a bunch of dry lube cans, I only have one of the inhibitor, the contact cleaner, and one of the white grease.
So is WD-40 good or bad? Well what WD-40 are you talking about? What is the application? I’d say WD-40 company products, are pretty good values, when you understand them and use them correctly. Like anything: if you want success, you need to be smarter than what you are operating. Start by reading the instructions!
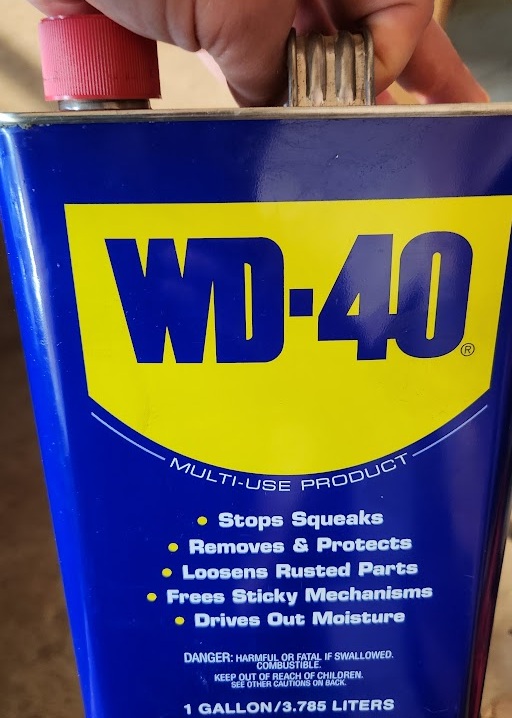
The gallon can I refill my “trigger pro” from
Are the Specialists the best at what they do? Maybe? The real question to ask is, “Are they effective enough and can you get your hands on them?” To me those are both “YES” answers, so I use them.
As a farewell, I’d like to point out that I rarely buy and use the aerosol version of Traditional WD-40. I get the “trigger pro” and refill it from gallon jugs. The trigger pro can seems designed to prevent refills, so it does take some creative use of pliers, exacto knives, and funnels. I cannot find a more simple effective affordable manner to clean all the grimy Remington 700 ML/MLS bolts sent to me. But those same bolts never leave with just Traditional WD-40 on them: its all Dry Lube, a drop of oil, and 3M molybdenum disulfide grease when they go.
Traditional WD-40 is never the only thing, nor last thing I use on any firearm component!
I’m embarrassed, but I’ll admit it: I’m disorganized and inefficient compared to what I expect of myself.
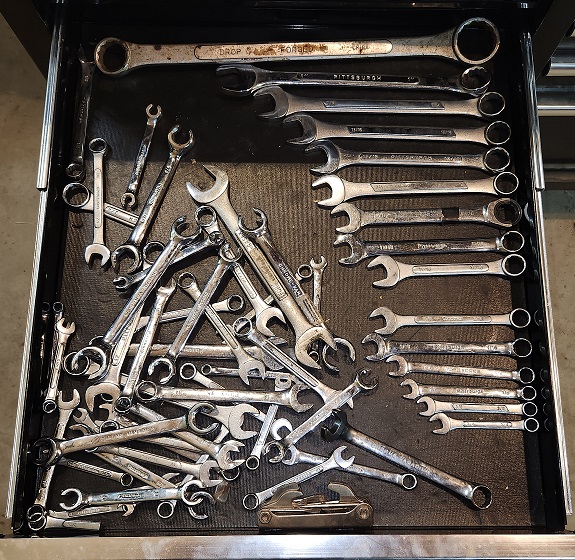
I like to work on all sorts of things, but I don’t invest the time and thought I should into organizing and cleaning up. I frequently finish a project, but fail to really ‘finish’ it by putting all the tools that got drug out back where they belong. Eventually when I need those same tools, I then cannot find them. Along the way I’ve bought a bunch of different sets of box end wrenches, and frequently grab more onesie-twosie at swap-n-shops. I occasionally have to cut weld or bend one to make a custom wrench for a specific job. So I have multiples of the same size in all sorts of lengths. When I need one of them, I typically have to stop and think about the last project I completed with that tool, and then begin searching the locale where that project was done. Or dig through the pile in the respective tool drawer.
I have resolved to do better. I know that the foundation of being organized is having a place for everything, then making sure to put everything back in its place. And to that end, I went around the shop and started gathering all the loose wrenches, screw drivers, pliers etc. When I pulled out the drawers of my tool chest and tossed them all in, I realized I had only just begun.
The ‘before’ pic of my wrench drawer after I tossed in the wrenches floating around the shop
That’s when inspiration hit me. I wanted to get started organizing, but of course, I had a whole bunch of other things that I had to get done before I could act on that inspiration. I turned those obligations into opportunities to continue working out in my mind what I was thinking of doing. Where I wanted to end up. Once I’d cleared my obligations out of the way, I rewarded myself with some time ‘CADing’ out what I had in my head for a tool drawer organizing widget:
This little widget interlocks with other widgets and has a magnet in it to hold tools in a tool chest drawer
At first I realized I had to keep it simple: just tackle all the box end wrenches that continually floated around. I knew that I didn’t want to make an investment into designing a “perfect” large organizer that I’d have to change and reprint once I bought new tools, or a different tool chest. I needed something flexible, that would adapt with changes in the work shop. So I decided a small flexible modular approach was best. I knew I wanted a magnet in the organizers to help hold the tools in their proper place. That’s what I “cadded.”
Then once I had the widget in my hand and I began to use it, I realized that I needed more than one size, that I wanted to follow the convention of metric-Blue, inch-red, and that these same widgets could organize many different types of tools. Along the way I think I got my box end & flare nut wrenches the way I want (at least for now):
This is the “after” picture for the “before” picture above: MUCH BETTER! Even have room to spare!
Now I just have to make myself put these wrenches back in their proper place when I’m done with the project that draws them out of the drawer. I also want to come up with a flexible labeling system, but really I’m not sure I’ll invest more time to that end: Just knowing where the 10mm and a few other sizes are by setting them off with different colors, seems to do enough that I’m not spending all the time I used to digging through the drawer looking for a specific size. I find what I need fast now.
So how does all this affect you? We’ll I’m glad to explain it to you! First I’m offering this tool organizing widget solution for sale here at Badger Ridge. You too can organize your tool chest drawers in an effective and flexible manner. First you need to appreciate that these widgets have magnets in them. They want to stay where you put them in your tool chest drawer. You’ll be best served if three or more are snapped together to get much greater stability than a single widget. Also with the magnets, metal tools want to stay in them, but aren’t so stuck that its work to get a tool of of them. Second the widgets snap together and apart if you need to re-arrange them, and again for stability, you probably want to plan on having 3 or more widgets snapped together.
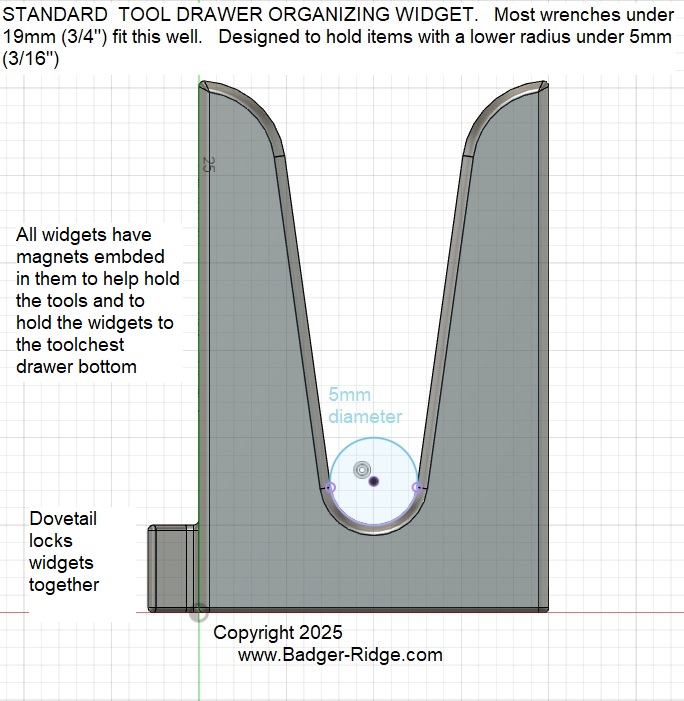
Also, before you buy you probably want to understand what sizes are available and what purpose they will probably serve. Let’s start with the standard widget:
Profile of standard tool drawer organizer widget
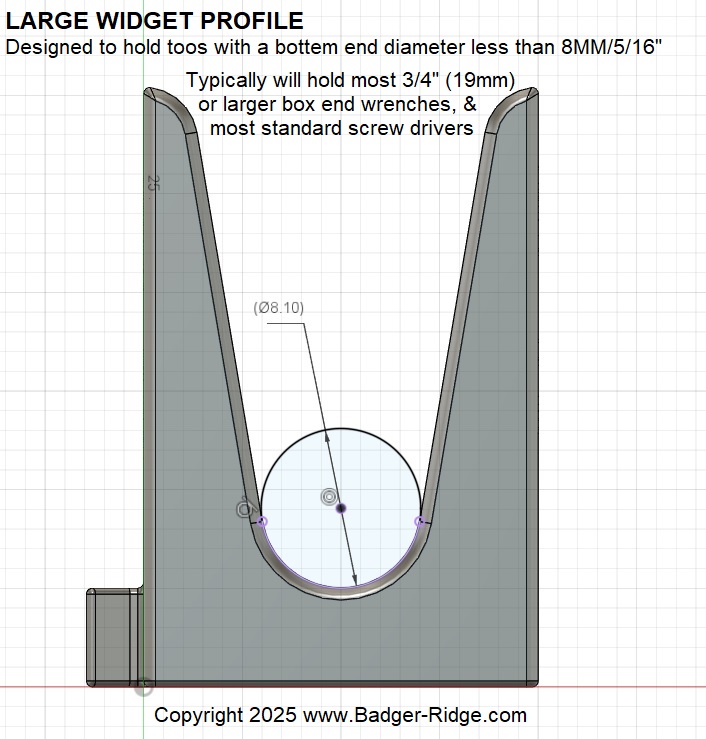
The standard widget holds wrenches smaller than 1″ (25mm), and does great with screw drivers with smaller shafts. However I’d plan on wrenches over 3/4″ (19mm) to fit better in a “large” widget:
Large Widget Profile
Also I’ve found that standard screw drivers sit better in the large widget.
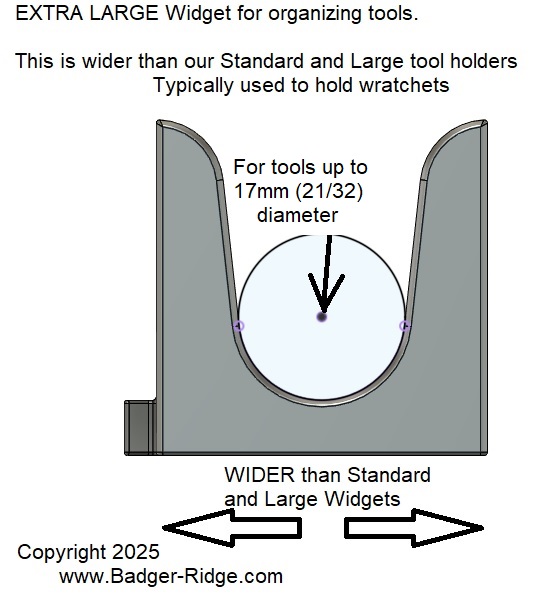
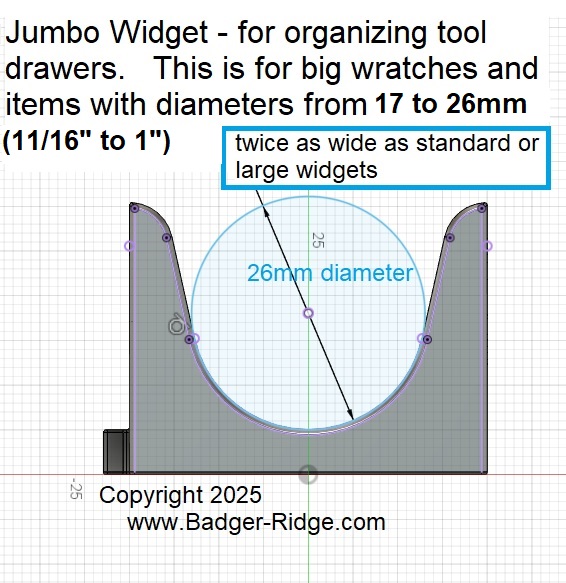
When I moved on to my drawer of ratchets I realized I needed a couple of different larger widgets. The standard and large widget have the same foot print, only their mouths had different profiles. But to hold the larger shafts of my 3/8″ and 1/2″ ratchets (bot standard and telescoping), I needed to make two larger widgets. I called them XL & Jumbo (see below)
Extra Large Widget Profile
Jumbo Widget Profile
The jumbo is double the width of the standard/large widgets, it holds my telescoping ratchets & 3/4″ drive ratchet. The XL widget is in between the Jumbo & the Standard/Large and holds my standard 3/8″ ratchets well.
So ignoring wrenches, if stuff to be held is under 5mm in diameter, use a standard widget. If its over 5mm but under 8mm, a large widget. Between 8 and 17mm, use and XL widget. Over 17mm, but un 26mm use a Jumbo.
In summary, let me break it down for you like this. If I was organizing a tool chest I’d count things in the following manner. First I’d go through and count all the wrenches. I’d break them down into two groups: how many below 19mm (3/4″) and above 19mm. I’d then break those into metric counts (for blue), and inch counts (for red). You might want to adjust these for using grey for 10mm etc… color choices are up to you.
For each wrench smaller than 19mm (3/4″) get a Standard Widget
For each wrench 19mm (3/4″) or larger get a Large Widget
Then segregate and count your remaining screw drivers, nut drivers, ratchets, extensions, etc, measuring at the diameter of the portion that would rest on the widget. Sort them by under 8mm, over 8mm, but under 15mm, and over 15mm.
For each screwdriver/nut driver with a shaft under 8mm driver get a Large Widget.
For each extension, and ratchet handle under 8mm (probably only 1/4 drive) get a Large Widget
For each screw driver, nut driver, etc., with a shaft 8mm (5/16) or larger get an XL Widget
For each extension, and each ratchet with a shaft over 8mm up to 17mm get an XL widget
For each extension & ratchet over 17mm (but under 26mm) diameter get an Jumbo widget
For each telescoping ratchet and 3/4″ ratchet (certainly will be over 17mm diameter) get a Jumbo
For each hammer handle (over 17mm diameter get a Jumbo
My favorite shotgun (if I don’t have to carry it while walking all day) is my Remington VersaMax. You may not know this: the VersaMax is a “sporterized”, improved, clone of the Benelli M4 that has been ‘upgraded to be able to shoot 3.5″ shells. I’ve shot mine a lot. So much that I ran into many of the issues that pop up from using them, even while caring for them. The first issue I had was light primer strikes/mis-fires. I went on a quest to figure out the issue and the fix.
The causes of light strikes might shock you. Everybody goes chasing down firing pin length/protrusion issues. While a broken our out of spec firing pin can cause the issue, if the pin isn’t obviously broken, its probably ok, and didn’t shrink. A bunch of folks were suggesting out of spec or damaged chambers, etc. That’s because if the bolt isn’t fully closed the firing pin cannot protrude completely. So I found that there were 3 basic areas to focus on simultaneously to ensure the bolt fully and properly closed. So I’d first look at the following inorder to fix the VersaMax light primer/failure to fire issues:
VersaMax Bolt with scar from burr in bolt carrier cam pin slot
First, The bolt carrier: the cam pin slot slot frequently had a burr leftover from manufacturing that was gouging and impinging on the bolt and the Cam Pin itself deformed. It didn’t seem like it was up to the task of lasting for a long time. Removing the bur from the slot and buffing out the gouge the bur cut in the bolt improved my troubles.
File knocking burr of edge of cam pin slot in VersaMax bolt carrier
My cam pin was deformed too. So I replaced the Cam pin with a better Benelli version, but those two improvements were not enough to fix my light primer strikes.
Deformed Remington Versa Max pin compared to new
Second: the hammer/spring/plunger. I moved on to the trigger pack to find the hammer spring plunger was chrome plated, but was flaking off and created hard, abrasive, crunchy grime that bound up the hammer. This robbed my hammer of energy needed to hit the primer hard enough to detonate it. I attempted to fix the hammer plunger’s chipping chrome, but even after polishing the edge of the chrome still attached caught and slowed the spring’s push. It began the process of flaking more off. On top of that, the hammer itself was deformed and mushroomed. So I replaced the Hammer, Hammer plunger, and spring with Benelli parts.
Remelli Kit, Benelli Cam Pin, Hammer, Spring, Plunger for Versa Max shotgun
Third: the manual doesn’t tell you to clean and lube the recoil spring. I removed the buttstock, removed the action spring from the tube in the butt, cleaned and lubed. This worked for a few hundred shots, but then I had to replace the recoil spring. It had worn. Mine had gone from about 13 inches long to just under 12 inches long.
I posted about my adventure and listed the parts I researched and then put up for sale. We’ve helped a bunch of folks get their VersaMax’s firing reliably again. Along the way I started getting calls from VersaMax shooters (and Stoeger M3000 shooters) about extractor and extractor spring issues. Others had lost their D/C clips while fixing their guns. So now we offer those too:
So if you need some advice, or parts please make a purchase or give us a call at 989 795 2526, send us and email, for fill out a contact form. We’d like to help you have a more reliable shot gun for a rewarding hunt.
In my last post in The Badger’s Den I detailed how my first encounters with a “Canadian 209” modification on my Remington 700 MLS and subsequent years left me disappointed. I knew the rifle could be more. Over the summer of 2012 I began a journey through forums of dedicated muzzle-loader enthusiasts to find that there was a better solution; I just didn’t know about it. The solution was a bit buried in forums full of customization, tinkering, some bad ideas, and dead ends. I hope to spare you all the details, cut to the chase, and share with you the product that has finally let me love my 700 MLS.
The kit I found and fell in love with was developed by a guy named Fred, who sold it on a few dedicated muzzle loader forums. It was called just a bolt nose kit. But what we offer is more than just a bolt nose, ours is the complete kit. So here at Badger Ridge we call it the “Hunter Remington 700 ML/MLS 209 Conversion Kit, by Badger Ridge”.
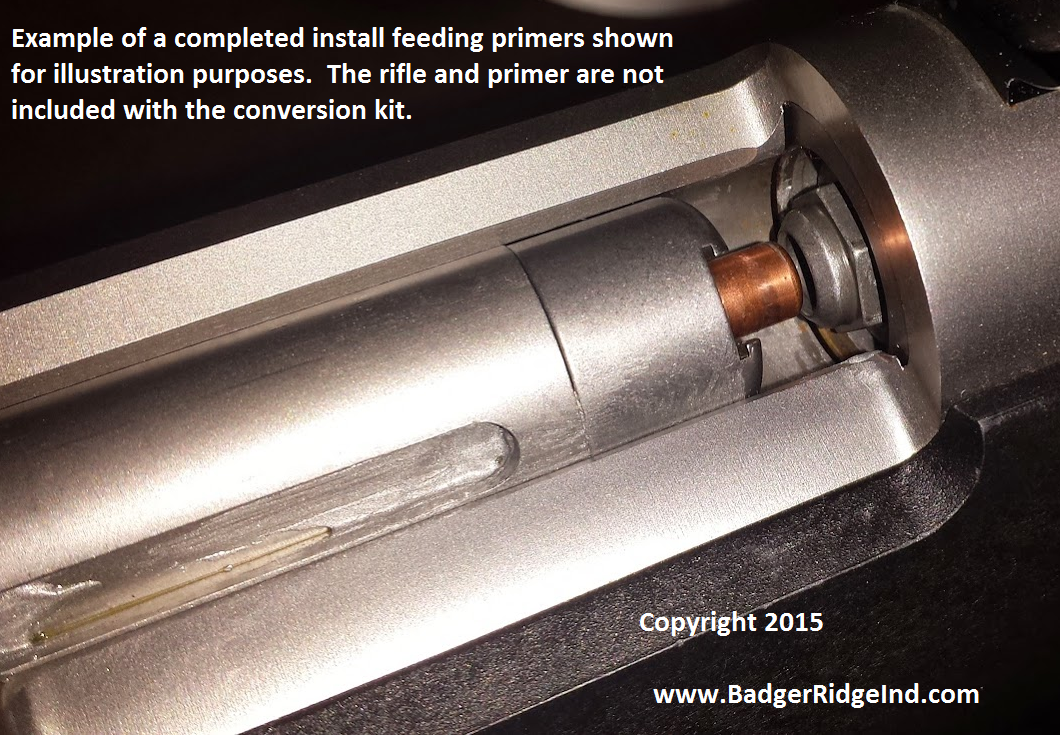
Close up of feeding a 209 primer into the kit’s breech plug
First let me truncate and summarize years of posts over many forums and years of development: Fred developed the kit to modify the OEM Remington 700 ML/MLS black powder muzzle-loader to work properly with 209 primers. At first he made the parts for himself and a few friends. Then the friends started sharing on the forums their success and general pleasure with the kits and from there it grew. Then people started tinkering with smokeless modifications to the 700ML/MLS. That required a barrel swap and and the original bolt nose was too short for the breech plugs that fit the smokeless barrels, so a second bolt nose was made just a bit longer and was called a “Smokeless” like the one you see below the OEM and the smoker, but… ah… well I promised to keep it simple… and now I’m rambling… so I’ll explain the “smoker” (standard black powder) modification kit we sell.
Like I said, I’m just going to focus on making your “Smoker” work. I suggest you keep it simple as well, and leverage the work and info I’m putting in this blog and my reference section… and end up with a great black powder rifle without breaking the bank.
FINALLY THE WAY THE 700 ML/MLS SHOULD BE!
A Remington 700 MLS with the Hunter-Badger Ridge 209 Conversion Kit
Longer nose developed for Smokeless barrels (.085 longer than the smoker)
The long-nose above is only for use when re-barreling. We don’t recommend re-barreling and thus you won’t read much about long-noses.
Those familiar with the successful Savage ML-II may recognize some of it’s innovative features applied to the Badger Ridge Kit. First should be the bolt nose.
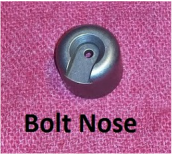
The original 700MLS bolt -needs- our bolt nose placed over the bolt body. Its a firm press fit that is also held in place by by friction (you can also add loctite if you wish). It won’t move on you (unless you put a torch and a wrench to it). The nose holds the primers firmly in place and ‘feeds’ them into the breach plug. It works a lot like a single shot rifle, except you slide the primer into and out of the bolt nose. No back pressure will be able to push the primer back and blow combustion gases all over the action because the bolt nose holds it firmly into the breech plug.
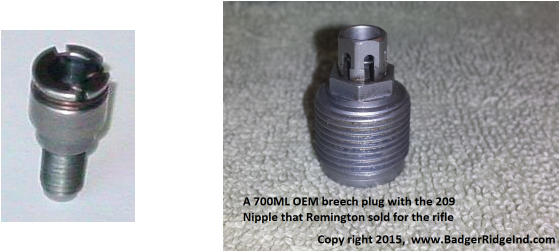
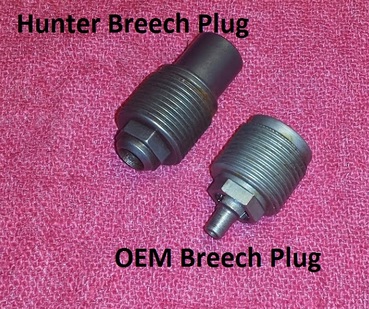
Badger Ridge/Hunter breech plug above OEM with #11 percussion nipple
Next is the breech plug. The original Remington breech plug was designed for percussion caps, not 209 primers. So with this kit the original breach plug is removed and discarded. The kit’s breach plug is used in its place. The kit’s breech plug is noticeably longer with a nose that protrudes in to the barrel. Thus a specific breech plug is required for each caliber; each kit is caliber specific. The longer length (and larger internal diameter) creates a much larger ‘flash chamber’ that allows the 209 primer to reach its maximum effectiveness with minimum blow back through the breech plug. And even so, the flash chamber is sealed by the primer so that it functions as a sealed breech system; the primer keeps any blow back inside the flash chamber.
Also your OEM breech plug wrench (or a 7/16 socket on an extension) can remove or install the kit’s breech plug. So no new or additional tools are required.
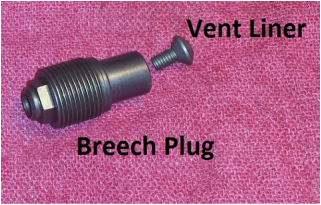
Breech plug with vent liner
A vent lineris threaded into the end that abuts the powder charge. A vent liner ‘focuses’ the fire made by the primer into the powder charge. As the vent liner receives a lot of heat and pressure, it erodes over the course of many firings, however it has an 7/64 Allen head that allows removal for cleaning, inspection, and periodic replacement. We provide a 17-4 Stainless vent liner with each kit. The is regarded by many as the best and is interchangeable with the Savage.
A Real Firing Pin!!!
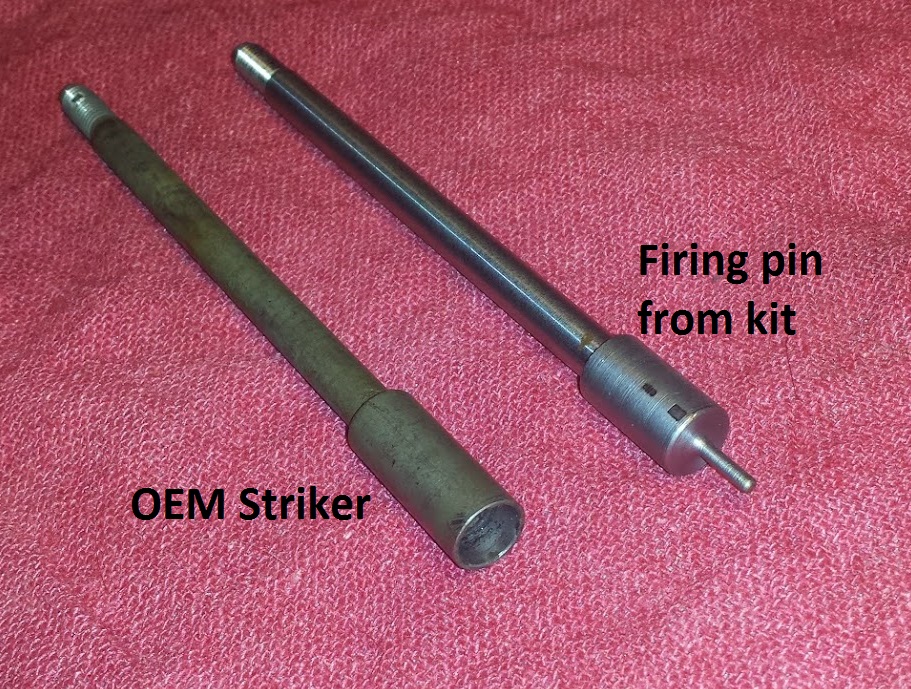
Finally we get to the firing pin. Yes it is a real firing pin. I couldn’t make myself call the OEM nor the Canadian 209 mod’s anything but a striker. The OEM striker is removed and replaced by the kit’s firing pin. The kit’s firing pin is purposely too long; it will need to be shortened to the proper protrusion and shaped to properly discharge a primer without piercing it. Every kit’s firing pin requires fine tuning to the individual bolt.
_`jhefggedoopp
DIY or pay us? You choose!
The bolt modifications may be something you do, something you have a gunsmith do, or you can just send us your bolt and for an appropriate fee we’ll do the bolt modification. If you choose us, all you’ll have to do is purchase the kit with installation, mail us your rifle’s bolt, we’ll do the modification (we always replace the main spring with a new one) and send it back with a new breech plug and vent liner (see this installation service page for the details). Once you get your bolt, all you’ll need to do is assemble the rifle per the Remington 700 ML owners manual (You may need to tune the breech plug with a letter C bit to feed your choice of primers).
For you bolt mod Do-It-Your-Selfers, you’ll need to drill a hole into the new firing pin during the installation (a bit is provided in the kit), and install the cross pin to hold the firing pin in the cocking piece/firing pin guide. In-case you lose the original bolt’s cross pin, a spare roll is included in the kit as well. You will also need a vice with jaws that open at least 6 inches, or a hydraulic press, and the ability to file the firing pin to tolerances held to 5/1000ths of an inch.
Our Remington 209 Conversion Kit alleviates blow back by solidly holding the primer into the breech plug. It improves the accuracy and the performance of the 209 primer by using an improved breech plug, it promotes longevity by using a common replaceable, inexpensive vent liner, and strikes the primer with a real firing pin. Now you can turn that rifle you couldn’t give away into a real performer.
So get that old 700ML out from the back of the closet and breathe new life into it with our 209 system! Or when you are walking through the local gun shop and see the lonely 700ML/MLS sitting in the corner with the discount sticker on it, go ahead and pick it up. You know how to turn that rough stone into a gem.
Soon in The Badger’s Den, I’ll get on my stump about the only powder I shoot in my 700MLS: BlackHorn209
Can you make it shine? YES! BUT FIRST YOU NEED TO UNDERSTAND THE PROBLEM AND YOUR OPTIONS
In 2002 I returned from a 3 year overseas tour. I started my new job as a flight instructor and I started back into my old ways of hunting, fishing, and tinkering with guns. My dad, ever so generous, gave me a muzzle-loader he picked up on the cheap. Remington made a muzzle-loader based off of their bolt action center-fire model 700. The blued steel version was called the 700ML. The stainless version, sometimes called the magnum, was the 700MLS. The benefits of converting a center-fire design to a muzzle-loader were obvious to me:
Center-fire rifles typically have faster lock times
It could use standard Remington 700 short action rings and mounts, and some other accessories
It had a good trigger (for a factory rifle)
It resembled the bolt action rifle I used the rest of the deer season
The safety was in the same spot.
The stock was pretty much the same
Though it was a single shot, the bolt worked the same as well.
Before I ever fired it, I read the owners manual, scoured the internet, read forums, and consumed every bit of information I could find. I poured over ChuckHawks article after ChuckHawks article. They were not very kind to the 700ML. I found most who had used the 700ML/MLS had high hopes going in but found it had less than desirable attributes as a muzzle-loader. Hence why my dad was able to pick one up at such a low price. The biggest problems I noted during my research:
1- #11 percussion caps are not as reliable and hot as 209 primers.
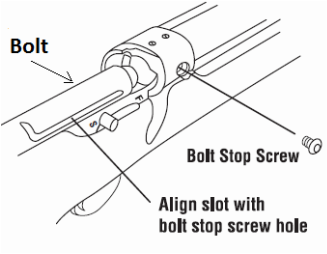
2- The bolt was held in by an Allen head screw with an un-threaded tip. It was easy to miss align, mangle the bolt and have a hard to work bolt.
3- Burning powder blows back through the percussion cap and into the bolt and action
(note 3 happens on side locks too, but the orientation of the lock and simplicity of the hammer make it less significant)
Black powder residue is corrosive. Blow back throughout the action caused the shooter to have to remove the bolt, disassemble and clean it after shooting the rifle. Failure to clean would certainly result in corroding the striker, spring, and inside of the bolt. Blow back got all over a scope, and some of the blow back could get into the trigger as well. To clean that, one had to remove the barreled action from the stock. This meant that one could possibly shift the zero after every cleaning. I had doubts as to how much, and made sure I used a torque wrench on each action screw. I then scribed a mark on each screw so that I could put them back with in the same tension after a field cleaning without a torque wrench. I didn’t know what more I could do. I wasn’t to concerned: I’d know if that was going to be a problem after a few range sessions.
The Savage design was taking over the market in the center-fire modified to muzzle-loader rifle. It had all the benefits and addressed some of the problems I had read about. But I had a free 700MLS in my hand and a desire to tinker. I knew I could and had to modify it.
I took the burs off of the tip of my Bolt Stop Screw with a file, and used a stone to work away the burs and abrasions on the bolt that I made when i misaligned and tightened up the screw. I lubed bolt and the slot the bolt stop screw rides in with anti-seize grease. No problems now, check off #2.
I also knew I had ‘better’ options than black powder. My dad had always used Pyrodex in his traditional side locks. I further researched and decided on Hodgdon Triple Seven. It was available in pellets and granular powder. It also was reported to be ‘less’ corrosive than black powder and Pyrodex, but still corrosive. I was suspicious of the claim of being “less corrosive” as a possible sales pitch. But when I realized Hodgdon made both Pyrodex and Triple Seven I wasn’t as worried; they had a solid reputation. I chose the granular powder because it was cheaper and allowed me to work up a load in smaller increments and see what my rifle would shoot best. For bullets, my research pointed me to MMP sabots and jacketed 45 caliber handgun bullets. I bought rings and put on a solid 4×32 scope.
The thing that really needed to go was the #11 percussion cap system. So off I went on my internet search to find a 209 modification for it. And at that time the pickings were slim on conversions (and still are). I found and purchased online what I’ll call a “Canadian” 209 kit. There really wasn’t any other 209 options. The kit came with a special tool to remove and replace the firing pin/striker with the included striker. It also had a new main spring, a 209 nipple to replace the #11 percussion cap nipple, and a fork to install the nipple and remove fired primers. Once I got the kit, I followed the instructions and I thought I had it whipped… but I really didn’t.
I went to the range and followed the Remington 700 ML/MLS Owners Manual as I worked up loads. I found that my rifle shot the best at 80 grains. Also there was still a bunch of blow back even at low charges, that worsened as I stepped up the load. As charges increased I started to find fragments of primers in the cavity around the primer holder. So, for many years I used 80 grains of Triple Seven, black MMP sabots, and .451cal 250gr Hornady XTP bullets. I deformed primers and had blow back, but the rifle was accurate at 80 grains. It was the best I could make of it; hotter loads weren’t an option.
I killed deer, cleaned the rifle, set the screws back to their scribe indexes and had no problems with point of impact shifts.
MY FIRST ATTEMPT (Canadian kit) WAS LESS THAN I HAD HOPED
Leaky Canadian 209 nipple (fail)
I was disappointed with the amount of blow back I was getting, and the labor it took to take the rifle apart and clean it. I was always a bit worried I missed something in the bolt and would have a failure to fire at a critical moment… say when the shoulder of a Boone and Crockett trophy was in the cross hairs. Also, after shooting a deer, gutting it, and hauling it out of the woods, I was beat. The last thing I wanted to do was tear down a rifle and clean it. But I did.
I had to understand what was happening with the ‘Canadian’ 209 modification if I was going to do better. The replacement firing pin ended with a large cylinder that had a nipple that fired the primer. The ‘Canadian’ kit used the original OEM breach plug, but had the replacement 209 nipple threaded into it. It was a bit tricky to get a primer in and the kit came with a fork to remove the spent primer that was also the wrench to snug up the nipple into the breech plug. Extra tools to carry in the field didn’t sit well with me, but I put them in my possibles bag.
Leaky Canadian 209 nipple (fail)
There was a small slot across the face for the fork to engage and a large cut out in the side for a spring to hold the primer in place. When cocked to fire, there was a gap between the striker face and the 209 primer. Nothing held the primer in place besides the spring on the nipple. Also the primer was exposed to the weather unless I used the OEM plastic cover. I had read that the weather shroud was not to be used with 209 primers somewhere, and had entered the land of operating outside the manual.
When the rifle fired, the striker sprung forward and struck the primer. With ignition came large pressures that blew the primer out and back against the face of the firing pin. With the firing pin being only held against the primer by spring pressure, the primer moves aft, unseats, and sprays blow back when discharged. Not to mention the nipple holding it was slotted so that pressure could blowout the three slots too. It was obvious why I was getting blow back, deformed and blown up primers. This explained why it worsened as I worked up powder charges.
So the Canadian 209 modification worked… but was messy, and the primer was exposed unless I took a perceived risk of adding the plastic weather shroud. The spring that held the primer in took a lot of abuse (and I’ve since learned they break and fail often). I also lost the plastic shroud on a hunting trip and had to purchase another. Plus the Remington 700 ML Owner’s manual says not to use the shroud with 209’s. I’ve seen plenty of reports of guys ignoring this warning and blowing up the shroud which then binds the bolt into the action. None of this set well with me.
I knew that my rifle returned to zero after I cleaned it. I killed deer, and never had a hang or a miss fire so long as I stayed on-top of the cleaning and maintenance, and didn’t hunt in the rain. I loved the trigger, and the feel. But I still wasn’t happy with the blow back and the required tedious maintenance.